
Introduction
You built a Next.js app. It renders fast server-side. It hydrates smoothly on the client. Your local environment works perfectly. Then you deploy to production. A user reports that the authentication flow breaks after server-side rendering. Another says data doesn't appear on initial page load. Your component tests caught nothing.
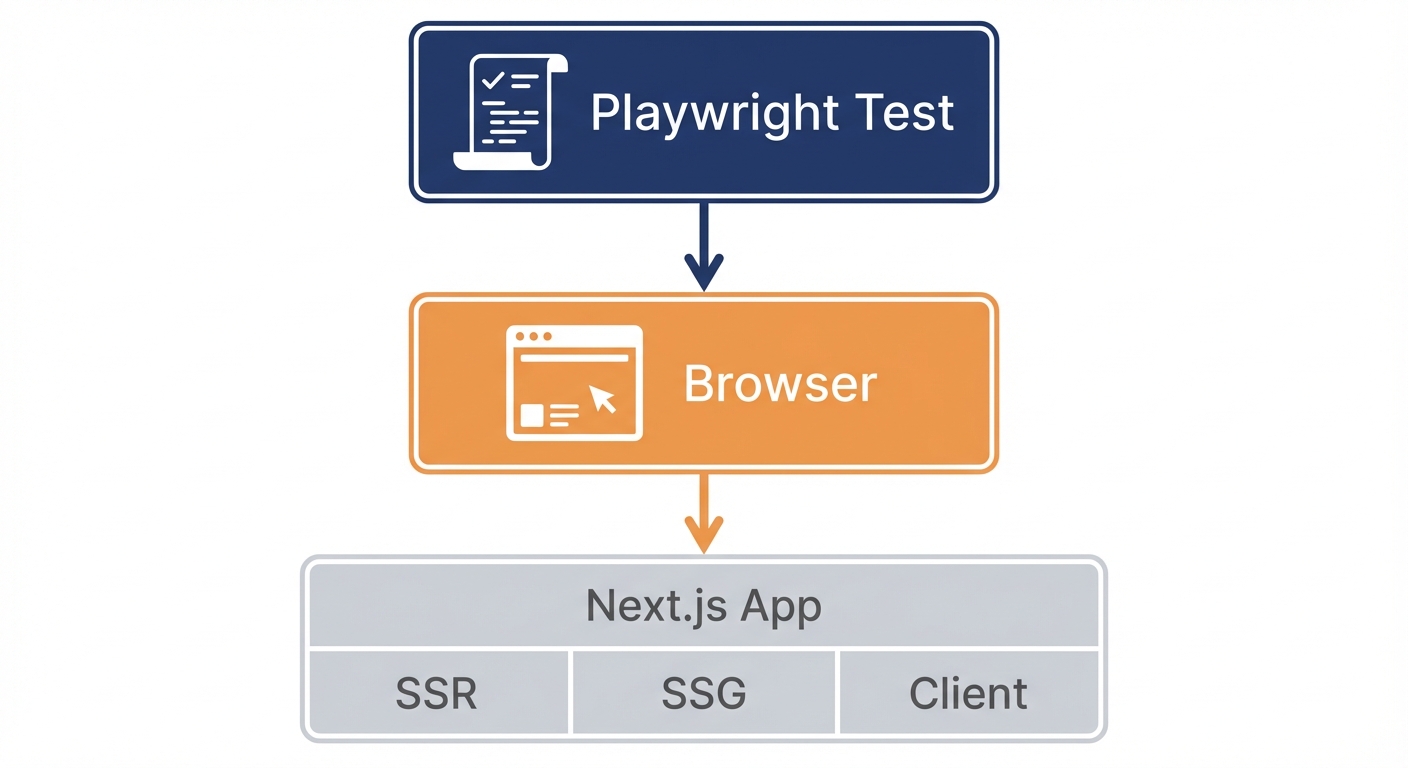
Unit tests can't simulate Next.js's unique architecture. Server Components render on the server. Client Components hydrate in the browser. API routes run in separate processes. These aren't just implementation details. They're where bugs hide.
Testing a Next.js app with Playwright changes how you catch these bugs. This complete Next.js Playwright tutorial shows you how to test applications the way Next.js actually runs them: server-side rendering, client-side hydration, API routes, and real browser interactions. You'll learn how to set up Playwright for Next.js, test both Server Components and Client Components, handle authentication flows, and solve the most common testing challenges specific to Next.js architecture.
Why Playwright for Next.js Testing?
Next.js isn't a typical React app. It runs in multiple environments simultaneously. Some components render on the server. Others render in the browser. API routes run in Node.js. Static pages generate at build time. Dynamic routes render on demand.
Your testing strategy needs to match this complexity. Jest and React Testing Library test components in isolation. Vitest tests server functions separately. Neither shows you what happens when server rendering hands off to client hydration, or when an API route receives a request from a Server Component.
Playwright tests the complete stack. It makes HTTP requests to your Next.js server, receives server-rendered HTML, waits for client-side JavaScript to hydrate, and verifies the result matches what users see. When Server Components fetch data, when API routes process requests, when Client Components add interactivity after hydration, Playwright sees it all.
The alternative is testing each layer separately and hoping they integrate correctly. Playwright tests integration by default. If your Next.js app works in Playwright, it works for users.
For teams who want E2E coverage without maintaining Playwright scripts, Autonoma reads your Next.js codebase and generates tests automatically — AI agents navigate your app on real browsers and adapt when your components change.
Understanding Next.js Architecture for Testing
Before writing tests, you need to understand what you're testing. Next.js 15 introduced significant changes to how applications are structured, and these changes affect your testing approach.
App Router vs. Pages Router
The App Router (introduced in Next.js 13, stable in 14-15) fundamentally changed Next.js architecture. Instead of the Pages Router's file-based routing with getServerSideProps, the App Router uses React Server Components by default.
Server Components are the default. They render on the server, never send JavaScript to the client, and can directly access databases or APIs. Client Components (marked with "use client") render on both server and client, handling interactivity and browser APIs.
This matters for testing. When you navigate to a route, you're testing server rendering first, then hydration. Your tests need to account for both phases.
Rendering Strategies: SSR, SSG, and ISR
Next.js renders pages three different ways, and each affects how you test:
Static Site Generation (SSG) renders pages at build time. The HTML exists before any request arrives. Tests run fast because there's no server-side work during the test. The challenge: testing dynamic data that won't exist until build time.
Server-Side Rendering (SSR) renders pages on each request. Every page load triggers server work. Tests are slower but reflect production behavior more accurately. You can test with real data, real API calls, real database queries.
Incremental Static Regeneration (ISR) combines both. Pages generate statically, then regenerate in the background after a timeout. Tests need to account for stale data scenarios and revalidation logic.
When testing, know which strategy your route uses. SSG pages load instantly but might show stale data. SSR pages load slower but always show fresh data. ISR pages might show either. Your assertions need to match the strategy.
Server Components vs. Client Components
The biggest architectural shift in modern Next.js is the default use of Server Components. Understanding the difference determines how you test.
Server Components run exclusively on the server. They never send JavaScript to the client. They can access databases, file systems, and server-only APIs directly. They're perfect for data fetching, layout structures, and anything that doesn't need interactivity. When testing, you verify the HTML output, not JavaScript behavior.
Client Components run on both server (for initial HTML) and client (for interactivity). They're marked with "use client" at the top of the file. They handle state, events, browser APIs, and third-party libraries that depend on window or document. When testing, you verify both the server-rendered HTML and the client-side behavior after hydration.
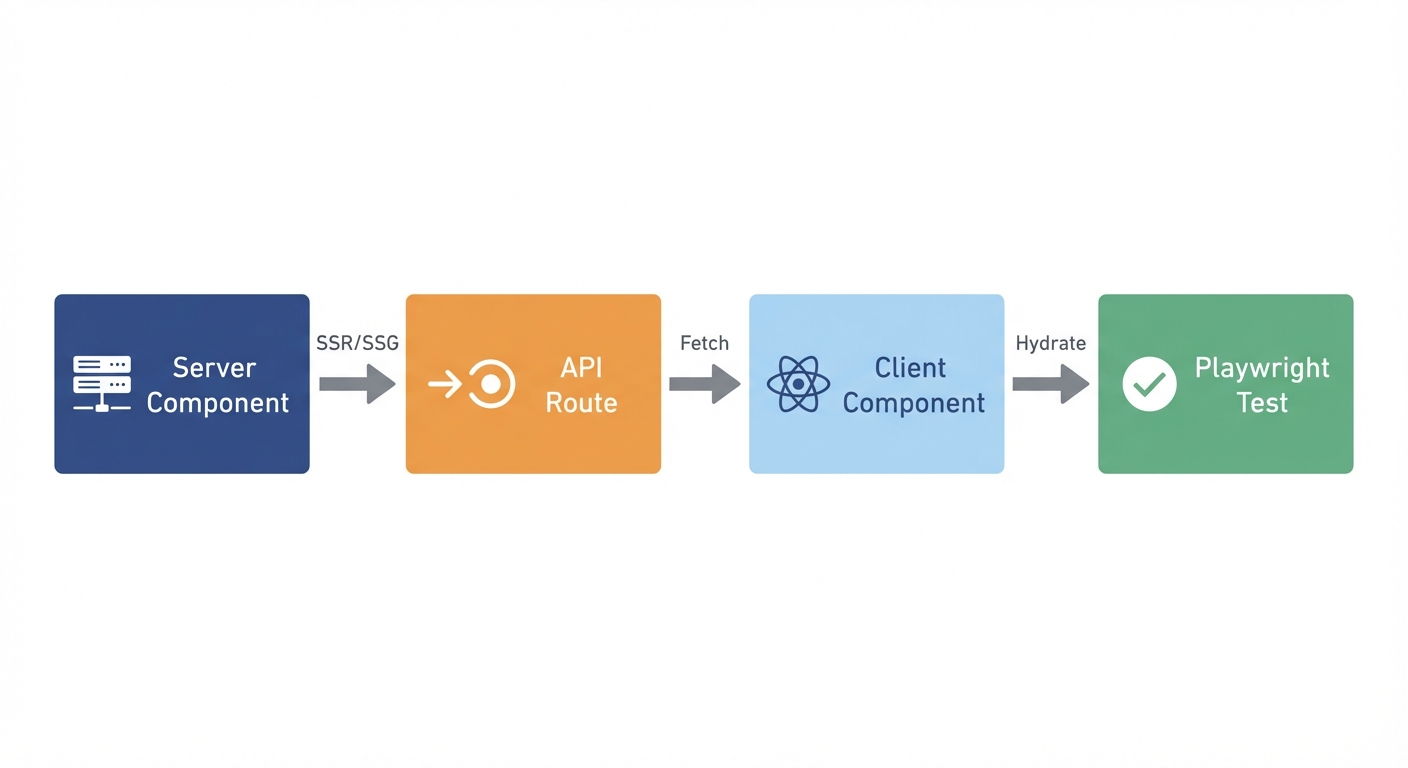
The pattern you'll test most often: a Server Component fetches data and passes it to a Client Component for display and interaction. Your test navigates to the page (triggering server rendering), waits for hydration (Client Component becomes interactive), then interacts (Client Component handles events).
Setting Up Playwright for Next.js
Installation and Configuration
First, install Playwright in your Next.js project:
npm init playwright@latestAccept the defaults when prompted (TypeScript, tests folder, GitHub Actions). This creates playwright.config.ts and example tests.
Now configure Playwright to work with Next.js development server. Open playwright.config.ts and update it for Next.js:
import { defineConfig, devices } from '@playwright/test';

export default defineConfig({
  testDir: './e2e',
  fullyParallel: true,
  forbidOnly: !!process.env.CI,
  retries: process.env.CI ? 2 : 0,
  workers: process.env.CI ? 1 : undefined,
  reporter: 'html',

  use: {
    baseURL: 'http://localhost:3000',
    trace: 'on-first-retry',
    screenshot: 'only-on-failure',
  },

  // Critical: Start Next.js dev server before tests
  webServer: {
    command: 'npm run dev',
    url: 'http://localhost:3000',
    reuseExistingServer: !process.env.CI,
    timeout: 120000,
  },

  projects: [
    {
      name: 'chromium',
      use: { ...devices['Desktop Chrome'] },
    },
    {
      name: 'firefox',
      use: { ...devices['Desktop Firefox'] },
    },
    {
      name: 'webkit',
      use: { ...devices['Desktop Safari'] },
    },
  ],
});
The webServer configuration is critical. It runs npm run dev before tests start, waits for http://localhost:3000 to respond, then runs your tests. The reuseExistingServer option reuses an already-running dev server during local development but starts a fresh server in CI environments.
For production testing, you'll want a separate config. Create playwright.config.production.ts:
import { defineConfig, devices } from '@playwright/test';

export default defineConfig({
  testDir: './e2e',
  fullyParallel: true,
  retries: 2,
  workers: 2,
  reporter: 'html',

  use: {
    baseURL: 'http://localhost:3000',
    trace: 'on-first-retry',
  },

  // Test production build
  webServer: {
    command: 'npm run build && npm start',
    url: 'http://localhost:3000',
    timeout: 180000,
    reuseExistingServer: false,
  },

  projects: [
    { name: 'chromium', use: { ...devices['Desktop Chrome'] } },
  ],
});
This config runs npm run build first, creating an optimized production bundle, then starts the production server. This catches issues that only appear in production builds: optimization bugs, missing environment variables, build-time errors.
Project Structure
Organize tests separately from your Next.js app structure. Create an e2e directory at your project root:
your-nextjs-app/
├── app/
│   ├── (auth)/
│   │   ├── login/
│   │   └── signup/
│   ├── api/
│   │   ├── users/
│   │   └── posts/
│   ├── dashboard/
│   └── page.tsx
├── e2e/
│   ├── auth/
│   │   ├── login.spec.ts
│   │   └── signup.spec.ts
│   ├── api/
│   │   └── users.spec.ts
│   ├── dashboard.spec.ts
│   └── homepage.spec.ts
├── playwright.config.ts
└── package.json
Mirror your app structure in the e2e directory. If you have app/dashboard, create e2e/dashboard.spec.ts. This makes tests easy to find and maintain.
Your First Next.js Test
Create e2e/homepage.spec.ts to test your root page:
import { test, expect } from '@playwright/test';

test('homepage loads with server-rendered content', async ({ page }) => {
  await page.goto('/');

  // Verify server-rendered content appears
  await expect(page).toHaveTitle(/My Next.js App/);
  await expect(page.getByRole('heading', { level: 1 })).toBeVisible();

  // Verify hydration completed (client-side JS loaded)
  await expect(page.locator('body')).toHaveAttribute('data-hydrated');
});
Run it:
npx playwright testPlaywright starts your Next.js dev server, waits for it to be ready, navigates to the homepage, and verifies both server-rendered HTML and client-side hydration.
Testing Server Components
Server Components are the foundation of modern Next.js. They render exclusively on the server, which changes how you test them.
Basic Server Component Testing
Server Components generate HTML on the server. When Playwright navigates to a page, it receives the fully-rendered HTML. You test the output, not the implementation:
// app/products/page.tsx - Server Component (default in App Router)
export default async function ProductsPage() {
  // This runs on the server, never in the browser
  const products = await fetch('https://api.example.com/products')
    .then(res => res.json());

  return (
    <div>
      <h1>Products</h1>
      <ul>
        {products.map(product => (
          <li key={product.id}>{product.name}</li>
        ))}
      </ul>
    </div>
  );
}
Test it by verifying what appears:
// e2e/products.spec.ts
import { test, expect } from '@playwright/test';

test('products page displays server-rendered product list', async ({ page }) => {
  await page.goto('/products');

  // Server Component already rendered, HTML is complete
  await expect(page.getByRole('heading', { name: 'Products' })).toBeVisible();

  // Products fetched server-side should be in the DOM
  await expect(page.getByRole('list')).toBeVisible();
  await expect(page.getByRole('listitem')).toHaveCount(10);

  // Verify specific product
  await expect(page.getByText('Premium Widget')).toBeVisible();
});
No loading states. No waiting for API calls. Server Components finish rendering before the HTML reaches the browser. The page is already complete when Playwright navigates to it.
Testing Server Components with Data Fetching
Server Components often fetch data directly. The fetch happens on the server during rendering:
// app/users/[id]/page.tsx - Server Component with dynamic route
interface Props {
  params: { id: string };
}

export default async function UserProfilePage({ params }: Props) {
  const user = await fetch(`https://api.example.com/users/${params.id}`)
    .then(res => res.json());

  return (
    <div>
      <h1>{user.name}</h1>
      <p>{user.email}</p>
      <p>Member since: {user.createdAt}</p>
    </div>
  );
}
Test by navigating and verifying the rendered data:
// e2e/users/profile.spec.ts
import { test, expect } from '@playwright/test';

test('user profile displays server-fetched data', async ({ page }) => {
  await page.goto('/users/123');

  // All data was fetched server-side before HTML was sent
  await expect(page.getByRole('heading', { name: 'Jane Smith' })).toBeVisible();
  await expect(page.getByText('[email protected]')).toBeVisible();
  await expect(page.getByText(/Member since:/)).toBeVisible();
});

test('user profile handles invalid ID gracefully', async ({ page }) => {
  await page.goto('/users/invalid-id');

  // Next.js error handling should show appropriate message
  await expect(page.getByText(/User not found/i)).toBeVisible();
});
When testing Server Components that fetch data, you're testing the integration of Next.js rendering, your data fetching logic, and error handling all at once.
Mocking Server Component Data
Testing against real APIs is slow and unpredictable. Mock the responses to control what Server Components receive:
// e2e/products.spec.ts
import { test, expect } from '@playwright/test';

test('products page with mocked API response', async ({ page }) => {
  // Intercept the server-side API call
  await page.route('**/api.example.com/products', async (route) => {
    await route.fulfill({
      status: 200,
      contentType: 'application/json',
      body: JSON.stringify([
        { id: 1, name: 'Test Product 1', price: 99.99 },
        { id: 2, name: 'Test Product 2', price: 149.99 },
      ]),
    });
  });

  await page.goto('/products');

  // Server Component received mock data
  await expect(page.getByText('Test Product 1')).toBeVisible();
  await expect(page.getByText('Test Product 2')).toBeVisible();
  await expect(page.getByText('$99.99')).toBeVisible();
});

test('products page handles API error', async ({ page }) => {
  // Mock API failure
  await page.route('**/api.example.com/products', async (route) => {
    await route.fulfill({
      status: 500,
      contentType: 'application/json',
      body: JSON.stringify({ error: 'Internal server error' }),
    });
  });

  await page.goto('/products');

  // Error boundary or fallback UI should display
  await expect(page.getByText(/Failed to load products/i)).toBeVisible();
});
The route interception works for server-side fetches because Playwright intercepts at the network layer. Whether Next.js makes the request on the server or in the browser, Playwright sees it and can mock the response.
Testing Client Components
Client Components add interactivity after server rendering completes. They're marked with "use client" and handle state, events, and browser APIs.
Testing Interactive Client Components
Client Components render twice: once on the server (initial HTML) and once in the browser (hydration + interactivity). Your tests verify both phases:
// app/components/Counter.tsx - Client Component
'use client';

import { useState } from 'react';

export default function Counter() {
  const [count, setCount] = useState(0);

  return (
    <div>
      <h2>Count: <span data-testid="count">{count}</span></h2>
      <button onClick={() => setCount(count + 1)}>Increment</button>
      <button onClick={() => setCount(count - 1)}>Decrement</button>
      <button onClick={() => setCount(0)}>Reset</button>
    </div>
  );
}
Test the full lifecycle:
// e2e/components/counter.spec.ts
import { test, expect } from '@playwright/test';

test('counter starts at zero and increments', async ({ page }) => {
  await page.goto('/counter');

  // Server-rendered initial state
  await expect(page.getByTestId('count')).toHaveText('0');

  // Client-side interactivity after hydration
  await page.getByRole('button', { name: 'Increment' }).click();
  await expect(page.getByTestId('count')).toHaveText('1');

  // Multiple interactions
  await page.getByRole('button', { name: 'Increment' }).click();
  await page.getByRole('button', { name: 'Increment' }).click();
  await expect(page.getByTestId('count')).toHaveText('3');

  // Decrement
  await page.getByRole('button', { name: 'Decrement' }).click();
  await expect(page.getByTestId('count')).toHaveText('2');

  // Reset
  await page.getByRole('button', { name: 'Reset' }).click();
  await expect(page.getByTestId('count')).toHaveText('0');
});
Playwright's auto-waiting handles hydration automatically. By the time the first click happens, the Client Component has already hydrated and event handlers are attached.
Testing Forms and Controlled Inputs
Forms in Next.js often combine Server Actions (for submission) with Client Components (for validation and UX). Test the entire flow:
// app/components/ContactForm.tsx - Client Component with validation
'use client';

import { useState } from 'react';

export default function ContactForm() {
  const [email, setEmail] = useState('');
  const [message, setMessage] = useState('');
  const [errors, setErrors] = useState<Record<string, string>>({});

  const validate = () => {
    const newErrors: Record<string, string> = {};
    if (!email) newErrors.email = 'Email is required';
    if (!/\S+@\S+\.\S+/.test(email)) newErrors.email = 'Invalid email';
    if (!message) newErrors.message = 'Message is required';
    if (message.length < 10) newErrors.message = 'Message too short';
    setErrors(newErrors);
    return Object.keys(newErrors).length === 0;
  };

  const handleSubmit = async (e: React.FormEvent) => {
    e.preventDefault();
    if (!validate()) return;

    // Submit to API route
    const res = await fetch('/api/contact', {
      method: 'POST',
      headers: { 'Content-Type': 'application/json' },
      body: JSON.stringify({ email, message }),
    });

    if (res.ok) {
      alert('Message sent!');
      setEmail('');
      setMessage('');
    }
  };

  return (
    <form onSubmit={handleSubmit}>
      <div>
        <label htmlFor="email">Email</label>
        <input
          id="email"
          type="email"
          value={email}
          onChange={(e) => setEmail(e.target.value)}
        />
        {errors.email && <p className="error">{errors.email}</p>}
      </div>

      <div>
        <label htmlFor="message">Message</label>
        <textarea
          id="message"
          value={message}
          onChange={(e) => setMessage(e.target.value)}
        />
        {errors.message && <p className="error">{errors.message}</p>}
      </div>

      <button type="submit">Send Message</button>
    </form>
  );
}
Test validation, submission, and error handling:
// e2e/components/contact-form.spec.ts
import { test, expect } from '@playwright/test';

test('contact form validates inputs', async ({ page }) => {
  await page.goto('/contact');

  // Submit empty form - validation errors appear
  await page.getByRole('button', { name: 'Send Message' }).click();

  await expect(page.locator('.error').filter({ hasText: 'Email is required' })).toBeVisible();
  await expect(page.locator('.error').filter({ hasText: 'Message is required' })).toBeVisible();

  // Fill invalid email
  await page.getByLabel('Email').fill('notanemail');
  await page.getByRole('button', { name: 'Send Message' }).click();

  await expect(page.locator('.error').filter({ hasText: 'Invalid email' })).toBeVisible();

  // Fill valid email
  await page.getByLabel('Email').fill('[email protected]');
  await page.getByRole('button', { name: 'Send Message' }).click();

  // Email error gone, message error remains
  await expect(page.locator('.error').filter({ hasText: 'Invalid email' })).not.toBeVisible();
  await expect(page.locator('.error').filter({ hasText: 'Message is required' })).toBeVisible();
});

test('contact form submits successfully', async ({ page }) => {
  // Mock API route
  await page.route('**/api/contact', async (route) => {
    await route.fulfill({
      status: 200,
      contentType: 'application/json',
      body: JSON.stringify({ success: true }),
    });
  });

  await page.goto('/contact');

  // Fill valid form
  await page.getByLabel('Email').fill('[email protected]');
  await page.getByLabel('Message').fill('This is a test message that is long enough.');

  // Listen for alert
  page.on('dialog', dialog => dialog.accept());

  // Submit
  await page.getByRole('button', { name: 'Send Message' }).click();

  // Form should clear after successful submission
  await expect(page.getByLabel('Email')).toHaveValue('');
  await expect(page.getByLabel('Message')).toHaveValue('');
});
Testing Client Components with useEffect
Client Components often use useEffect for data fetching after mount. Test what users see, not the hook implementation:
// app/components/UserList.tsx - Client Component with useEffect
'use client';

import { useState, useEffect } from 'react';

export default function UserList() {
  const [users, setUsers] = useState([]);
  const [loading, setLoading] = useState(true);
  const [error, setError] = useState(null);

  useEffect(() => {
    fetch('/api/users')
      .then(res => res.json())
      .then(data => {
        setUsers(data);
        setLoading(false);
      })
      .catch(err => {
        setError(err.message);
        setLoading(false);
      });
  }, []);

  if (loading) return <div>Loading users...</div>;
  if (error) return <div>Error: {error}</div>;

  return (
    <ul>
      {users.map(user => (
        <li key={user.id}>{user.name}</li>
      ))}
    </ul>
  );
}
Test the loading state, success state, and error state:
// e2e/components/user-list.spec.ts
import { test, expect } from '@playwright/test';

test('user list shows loading then displays data', async ({ page }) => {
  // Mock API response
  await page.route('**/api/users', async (route) => {
    // Add delay to make loading state visible
    await new Promise(resolve => setTimeout(resolve, 500));
    await route.fulfill({
      status: 200,
      contentType: 'application/json',
      body: JSON.stringify([
        { id: 1, name: 'Alice Johnson' },
        { id: 2, name: 'Bob Smith' },
      ]),
    });
  });

  await page.goto('/users');

  // Loading state appears first
  await expect(page.getByText('Loading users...')).toBeVisible();

  // Then data appears after fetch completes
  await expect(page.getByText('Alice Johnson')).toBeVisible();
  await expect(page.getByText('Bob Smith')).toBeVisible();

  // Loading state disappears
  await expect(page.getByText('Loading users...')).not.toBeVisible();
});

test('user list handles API error', async ({ page }) => {
  // Mock API failure
  await page.route('**/api/users', async (route) => {
    await route.fulfill({
      status: 500,
      contentType: 'application/json',
      body: JSON.stringify({ error: 'Database connection failed' }),
    });
  });

  await page.goto('/users');

  // Error state displays
  await expect(page.getByText(/Error:/)).toBeVisible();
});
Testing API Routes
Next.js API routes run on the server, handling HTTP requests independently of your UI. You can test them two ways: indirectly through UI interactions, or directly with HTTP requests.
Testing API Routes Through UI
The most realistic approach: test API routes by interacting with UI components that call them:
// app/api/users/route.ts - API route
import { NextRequest, NextResponse } from 'next/server';

export async function GET(request: NextRequest) {
  const users = await fetchUsersFromDatabase();
  return NextResponse.json(users);
}

export async function POST(request: NextRequest) {
  const body = await request.json();
  const newUser = await createUser(body);
  return NextResponse.json(newUser, { status: 201 });
}
Test by using the UI that calls this route:
// e2e/api/users.spec.ts
import { test, expect } from '@playwright/test';

test('users page calls GET /api/users and displays results', async ({ page }) => {
  await page.goto('/users');

  // UI component calls API route, displays results
  await expect(page.getByRole('list')).toBeVisible();
  await expect(page.getByRole('listitem')).not.toHaveCount(0);
});

test('create user form calls POST /api/users', async ({ page }) => {
  await page.goto('/users/new');

  // Fill form
  await page.getByLabel('Name').fill('New User');
  await page.getByLabel('Email').fill('[email protected]');

  // Submit triggers POST to /api/users
  await page.getByRole('button', { name: 'Create User' }).click();

  // Verify success message or redirect
  await expect(page.getByText('User created successfully')).toBeVisible();
});
This tests the full integration: form validation, API route logic, database operations, and UI updates.
Direct API Route Testing
For focused API testing without UI, use page.request to make HTTP requests directly:
// e2e/api/users-direct.spec.ts
import { test, expect } from '@playwright/test';

test('GET /api/users returns user list', async ({ request }) => {
  const response = await request.get('/api/users');

  expect(response.status()).toBe(200);

  const users = await response.json();
  expect(users).toBeInstanceOf(Array);
  expect(users.length).toBeGreaterThan(0);
  expect(users[0]).toHaveProperty('id');
  expect(users[0]).toHaveProperty('name');
  expect(users[0]).toHaveProperty('email');
});

test('POST /api/users creates new user', async ({ request }) => {
  const response = await request.post('/api/users', {
    data: {
      name: 'Test User',
      email: '[email protected]',
    },
  });

  expect(response.status()).toBe(201);

  const user = await response.json();
  expect(user).toHaveProperty('id');
  expect(user.name).toBe('Test User');
  expect(user.email).toBe('[email protected]');
});

test('POST /api/users validates input', async ({ request }) => {
  const response = await request.post('/api/users', {
    data: {
      name: '', // Invalid: empty name
      email: 'notanemail', // Invalid: bad email format
    },
  });

  expect(response.status()).toBe(400);

  const error = await response.json();
  expect(error).toHaveProperty('error');
  expect(error.error).toContain('validation');
});
Direct API testing is faster and more focused. UI testing through API routes is more realistic but slower. Use both: direct tests for API logic, UI tests for integration.
Testing Authenticated API Routes
Many API routes require authentication. Test with real auth flows:
// e2e/api/authenticated.spec.ts
import { test, expect } from '@playwright/test';

test('authenticated API route rejects unauthenticated requests', async ({ request }) => {
  const response = await request.get('/api/dashboard/stats');

  // Should return 401 Unauthorized
  expect(response.status()).toBe(401);
});

test('authenticated API route accepts authenticated requests', async ({ page }) => {
  // Login first to get session
  await page.goto('/login');
  await page.getByLabel('Email').fill('[email protected]');
  await page.getByLabel('Password').fill('password123');
  await page.getByRole('button', { name: 'Sign In' }).click();

  // Wait for redirect to dashboard (confirms auth succeeded)
  await expect(page).toHaveURL('/dashboard');

  // Now use page.request with the authenticated context
  const response = await page.request.get('/api/dashboard/stats');

  expect(response.status()).toBe(200);

  const stats = await response.json();
  expect(stats).toHaveProperty('totalUsers');
  expect(stats).toHaveProperty('revenue');
});
The page.request object shares cookies with the page context. After logging in through the UI, subsequent API requests include the session cookie.
Testing Authentication Flows
Authentication in Next.js spans multiple layers: UI forms, API routes, middleware, session management, and protected routes. Comprehensive testing covers the entire flow.
Testing Login and Signup
Test the complete authentication journey from form submission to protected route access:
// e2e/auth/login.spec.ts
import { test, expect } from '@playwright/test';

test('user can log in with valid credentials', async ({ page }) => {
  await page.goto('/login');

  // Fill login form
  await page.getByLabel('Email').fill('[email protected]');
  await page.getByLabel('Password').fill('correctPassword123');

  // Submit
  await page.getByRole('button', { name: 'Sign In' }).click();

  // Verify redirect to dashboard
  await expect(page).toHaveURL('/dashboard');

  // Verify user-specific content appears
  await expect(page.getByText('Welcome back, Test User')).toBeVisible();

  // Verify session persists across navigation
  await page.goto('/profile');
  await expect(page.getByText('Test User')).toBeVisible();
});

test('login fails with invalid credentials', async ({ page }) => {
  await page.goto('/login');

  await page.getByLabel('Email').fill('[email protected]');
  await page.getByLabel('Password').fill('wrongPassword');

  await page.getByRole('button', { name: 'Sign In' }).click();

  // Should stay on login page
  await expect(page).toHaveURL('/login');

  // Error message appears
  await expect(page.getByText(/Invalid email or password/i)).toBeVisible();
});

test('signup creates account and logs in', async ({ page }) => {
  await page.goto('/signup');

  // Fill signup form
  await page.getByLabel('Name').fill('New User');
  await page.getByLabel('Email').fill('[email protected]');
  await page.getByLabel('Password').fill('newPassword123');
  await page.getByLabel('Confirm Password').fill('newPassword123');

  // Submit
  await page.getByRole('button', { name: 'Create Account' }).click();

  // Should redirect to dashboard (auto-login after signup)
  await expect(page).toHaveURL('/dashboard');

  // Welcome message for new user
  await expect(page.getByText('Welcome, New User')).toBeVisible();
});
Testing Protected Routes
Next.js middleware or API routes often protect pages from unauthenticated access. Test both scenarios:
// e2e/auth/protected-routes.spec.ts
import { test, expect } from '@playwright/test';

test('unauthenticated user redirected from protected route', async ({ page }) => {
  await page.goto('/dashboard');

  // Should redirect to login
  await expect(page).toHaveURL('/login');

  // Optional: verify redirect message
  await expect(page.getByText(/Please log in to continue/i)).toBeVisible();
});

test('authenticated user can access protected route', async ({ page }) => {
  // Helper function to log in (you'd extract this to a fixture or helper)
  async function login() {
    await page.goto('/login');
    await page.getByLabel('Email').fill('[email protected]');
    await page.getByLabel('Password').fill('password123');
    await page.getByRole('button', { name: 'Sign In' }).click();
    await expect(page).toHaveURL('/dashboard');
  }

  await login();

  // Navigate to protected route
  await page.goto('/settings');

  // Should successfully load (not redirect)
  await expect(page).toHaveURL('/settings');
  await expect(page.getByRole('heading', { name: 'Settings' })).toBeVisible();
});

test('user loses access after logout', async ({ page }) => {
  // Login
  await page.goto('/login');
  await page.getByLabel('Email').fill('[email protected]');
  await page.getByLabel('Password').fill('password123');
  await page.getByRole('button', { name: 'Sign In' }).click();
  await expect(page).toHaveURL('/dashboard');

  // Access protected route
  await page.goto('/settings');
  await expect(page).toHaveURL('/settings');

  // Logout
  await page.getByRole('button', { name: 'Logout' }).click();

  // Verify redirect to login or homepage
  await expect(page).toHaveURL(/\/(login)?/);

  // Try to access protected route again
  await page.goto('/settings');

  // Should redirect to login
  await expect(page).toHaveURL('/login');
});
Reusable Authentication State
Logging in for every test is slow. Playwright supports reusable authentication state. Log in once, save the session, reuse it:
// e2e/auth.setup.ts - Authentication setup
import { test as setup, expect } from '@playwright/test';

const authFile = 'playwright/.auth/user.json';

setup('authenticate', async ({ page }) => {
  await page.goto('/login');

  await page.getByLabel('Email').fill('[email protected]');
  await page.getByLabel('Password').fill('password123');
  await page.getByRole('button', { name: 'Sign In' }).click();

  await expect(page).toHaveURL('/dashboard');

  // Save authentication state
  await page.context().storageState({ path: authFile });
});
Configure Playwright to run this setup before tests:
// playwright.config.ts
export default defineConfig({
  // ...other config

  projects: [
    { name: 'setup', testMatch: /.*\.setup\.ts/ },
    {
      name: 'chromium',
      use: {
        ...devices['Desktop Chrome'],
        storageState: 'playwright/.auth/user.json',
      },
      dependencies: ['setup'],
    },
  ],
});
Now all tests run with authenticated state. No need to log in repeatedly:
// e2e/dashboard.spec.ts - Automatically authenticated
import { test, expect } from '@playwright/test';

test('dashboard shows user stats', async ({ page }) => {
  // No login needed - already authenticated from setup
  await page.goto('/dashboard');

  await expect(page.getByText('Total Sales')).toBeVisible();
  await expect(page.getByText('Active Users')).toBeVisible();
});
Best Practices for Next.js E2E Testing
These patterns make your Next.js Playwright tests faster, more reliable, and easier to maintain.
Use Resilient Locators
Next.js renders components server-side and client-side. DOM structure can change between builds. Use semantic locators that survive refactoring:
Avoid:
// Breaks when you change CSS or structure
await page.locator('.btn-primary').click();
await page.locator('div.container > nav > a:nth-child(2)').click();
Prefer:
// Survives CSS and structure changes
await page.getByRole('button', { name: 'Submit' }).click();
await page.getByRole('link', { name: 'Dashboard' }).click();
Test Production Builds Periodically
Development mode and production mode behave differently. Next.js optimizes aggressively in production. Test both:
# Local development testing
npx playwright test

# Production build testing
npx playwright test --config=playwright.config.production.ts
Run production tests before deploying or in CI before merging to main. Catch optimization bugs, missing environment variables, and build-time errors.
Mock External APIs Consistently
Don't let external API flakiness break your tests. Mock all external calls:
// e2e/helpers/api-mocks.ts - Reusable mocks
import { Page } from '@playwright/test';

export async function mockUserAPI(page: Page) {
  await page.route('**/api.example.com/users', async (route) => {
    await route.fulfill({
      status: 200,
      contentType: 'application/json',
      body: JSON.stringify([
        { id: 1, name: 'Test User 1', email: '[email protected]' },
        { id: 2, name: 'Test User 2', email: '[email protected]' },
      ]),
    });
  });
}

export async function mockPaymentAPI(page: Page) {
  await page.route('**/api.stripe.com/**', async (route) => {
    await route.fulfill({
      status: 200,
      contentType: 'application/json',
      body: JSON.stringify({ success: true, transactionId: 'test_12345' }),
    });
  });
}
Use in tests:
import { test, expect } from '@playwright/test';
import { mockUserAPI } from './helpers/api-mocks';

test('users page with mocked API', async ({ page }) => {
  await mockUserAPI(page);
  await page.goto('/users');

  await expect(page.getByText('Test User 1')).toBeVisible();
});
Separate Dev and Production Configs
Development servers have hot reload, verbose logging, and slower builds. Production servers are optimized and fast. Use separate configs:
Development config uses npm run dev, reuses existing servers, and has longer timeouts for hot reload. Production config uses npm run build && npm start, never reuses servers, and has stricter timeouts.
This catches bugs that only appear in production: code splitting issues, environment variable problems, optimization errors.
Keep Tests Independent
Each test should run in isolation. Don't rely on state from previous tests:
// ❌ WRONG - Tests depend on each other
test('create user', async ({ page }) => {
  // Creates user
});

test('update user', async ({ page }) => {
  // Assumes user from previous test exists
});
// ✅ CORRECT - Each test sets up own state
test.beforeEach(async ({ page }) => {
// Create user before each test
await createTestUser();
});
test('update user', async ({ page }) => {
// User exists from beforeEach
await page.goto('/users/1/edit');
// ...
});The Path Forward
You now understand how to test Next.js applications with Playwright. You know how to set up Playwright for Next.js development, test Server Components that render on the server, test Client Components that add interactivity after hydration, verify API routes both directly and through UI, and implement authentication testing with reusable state.
The Next.js architecture is complex. Server rendering, client hydration, API routes, middleware, and deployment strategies create many opportunities for bugs. Playwright tests catch these bugs by running your application the way users experience it: as a complete, integrated system.
Start with one critical user flow. Login, checkout, data submission, whatever matters most. Write the test. Run it. Watch it verify not just that components work, but that your entire Next.js stack works together correctly.
That's the confidence Playwright brings to Next.js development.
Of course, we built Autonoma because even comprehensive Playwright testing has limitations. You write tests for the scenarios you anticipate. Autonoma's AI agents explore your application autonomously, finding edge cases you didn't think to test. They understand Next.js architecture: Server Components, Client Components, API routes, authentication flows. They generate tests, run them, and fix them when your UI changes. For teams shipping Next.js applications at scale, autonomous testing removes the maintenance burden while expanding coverage beyond manual test writing.
Next steps: Add Playwright to your Next.js project, write one test for your most critical flow, set up both development and production configs, create reusable authentication state for protected routes, integrate tests into your CI/CD pipeline.
Resources:
- Playwright Documentation
- Next.js Testing Documentation
- Test Automation Frameworks Guide
- Integration vs E2E Testing
The tools are ready. Your Next.js app is waiting. Start testing.
Frequently Asked Questions
Navigate to the page with page.goto() and verify the rendered HTML output. Server Components render on the server before HTML reaches the browser, so Playwright sees the complete, rendered result. Test what appears to users, not the server-side implementation. Use assertions like expect(page.getByText('data')).toBeVisible() to verify server-rendered content.
Server Components render only on the server and produce HTML. Test by verifying the HTML output. Client Components render on both server (initial HTML) and client (hydration + interactivity). Test both the server-rendered content and client-side behavior like click handlers and state updates. Playwright's auto-waiting handles the hydration automatically.
Install Playwright with npm init playwright@latest, then add a webServer configuration in playwright.config.ts. Set command to 'npm run dev', url to 'http://localhost:3000', and reuseExistingServer to !process.env.CI. This starts your dev server automatically before tests run, reuses existing servers locally, and starts fresh servers in CI.
Test API routes two ways: indirectly by interacting with UI components that call them (most realistic), or directly using page.request.get/post() to make HTTP requests (faster and more focused). For UI testing, navigate to pages that trigger API calls and verify displayed results. For direct testing, make requests and assert response status, headers, and body.
Test the complete flow: navigate to login page, fill credentials, submit, verify redirect to protected route, and confirm user-specific content appears. For faster tests, use Playwright's authentication setup to log in once and save the session state, then reuse that state across all tests. Configure this with storageState in playwright.config.ts.
Test both. Development builds have hot reload and verbose logging, making debugging easier. Production builds are optimized and match deployed behavior. Use separate configs: one running 'npm run dev' for fast iteration, another running 'npm run build && npm start' for pre-deployment verification. Production testing catches optimization bugs and build-time errors.
Use page.route() before navigation to intercept network requests. Server Components make fetch calls during server rendering, and Playwright intercepts these at the network layer. Set up the route with page.route('**/api.example.com/data', route => route.fulfill({...})) before calling page.goto(). This works for both server-side and client-side fetches.
Next.js optimizes builds differently across versions. Check for: changed hydration behavior (verify Client Components hydrate before interacting), new default caching strategies (clear cache or mock responses), updated routing patterns (verify URLs match new structure), or build output changes (update selectors if DOM structure changed). Always test production builds to catch optimization-related issues.
Middleware runs before routes render, handling redirects and rewrites. Test by navigating to routes that trigger middleware and verifying the result. For auth middleware, test that unauthenticated users redirect to login and authenticated users access protected routes. For redirects, verify the final URL with expect(page).toHaveURL(). Middleware behavior appears through its effects on routing and responses.
Yes, Playwright tests both. The testing approach is nearly identical. Both routers serve HTML and handle client-side navigation. The main difference: App Router uses Server Components by default (test server-rendered output), while Pages Router uses Client Components (test after hydration). Configure webServer the same way for both. Your test code focuses on user behavior, not router implementation.


