
Introduction to UI Automator for Android Testing
Your Android app works perfectly in testing. Users tap the login button, enter their credentials, navigate through the app. Everything flows smoothly.
Then production hits. Users on different devices report frozen screens. Scrolling doesn't work on tablets. Buttons that respond instantly on your Pixel 7 take seconds on a Samsung Galaxy running Android 11. You didn't test across device configurations. Manual testing on every device combination is impossible.
UI Automator solves this. It's Google's framework for testing Android apps across devices, system apps, and UI interactions that cross app boundaries. Write tests once, run them on any Android device, any screen size, any manufacturer's customization.
This guide covers complete UI Automator setup, writing tests in Java and Kotlin, handling complex scenarios like system dialogs and scrolling, and knowing when UI Automator is the right choice versus Espresso or Appium.
What is UI Automator and When Should You Use It?
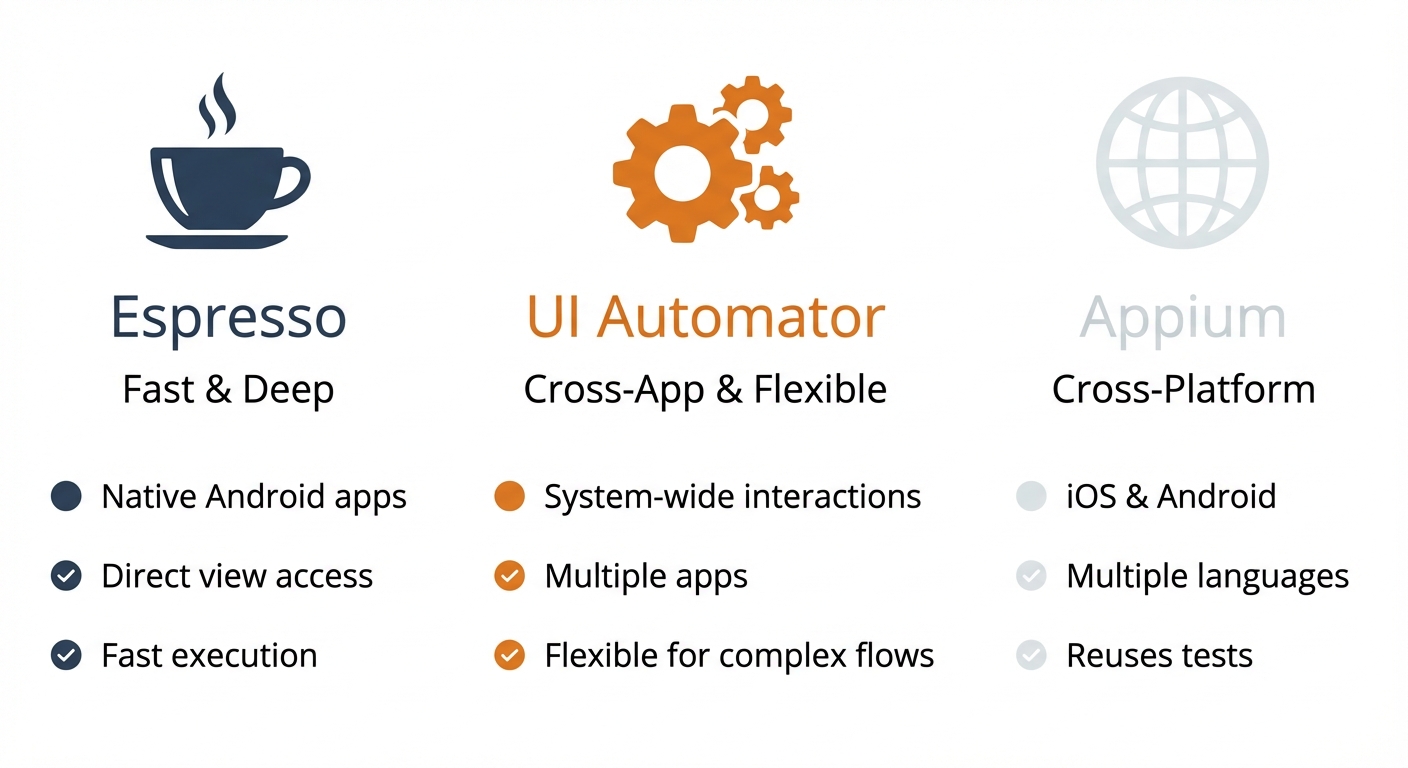
UI Automator is Google's framework for black-box UI testing on Android. Unlike Espresso (which tests within a single app), UI Automator can interact with any app on the device, including system apps and settings.
The framework works at the system level. Your tests can press the home button, pull down notifications, interact with permission dialogs, launch other apps, and verify behavior across the entire Android UI.
UI Automator uses the Android Accessibility framework to query and interact with UI elements. It doesn't require access to your app's source code. You test the compiled APK exactly as users experience it.
When to choose UI Automator:
UI Automator suits specific scenarios better than alternatives. It handles cross-app interactions that Espresso can't touch. Testing a sharing flow that opens another app? UI Automator. Verifying notification behavior? UI Automator. Testing on devices you can't physically access? UI Automator works with cloud device farms.
Espresso is faster for single-app testing but can't leave your app's process. UI Automator trades some speed for flexibility. It runs slower than Espresso because it works through the accessibility layer, not direct instrumentation.
Appium offers cross-platform capabilities (Android and iOS). UI Automator is Android-only but integrates natively with Android Studio, requires no server setup, and executes faster than Appium for Android-specific testing.
Choose UI Automator when you need device-level access, cross-app testing, or broad device compatibility. Choose Espresso when testing within a single app for maximum speed. Choose Appium when testing both Android and iOS with shared test code.
For Android teams where UI Automator's setup and maintenance complexity is a barrier, Autonoma offers AI-driven testing on real devices — agents navigate your app autonomously without requiring test scripts or resource IDs.
UI Automator vs Espresso vs Appium: Choosing the Right Framework
The three frameworks serve different purposes. Understanding the tradeoffs helps you choose correctly.
Espresso is fast but limited. It instruments your app directly, giving you fast, reliable tests. When a button click happens in Espresso, it fires immediately with no waiting for animations or idle states. Espresso knows when your app is busy and automatically waits.
This speed comes with restrictions. Espresso tests run inside your app's process. You can't interact with system dialogs, other apps, or anything outside your application boundary. Need to test permission requests? Espresso sees the dialog but can't tap "Allow" because that button belongs to the system.
UI Automator is flexible but slower. It works at the device level through Android's accessibility framework. Any visible UI element on any screen becomes accessible to your tests. Press the home button, pull down notifications, interact with another app, verify system settings. UI Automator handles all of it.
The tradeoff is performance. Accessibility-layer interaction adds latency. Element lookups take longer. Tests run noticeably slower than Espresso. For large test suites, this compounds.
Appium is cross-platform but complex. Write tests once, run on Android and iOS. Appealing for teams maintaining both platforms. Appium uses WebDriver protocol, so developers familiar with Selenium adapt quickly.
Complexity increases with Appium. You need an Appium server running separately from your tests. Configuration involves capabilities, drivers, and connection management. When tests fail, debugging involves your test code, Appium server, and the mobile driver layer. More components mean more failure points.
For our team building Android-first products, UI Automator proved ideal. We needed to test notification interactions and cross-app sharing flows. Espresso couldn't access system dialogs. Appium added server management overhead we didn't want. UI Automator gave us the device-level access we needed with native Android Studio integration.
For more detailed comparison of all major testing frameworks, see our guide on Test Automation Frameworks: Playwright, Selenium, Cypress, and Appium Compared.
Understanding UI Automator Architecture
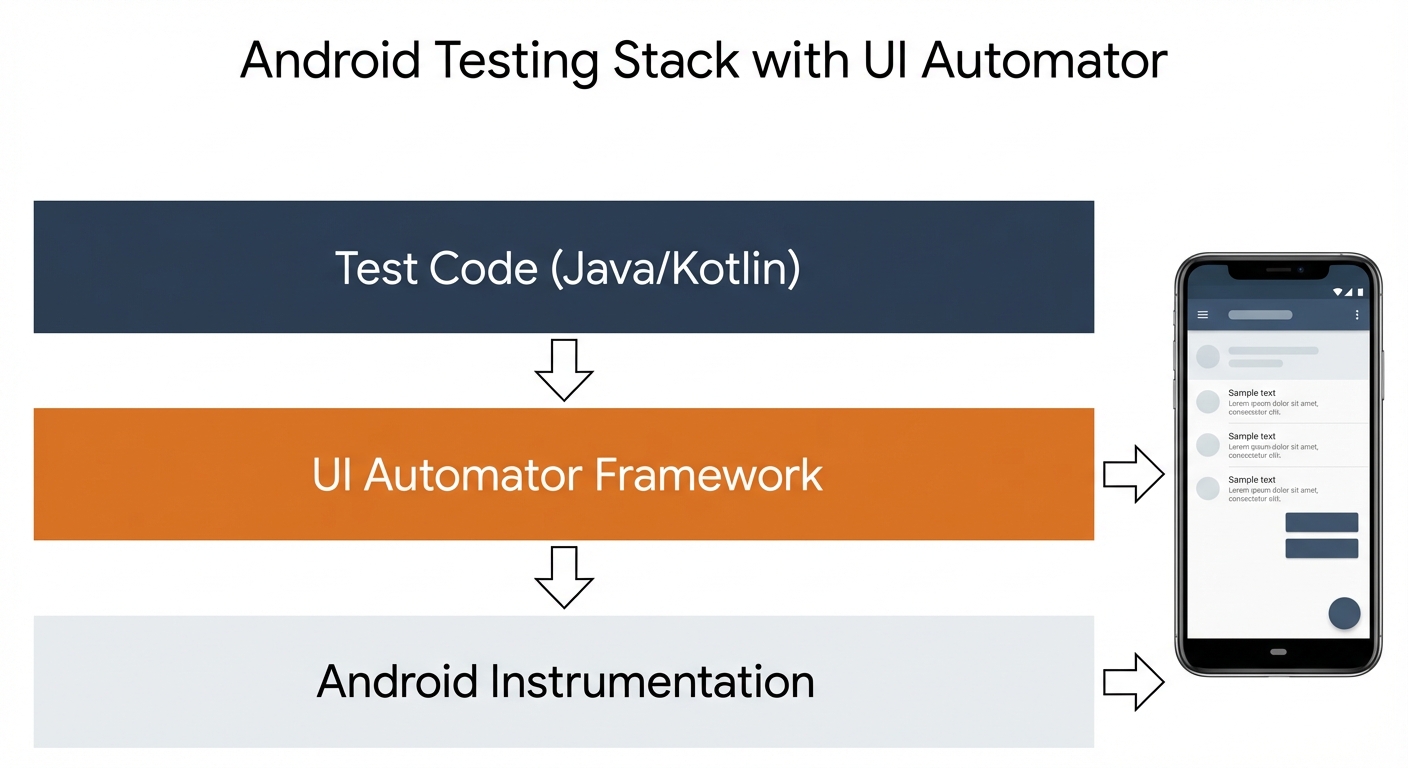
UI Automator sits between your test code and the Android system. Understanding this architecture helps when tests behave unexpectedly.
The testing stack has three layers:
Your test code lives at the top. You write Java or Kotlin classes that describe user interactions. Click this button, verify that text appears, scroll to this element.
UI Automator framework sits in the middle. It translates your high-level commands into Android accessibility actions. When your test says "find element with text 'Login'", UI Automator queries the accessibility tree, searches for matching nodes, and returns a reference.
Android Instrumentation runs at the bottom. This is the actual testing infrastructure provided by Android. It launches your app, provides access to the device, and executes your commands.
How element finding works:
When you query for a UI element, UI Automator doesn't directly access your app's view hierarchy. Instead, it requests the accessibility tree from Android. This tree represents all visible UI elements with their properties: text, content descriptions, resource IDs, clickable state, scrollable state.
UI Automator traverses this tree looking for elements matching your selector. Once found, it sends accessibility actions (click, longClick, setText) that Android routes to the appropriate UI component.
This indirection explains why UI Automator is slower than Espresso. Espresso directly instruments your app's views. UI Automator goes through the accessibility layer, adding latency at each step.
Why this matters for your tests:
Element properties you can query depend on what's exposed to accessibility services. If a developer didn't set contentDescription on a button, you can't find it by accessibility ID. If a custom view doesn't report itself as clickable to the accessibility framework, UI Automator might not interact with it correctly.
Understanding the accessibility layer helps debug test failures. When an element isn't found, check if it's properly exposed to accessibility services, not just whether it's visible on screen.
Setting Up UI Automator: Environment and Dependencies
Before writing tests, set up your development environment. UI Automator integrates with Android Studio, requiring minimal external dependencies.
Prerequisites:
You need Android Studio (version 2021.1.1 or higher recommended), Java JDK 8 or higher (JDK 11 recommended), and the Android SDK installed through Android Studio.
Verify your setup:
# Check Java version
java -version
# Should output: java version "11.0.x" or higher

# Check Android SDK location
echo $ANDROID_HOME
# Should output path like: /Users/username/Library/Android/sdk
Adding UI Automator dependencies:
UI Automator comes as an Android library. Add it to your app module's build.gradle file:
android {
    defaultConfig {
        testInstrumentationRunner "androidx.test.runner.AndroidJUnitRunner"
    }
}

dependencies {
    // UI Automator
    androidTestImplementation 'androidx.test.uiautomator:uiautomator:2.3.0'

    // Required test dependencies
    androidTestImplementation 'androidx.test:runner:1.5.2'
    androidTestImplementation 'androidx.test:rules:1.5.0'
    androidTestImplementation 'androidx.test.ext:junit:1.1.5'
}
The version numbers represent stable releases at the time of writing. Check Android's testing documentation for the latest versions.
Creating the test directory structure:
Android test files live in src/androidTest/java/ within your module. Create this structure if it doesn't exist:
mkdir -p app/src/androidTest/java/com/yourcompany/yourappTests placed here run as instrumented tests on actual devices or emulators, with full access to Android APIs and UI Automator.
Configuring the test runner:
The AndroidJUnitRunner specified in build.gradle handles test execution. This runner supports UI Automator, Espresso, and standard JUnit tests within the same test suite.
No additional configuration is needed for basic usage. Advanced scenarios like custom test runners or test orchestration require additional setup, but the standard runner works for most projects.
Writing Your First UI Automator Test
Let's write a simple test that launches the Settings app and verifies basic navigation. This demonstrates UI Automator's device-level access.
Create app/src/androidTest/java/com/yourcompany/yourapp/SettingsTest.java:
package com.yourcompany.yourapp;

import androidx.test.ext.junit.runners.AndroidJUnit4;
import androidx.test.platform.app.InstrumentationRegistry;
import androidx.test.uiautomator.By;
import androidx.test.uiautomator.UiDevice;
import androidx.test.uiautomator.UiObject2;
import androidx.test.uiautomator.Until;

import org.junit.Before;
import org.junit.Test;
import org.junit.runner.RunWith;

import static org.junit.Assert.assertNotNull;

@RunWith(AndroidJUnit4.class)
public class SettingsTest {

    private UiDevice device;

    @Before
    public void setUp() {
        // Initialize UiDevice instance
        device = UiDevice.getInstance(InstrumentationRegistry.getInstrumentation());
    }

    @Test
    public void testOpenSettings() {
        // Press home button to start from known state
        device.pressHome();

        // Launch Settings app using package name
        device.executeShellCommand("am start -n com.android.settings/.Settings");

        // Wait for Settings app to appear
        device.wait(Until.hasObject(By.pkg("com.android.settings")), 5000);

        // Find "Network & internet" option (text might vary by Android version)
        UiObject2 networkOption = device.findObject(By.text("Network & internet"));

        // Verify element was found
        assertNotNull("Network option should be visible", networkOption);

        // Click the option
        networkOption.click();

        // Wait for the next screen
        device.wait(Until.hasObject(By.text("Wi-Fi")), 3000);

        // Verify we navigated correctly
        UiObject2 wifiOption = device.findObject(By.text("Wi-Fi"));
        assertNotNull("Wi-Fi option should be visible", wifiOption);
    }
}
Running the test:
Connect an Android device or start an emulator. In Android Studio, right-click the test file and select "Run 'SettingsTest'". The test launches the Settings app, navigates to Network settings, and verifies the UI.
Understanding the code:
UiDevice is the central class in UI Automator. It represents the Android device and provides methods for device-level actions like pressing buttons, taking screenshots, and querying the UI hierarchy.
By selectors specify how to find elements. By.text("Network & internet") finds elements with that exact text. By.pkg("com.android.settings") finds elements belonging to that package.
wait(Until.hasObject()) waits for an element to appear. The timeout (5000 milliseconds) prevents tests from failing due to animation delays or slow device performance.
UiObject2 represents a found UI element. Once you have a reference, you can interact with it: click, longClick, setText, scroll.
This test demonstrates UI Automator's key advantage. Espresso can't launch system apps or interact with Settings. UI Automator does it naturally because it operates at the device level.
Finding UI Elements: Selectors and Strategies
Reliable element location is critical for test stability. UI Automator offers multiple selector strategies, each with tradeoffs.
Finding by text:
The simplest approach searches for visible text. Useful for buttons, labels, and menu items.
// Exact text match
UiObject2 loginButton = device.findObject(By.text("Login"));

// Text contains (partial match)
UiObject2 welcomeText = device.findObject(By.textContains("Welcome"));

// Text starts with
UiObject2 errorMsg = device.findObject(By.textStartsWith("Error:"));

// Case-insensitive text match
UiObject2 button = device.findObject(By.text("LOGIN").caseSensitive(false));
Text selectors break when text changes (localization, A/B tests, copy updates). They work for system apps where text is stable but are risky for your own app's UI.
Finding by resource ID:
More stable than text. Resource IDs are defined in code and don't change with translations.
// Find by resource ID (most reliable for your app)
UiObject2 emailField = device.findObject(By.res("com.yourapp:id/email_input"));

// Shorthand when package is unambiguous
UiObject2 passwordField = device.findObject(By.res("password_input"));
Resource IDs are the recommended approach for finding elements in your own app. They survive text changes and work across languages.
Finding by content description:
Content descriptions (accessibility labels) provide stable identifiers without exposing resource IDs.
// Find by content description
UiObject2 submitButton = device.findObject(By.desc("Submit button"));

// Content description contains
UiObject2 closeIcon = device.findObject(By.descContains("Close"));
Good practice for accessibility. Any element without visible text should have a content description for screen readers. This makes your app more accessible and tests more reliable.
Finding by class name:
Finds elements by their Android widget type.
// Find all EditText widgets
UiObject2 firstTextField = device.findObject(By.clazz("android.widget.EditText"));

// Find all ImageButtons
UiObject2 imageButton = device.findObject(By.clazz("android.widget.ImageButton"));
Less specific than other selectors. Use when you need to find "any text field" or combine with other selectors for specificity.
Combining selectors for precision:
Combine selectors to uniquely identify elements.
// Find EditText with specific resource ID
UiObject2 emailInput = device.findObject(
    By.clazz("android.widget.EditText").res("com.yourapp:id/email_input")
);

// Find clickable element with specific text
UiObject2 submitButton = device.findObject(
    By.text("Submit").clickable(true)
);

// Find element by text within specific package
UiObject2 notification = device.findObject(
    By.pkg("com.yourapp").text("New message received")
);
Finding multiple elements:
findObject() returns the first match. Use findObjects() to get all matching elements.
// Find all buttons on screen
List<UiObject2> allButtons = device.findObjects(By.clickable(true));

// Find all items in a list
List<UiObject2> listItems = device.findObjects(By.res("com.yourapp:id/list_item"));

// Iterate through results
for (UiObject2 item : listItems) {
    String itemText = item.getText();
    System.out.println("Found item: " + itemText);
}
Waiting for elements to appear:
Elements aren't always immediately visible. Animations, network requests, and lazy loading cause delays.
// Wait up to 10 seconds for element to appear
device.wait(Until.hasObject(By.text("Loading complete")), 10000);

// Wait for element to disappear (useful for loading spinners)
device.wait(Until.gone(By.res("com.yourapp:id/loading_spinner")), 5000);

// Wait and find in one step
UiObject2 element = device.wait(Until.findObject(By.text("Success")), 8000);
if (element != null) {
    element.click();
}
Without waits, tests fail intermittently. Loading takes 2 seconds on your development device, 5 seconds on a slower device. Hard-coded Thread.sleep() calls make tests slower than necessary. Use wait(Until...) for responsive tests that adapt to device performance.
Interacting with UI Elements: Clicks, Text Input, and Gestures
Once you find elements, you need to interact with them. UI Automator supports all common user actions.
Clicking elements:
// Simple click
UiObject2 loginButton = device.findObject(By.text("Login"));
loginButton.click();

// Long click (press and hold)
UiObject2 listItem = device.findObject(By.res("com.yourapp:id/list_item"));
listItem.longClick();

// Click at specific coordinates (avoid when possible)
device.click(500, 800);
Coordinate-based clicks are brittle. Screen sizes vary across devices. What's at (500, 800) on your Pixel might be off-screen on a smaller device. Use selector-based clicks whenever possible.
Entering text:
// Set text in a field (replaces existing text)
UiObject2 emailField = device.findObject(By.res("com.yourapp:id/email_input"));
emailField.setText("user@example.com");

// Clear existing text first
emailField.clear();
emailField.setText("newuser@example.com");

// Type text character by character (slower but simulates real typing)
emailField.click(); // Focus the field first
device.waitForIdle(); // Wait for keyboard
for (char c : "test@example.com".toCharArray()) {
    device.pressKeyCode(KeyEvent.keyCodeFromString("KEYCODE_" + c));
}
setText() is faster and more reliable than character-by-character typing. Use it unless you specifically need to test keyboard behavior.
Swiping and scrolling:
Swipe actions simulate finger drags across the screen.
// Swipe from bottom to top (scroll down)
device.swipe(
    device.getDisplayWidth() / 2,  // start x (center)
    device.getDisplayHeight() - 100, // start y (near bottom)
    device.getDisplayWidth() / 2,   // end x (center)
    100,                             // end y (near top)
    50                               // steps (controls speed)
);

// Swipe horizontally (useful for carousels, tabs)
device.swipe(
    device.getDisplayWidth() - 100, // start x (right edge)
    device.getDisplayHeight() / 2,  // start y (vertical center)
    100,                             // end x (left edge)
    device.getDisplayHeight() / 2,  // end y (same vertical position)
    25                               // steps
);
Scrolling to find elements:
Often you need to scroll until a specific element becomes visible.
// Find a scrollable element
UiObject2 scrollable = device.findObject(By.scrollable(true));

// Scroll until element appears (scrolls forward)
UiObject2 targetElement = scrollable.scrollUntil(
    Direction.DOWN,
    Until.findObject(By.text("Account Settings"))
);

// Scroll to beginning or end
scrollable.scroll(Direction.UP, 1.0f); // Scroll to top
scrollable.scroll(Direction.DOWN, 1.0f); // Scroll to bottom
This approach is more reliable than blind swiping. UI Automator scrolls until it finds the element or reaches the end of the scrollable area.
Checking element state before interaction:
Verify elements are in the expected state before interacting.
UiObject2 submitButton = device.findObject(By.res("com.yourapp:id/submit_button"));

// Check if element is enabled
if (submitButton.isEnabled()) {
    submitButton.click();
} else {
    System.out.println("Submit button is disabled");
}

// Check if element is clickable
if (submitButton.isClickable()) {
    submitButton.click();
}

// Check if element is selected (useful for toggles)
if (!submitButton.isSelected()) {
    submitButton.click(); // Toggle to selected state
}

// Check if element is visible
if (submitButton.isDisplayed()) {
    submitButton.click();
}
Getting element properties:
Extract information from elements for assertions.
UiObject2 balanceLabel = device.findObject(By.res("com.yourapp:id/balance"));

// Get visible text
String balanceText = balanceLabel.getText();
assertEquals("$1,234.56", balanceText);

// Get content description
String description = balanceLabel.getContentDescription();

// Get resource ID
String resourceId = balanceLabel.getResourceName();
assertEquals("com.yourapp:id/balance", resourceId);

// Get element bounds (position and size)
Rect bounds = balanceLabel.getVisibleBounds();
System.out.println("Element at: " + bounds.left + "," + bounds.top);
Testing Real Android App Flows with UI Automator
Let's test a realistic scenario: a fintech app's money transfer flow. This demonstrates handling multiple screens, input validation, and success verification.
Create TransferTest.java:
package com.yourcompany.yourapp;

import androidx.test.ext.junit.runners.AndroidJUnit4;
import androidx.test.platform.app.InstrumentationRegistry;
import androidx.test.uiautomator.By;
import androidx.test.uiautomator.UiDevice;
import androidx.test.uiautomator.UiObject2;
import androidx.test.uiautomator.Until;

import org.junit.Before;
import org.junit.Test;
import org.junit.runner.RunWith;

import static org.junit.Assert.*;

@RunWith(AndroidJUnit4.class)
public class TransferTest {

    private UiDevice device;
    private static final String APP_PACKAGE = "com.yourcompany.financeapp";
    private static final int TIMEOUT = 5000;

    @Before
    public void setUp() {
        device = UiDevice.getInstance(InstrumentationRegistry.getInstrumentation());

        // Start from home screen
        device.pressHome();

        // Launch the app
        launchApp();

        // Login first
        login("user@example.com", "SecurePass123!");
    }

    private void launchApp() {
        // Use package manager to launch app
        device.executeShellCommand(
            "am start -n " + APP_PACKAGE + "/.MainActivity"
        );

        // Wait for app to launch
        device.wait(Until.hasObject(By.pkg(APP_PACKAGE)), TIMEOUT);
    }

    private void login(String email, String password) {
        // Find and fill email field
        UiObject2 emailField = device.wait(
            Until.findObject(By.res(APP_PACKAGE + ":id/email_input")),
            TIMEOUT
        );
        assertNotNull("Email field should be visible", emailField);
        emailField.setText(email);

        // Find and fill password field
        UiObject2 passwordField = device.findObject(
            By.res(APP_PACKAGE + ":id/password_input")
        );
        passwordField.setText(password);

        // Click login button
        UiObject2 loginButton = device.findObject(
            By.res(APP_PACKAGE + ":id/login_button")
        );
        loginButton.click();

        // Wait for home screen to load
        device.wait(
            Until.hasObject(By.res(APP_PACKAGE + ":id/home_screen")),
            TIMEOUT
        );
    }

    @Test
    public void testSuccessfulTransfer() {
        // Get initial balance
        UiObject2 balanceElement = device.findObject(
            By.res(APP_PACKAGE + ":id/account_balance")
        );
        String initialBalanceText = balanceElement.getText();
        double initialBalance = parseBalance(initialBalanceText);

        // Navigate to transfer screen
        UiObject2 transferButton = device.findObject(
            By.res(APP_PACKAGE + ":id/transfer_button")
        );
        transferButton.click();

        // Wait for transfer screen
        device.wait(
            Until.hasObject(By.text("Transfer Money")),
            TIMEOUT
        );

        // Select recipient
        UiObject2 recipientDropdown = device.findObject(
            By.res(APP_PACKAGE + ":id/recipient_spinner")
        );
        recipientDropdown.click();

        // Wait for dropdown options
        device.waitForIdle();

        // Select "Savings Account"
        UiObject2 savingsOption = device.findObject(By.text("Savings Account"));
        savingsOption.click();

        // Enter transfer amount
        UiObject2 amountField = device.findObject(
            By.res(APP_PACKAGE + ":id/amount_input")
        );
        amountField.setText("100.00");

        // Enter memo
        UiObject2 memoField = device.findObject(
            By.res(APP_PACKAGE + ":id/memo_input")
        );
        memoField.setText("Test transfer");

        // Proceed to review
        UiObject2 reviewButton = device.findObject(
            By.res(APP_PACKAGE + ":id/review_button")
        );
        reviewButton.click();

        // Wait for review screen
        device.wait(Until.hasObject(By.text("Review Transfer")), TIMEOUT);

        // Verify transfer details
        UiObject2 reviewAmount = device.findObject(
            By.res(APP_PACKAGE + ":id/review_amount")
        );
        assertEquals("$100.00", reviewAmount.getText());

        UiObject2 reviewRecipient = device.findObject(
            By.res(APP_PACKAGE + ":id/review_recipient")
        );
        assertEquals("Savings Account", reviewRecipient.getText());

        // Confirm transfer
        UiObject2 confirmButton = device.findObject(
            By.res(APP_PACKAGE + ":id/confirm_button")
        );
        confirmButton.click();

        // Wait for success message
        UiObject2 successMessage = device.wait(
            Until.findObject(By.text("Transfer successful")),
            TIMEOUT
        );
        assertNotNull("Success message should appear", successMessage);

        // Navigate back to home
        UiObject2 doneButton = device.findObject(By.text("Done"));
        doneButton.click();

        // Wait for home screen
        device.wait(
            Until.hasObject(By.res(APP_PACKAGE + ":id/home_screen")),
            TIMEOUT
        );

        // Verify balance decreased
        UiObject2 newBalanceElement = device.findObject(
            By.res(APP_PACKAGE + ":id/account_balance")
        );
        String newBalanceText = newBalanceElement.getText();
        double newBalance = parseBalance(newBalanceText);

        assertEquals(
            "Balance should decrease by $100",
            initialBalance - 100.00,
            newBalance,
            0.01
        );
    }

    @Test
    public void testTransferWithInsufficientFunds() {
        // Navigate to transfer screen
        device.findObject(By.res(APP_PACKAGE + ":id/transfer_button")).click();
        device.wait(Until.hasObject(By.text("Transfer Money")), TIMEOUT);

        // Select recipient
        device.findObject(By.res(APP_PACKAGE + ":id/recipient_spinner")).click();
        device.waitForIdle();
        device.findObject(By.text("Savings Account")).click();

        // Try to transfer more than available balance
        UiObject2 amountField = device.findObject(
            By.res(APP_PACKAGE + ":id/amount_input")
        );
        amountField.setText("999999.00");

        // Attempt to proceed
        device.findObject(By.res(APP_PACKAGE + ":id/review_button")).click();

        // Verify error message appears
        UiObject2 errorMessage = device.wait(
            Until.findObject(By.textContains("Insufficient funds")),
            TIMEOUT
        );
        assertNotNull("Error message should appear", errorMessage);

        // Verify confirm button is disabled
        UiObject2 confirmButton = device.findObject(
            By.res(APP_PACKAGE + ":id/confirm_button")
        );
        assertFalse("Confirm button should be disabled", confirmButton.isEnabled());
    }

    private double parseBalance(String balanceText) {
        // Remove currency symbols and commas: "$1,234.56" -> 1234.56
        String cleaned = balanceText.replaceAll("[^0-9.]", "");
        return Double.parseDouble(cleaned);
    }
}
Key patterns demonstrated:
The setUp() method ensures every test starts from a known state. Launch the app, log in, navigate to the home screen. Tests become independent. One test's failure doesn't cascade into others.
Helper methods like login() and parseBalance() reduce duplication. Multiple tests need login. Extract it once, reuse everywhere. This is basic Page Object Model thinking applied at the method level.
Explicit waits after every navigation prevent race conditions. Click the transfer button, immediately wait for the transfer screen to appear. Don't assume it loads instantly. Device performance varies.
Assertions verify both success and failure paths. The successful transfer test confirms the balance decreases. The insufficient funds test confirms the error message appears and the confirm button stays disabled. Test what should happen and what shouldn't.
Handling System Dialogs and Permissions with UI Automator
System dialogs (permissions, notifications, confirmations) exist outside your app's process. Espresso can't touch them. UI Automator handles them naturally.
Granting runtime permissions:
Modern Android requires runtime permission requests for sensitive features like camera, location, contacts.
@Test
public void testCameraPermission() {
    // Trigger camera feature in your app
    UiObject2 scanButton = device.findObject(
        By.res(APP_PACKAGE + ":id/scan_check_button")
    );
    scanButton.click();

    // Wait for permission dialog (system dialog, not your app)
    device.wait(Until.hasObject(By.text("Allow")), TIMEOUT);

    // Grant permission
    UiObject2 allowButton = device.findObject(By.text("Allow"));
    assertNotNull("Permission dialog should appear", allowButton);
    allowButton.click();

    // Verify camera view opens
    UiObject2 cameraPreview = device.wait(
        Until.findObject(By.res(APP_PACKAGE + ":id/camera_preview")),
        TIMEOUT
    );
    assertNotNull("Camera should open after permission granted", cameraPreview);
}
Permission dialog text varies by Android version. Android 11+ shows "While using the app" and "Only this time" instead of just "Allow". Handle version differences:
private void grantPermission() {
    // Try different permission button texts
    UiObject2 allowButton = device.findObject(By.text("Allow"));

    if (allowButton == null) {
        allowButton = device.findObject(By.text("While using the app"));
    }

    if (allowButton == null) {
        allowButton = device.findObject(By.textContains("Allow"));
    }

    if (allowButton != null) {
        allowButton.click();
    } else {
        fail("Could not find permission button");
    }
}
Handling notification interactions:
Test notification appearance and tap actions.
@Test
public void testNotificationTap() {
    // Trigger notification (e.g., receive a message)
    triggerNotification();

    // Open notification shade
    device.openNotification();

    // Wait for notification shade to fully expand
    device.wait(Until.hasObject(By.pkg("com.android.systemui")), TIMEOUT);

    // Find your app's notification
    UiObject2 notification = device.findObject(
        By.pkg(APP_PACKAGE).text("New message received")
    );
    assertNotNull("Notification should be visible", notification);

    // Tap notification
    notification.click();

    // Verify app opens to correct screen
    device.wait(
        Until.hasObject(By.res(APP_PACKAGE + ":id/message_detail_screen")),
        TIMEOUT
    );

    UiObject2 messageScreen = device.findObject(
        By.res(APP_PACKAGE + ":id/message_detail_screen")
    );
    assertNotNull("App should open to message detail", messageScreen);
}
Interacting with system settings:
Sometimes tests need to change device settings (Wi-Fi, location, airplane mode).
@Test
public void testOfflineMode() {
    // Enable airplane mode via shell command
    device.executeShellCommand("cmd connectivity airplane-mode enable");

    // Wait a moment for mode to activate
    SystemClock.sleep(1000);

    // Trigger network request in app
    device.findObject(By.res(APP_PACKAGE + ":id/refresh_button")).click();

    // Verify offline error appears
    UiObject2 offlineMessage = device.wait(
        Until.findObject(By.textContains("No internet connection")),
        TIMEOUT
    );
    assertNotNull("Offline message should appear", offlineMessage);

    // Disable airplane mode to clean up
    device.executeShellCommand("cmd connectivity airplane-mode disable");
    SystemClock.sleep(1000);
}
Shell commands provide powerful control over device state. Use them to set up test preconditions (enable location, disable Wi-Fi) or verify behavior under specific conditions.
Dismissing system dialogs:
Sometimes dialogs appear unexpectedly during tests. Handle them generically:
private void dismissAnyDialog() {
    // Look for common dismiss buttons
    UiObject2 okButton = device.findObject(By.text("OK"));
    if (okButton != null) {
        okButton.click();
        return;
    }

    UiObject2 closeButton = device.findObject(By.text("Close"));
    if (closeButton != null) {
        closeButton.click();
        return;
    }

    // Press back button as fallback
    device.pressBack();
}
Kotlin Examples for UI Automator Tests
Kotlin offers cleaner syntax for UI Automator tests. Extension functions and null safety reduce boilerplate.
Here's the same transfer test rewritten in Kotlin:
package com.yourcompany.yourapp

import androidx.test.ext.junit.runners.AndroidJUnit4
import androidx.test.platform.app.InstrumentationRegistry
import androidx.test.uiautomator.By
import androidx.test.uiautomator.UiDevice
import androidx.test.uiautomator.UiObject2
import androidx.test.uiautomator.Until
import org.junit.Assert.*
import org.junit.Before
import org.junit.Test
import org.junit.runner.RunWith

@RunWith(AndroidJUnit4::class)
class TransferTestKotlin {

    private lateinit var device: UiDevice

    companion object {
        private const val APP_PACKAGE = "com.yourcompany.financeapp"
        private const val TIMEOUT = 5000L
    }

    @Before
    fun setUp() {
        device = UiDevice.getInstance(InstrumentationRegistry.getInstrumentation())
        device.pressHome()
        launchApp()
        login("user@example.com", "SecurePass123!")
    }

    private fun launchApp() {
        device.executeShellCommand("am start -n $APP_PACKAGE/.MainActivity")
        device.wait(Until.hasObject(By.pkg(APP_PACKAGE)), TIMEOUT)
    }

    private fun login(email: String, password: String) {
        device.waitForObject(By.res("$APP_PACKAGE:id/email_input"))?.setText(email)
        device.findObject(By.res("$APP_PACKAGE:id/password_input"))?.setText(password)
        device.findObject(By.res("$APP_PACKAGE:id/login_button"))?.click()
        device.wait(Until.hasObject(By.res("$APP_PACKAGE:id/home_screen")), TIMEOUT)
    }

    @Test
    fun testSuccessfulTransfer() {
        // Get initial balance
        val initialBalance = device.findObject(By.res("$APP_PACKAGE:id/account_balance"))
            ?.text
            ?.parseBalance() ?: 0.0

        // Navigate to transfer
        device.findObject(By.res("$APP_PACKAGE:id/transfer_button"))?.click()
        device.wait(Until.hasObject(By.text("Transfer Money")), TIMEOUT)

        // Fill transfer form
        device.findObject(By.res("$APP_PACKAGE:id/recipient_spinner"))?.click()
        device.waitForIdle()
        device.findObject(By.text("Savings Account"))?.click()

        device.findObject(By.res("$APP_PACKAGE:id/amount_input"))?.setText("100.00")
        device.findObject(By.res("$APP_PACKAGE:id/memo_input"))?.setText("Test transfer")

        // Review and confirm
        device.findObject(By.res("$APP_PACKAGE:id/review_button"))?.click()
        device.wait(Until.hasObject(By.text("Review Transfer")), TIMEOUT)

        // Verify details
        val reviewAmount = device.findObject(By.res("$APP_PACKAGE:id/review_amount"))?.text
        assertEquals("$100.00", reviewAmount)

        val reviewRecipient = device.findObject(By.res("$APP_PACKAGE:id/review_recipient"))?.text
        assertEquals("Savings Account", reviewRecipient)

        // Confirm
        device.findObject(By.res("$APP_PACKAGE:id/confirm_button"))?.click()

        // Verify success
        val successMessage = device.waitForObject(By.text("Transfer successful"))
        assertNotNull("Success message should appear", successMessage)

        // Return home and verify balance
        device.findObject(By.text("Done"))?.click()
        device.wait(Until.hasObject(By.res("$APP_PACKAGE:id/home_screen")), TIMEOUT)

        val newBalance = device.findObject(By.res("$APP_PACKAGE:id/account_balance"))
            ?.text
            ?.parseBalance() ?: 0.0

        assertEquals(initialBalance - 100.0, newBalance, 0.01)
    }

    @Test
    fun testInsufficientFunds() {
        device.findObject(By.res("$APP_PACKAGE:id/transfer_button"))?.click()
        device.wait(Until.hasObject(By.text("Transfer Money")), TIMEOUT)

        device.findObject(By.res("$APP_PACKAGE:id/recipient_spinner"))?.click()
        device.waitForIdle()
        device.findObject(By.text("Savings Account"))?.click()

        device.findObject(By.res("$APP_PACKAGE:id/amount_input"))?.setText("999999.00")
        device.findObject(By.res("$APP_PACKAGE:id/review_button"))?.click()

        val errorMessage = device.waitForObject(By.textContains("Insufficient funds"))
        assertNotNull("Error message should appear", errorMessage)

        val confirmButton = device.findObject(By.res("$APP_PACKAGE:id/confirm_button"))
        assertFalse("Confirm button should be disabled", confirmButton?.isEnabled ?: true)
    }

    // Extension functions for cleaner code
    private fun UiDevice.waitForObject(selector: androidx.test.uiautomator.BySelector): UiObject2? {
        return this.wait(Until.findObject(selector), TIMEOUT)
    }

    private fun String.parseBalance(): Double {
        return this.replace(Regex("[^0-9.]"), "").toDoubleOrNull() ?: 0.0
    }
}
Kotlin advantages:
Null safety catches errors at compile time. findObject() returns UiObject2? (nullable). The safe call operator ?. prevents null pointer exceptions. If an element isn't found, the operation simply doesn't execute.
Extension functions add custom behavior to existing classes. waitForObject() wraps the verbose wait(Until.findObject()) pattern. parseBalance() extends String with domain-specific parsing logic.
String templates reduce concatenation noise. "$APP_PACKAGE:id/email_input" instead of APP_PACKAGE + ":id/email_input".
Named parameters and default arguments make test code more readable and maintainable.
For teams already using Kotlin for Android development, Kotlin tests feel natural. For Java teams, the conversion is straightforward, and the syntax differences are minimal.
Best Practices for Reliable UI Automator Tests
Writing tests is easy. Writing reliable, maintainable tests requires discipline.
Use resource IDs instead of text whenever possible. Text changes frequently (A/B tests, translations, copy updates). Resource IDs are stable. When your designer changes "Sign In" to "Log In", text-based selectors break. Resource ID selectors keep working.
Always add explicit waits, never use Thread.sleep(). Sleep statements make tests slow and unreliable. A 5-second sleep waits 5 seconds even if the element appears in 200ms. Explicit waits (wait(Until.hasObject())) return immediately when the condition is met, making tests as fast as possible while handling slow devices gracefully.
Disable animations on test devices. Animations cause timing issues. UI Automator might try to click a button that's mid-animation and miss. Disable all animations via ADB:
adb shell settings put global window_animation_scale 0
adb shell settings put global transition_animation_scale 0
adb shell settings put global animator_duration_scale 0
For more strategies on preventing flaky tests, read our comprehensive guide: How to Reduce Test Flakiness: Best Practices and Solutions.
Reset app state between tests. Tests should be independent. Use @Before to reset the app to a known state. Uninstall and reinstall, clear data, or log out and log back in. One test's data shouldn't affect another test's outcome.
Keep tests focused and atomic. Each test should verify one specific behavior. Don't create a single test that logs in, makes a transfer, checks notifications, and updates profile settings. Split into separate tests. When one fails, you immediately know which feature broke.
Use Page Object Model for organization. As test suites grow, duplicated selectors and actions create maintenance nightmares. Page objects encapsulate screen-specific logic in reusable classes. For a complete guide to implementing POM, check out our article on Page Object Model: Building Maintainable Test Automation.
Log actions and take screenshots on failure. When tests fail in CI, you need context. What screen was visible? What state was the app in?
@Rule
public TestRule watcher = new TestWatcher() {
    @Override
    protected void failed(Throwable e, Description description) {
        // Take screenshot on failure
        File screenshot = new File("/sdcard/" + description.getMethodName() + ".png");
        device.takeScreenshot(screenshot);

        // Log app state
        String currentPackage = device.getCurrentPackageName();
        System.out.println("Test failed on package: " + currentPackage);
    }
};
Test on real devices, not just emulators. Emulators are convenient but don't catch device-specific bugs. Samsung, Xiaomi, and other manufacturers customize Android. Their changes can break your app. Test on at least a few popular real devices to catch these issues.
Maintain a device compatibility matrix. Document which Android versions and screen sizes you test. Update it as you add or retire test devices. Know your coverage gaps.
When UI Automator Isn't Enough: Autonomous Testing
UI Automator gives you programmatic control over Android devices. You write code specifying every interaction: find this element, click it, verify that text appears.
This works. It also requires constant maintenance. Every UI change demands test updates. A designer moves a button. Your selector breaks. A product manager adds a new onboarding screen. Your login flow breaks. Tests become brittle.
We built Autonoma to solve this. Instead of writing selectors and actions, you describe what you want to test. "Verify a user can transfer $100 to their savings account." Autonoma's AI figures out how to navigate your app, finds elements automatically, and adapts when your UI changes.
Self-healing tests survive refactors. When a button's resource ID changes, traditional UI Automator tests fail. Autonoma tests keep running because they understand intent, not just selectors.
For teams spending more time fixing tests than writing features, Autonoma offers a different approach. You maintain the test logic (what to test), Autonoma maintains the test implementation (how to test it).
Learn more about autonomous testing at autonoma.app.
Frequently Asked Questions About UI Automator Testing
UI Automator is Google's framework for testing Android apps at the system level. It's used for black-box UI testing that can interact with any app on the device, including system apps, settings, and cross-app flows. Unlike Espresso (which tests within a single app), UI Automator can press home buttons, handle permission dialogs, interact with notifications, and test scenarios that involve multiple apps.
Espresso tests within your app's process and is faster but limited to single-app interactions. UI Automator works at the device level through Android's accessibility framework and can interact with any UI element on any screen, including system dialogs and other apps. Choose Espresso for fast, single-app tests. Choose UI Automator when you need device-level access, cross-app testing, or must handle system dialogs like permissions.
UI Automator is better for Android-only projects because it integrates natively with Android Studio, requires no server setup, and executes faster than Appium for Android testing. Appium is better for cross-platform projects (Android and iOS) where you want to share test code between platforms. UI Automator offers simpler setup and faster execution for Android. Appium offers broader platform support but adds complexity.
- Resource ID:
By.res(\"com.app:id/button\") - Most reliable for your app- Text:
By.text(\"Login\") - Simple but breaks with text changes- Content description:
By.desc(\"Submit button\") - Good for accessibility- Class name:
By.clazz(\"android.widget.Button\") - Find by widget typeUse resource IDs whenever possible for stability. Combine selectors for precision:
By.res(\"button_id\").text(\"Login\").Yes, UI Automator can test system apps like Settings, Phone, Messages, and any other app on the device. This is one of its key advantages over Espresso. You can launch system apps using shell commands or package names, interact with their UI elements, and verify behavior across the entire Android system.
1. Missing waits - Use
device.wait(Until.hasObject()) instead of Thread.sleep()2. Animations - Disable animations on test devices via ADB
3. Unstable selectors - Use resource IDs instead of text
4. Device performance variance - Increase timeout values for slower devices
5. Network dependencies - Mock API responses for consistent test data
Always add explicit waits, use stable selectors, and reset app state between tests.
UI Automator 2.0 (the current version) requires Android API level 18 (Android 4.3) or higher. This covers virtually all devices in active use today. The library is part of the AndroidX Test library and receives regular updates from Google.
Yes, UI Automator tests run in CI/CD pipelines using Android emulators or cloud device farms. For GitHub Actions, use android-emulator-runner. For Jenkins, use the Android Emulator plugin. For cloud testing, services like Firebase Test Lab, AWS Device Farm, and BrowserStack support UI Automator tests on real devices at scale.
1. Take screenshots on failure using
device.takeScreenshot()2. Log element properties and app state
3. Use
device.dumpWindowHierarchy() to inspect UI tree4. Run tests with verbose logging enabled
5. Use Android Studio's debugger to step through test code
6. Check logcat output for app crashes and errors
Screenshots and hierarchy dumps provide the most useful failure context.
Yes, UI Automator is completely free and open-source. It's maintained by Google as part of the AndroidX Test library. There are no licensing fees, usage limits, or premium features. You only need Android Studio and the Android SDK, both of which are also free.
Conclusion
You now have a complete foundation for testing Android apps with UI Automator. You understand when to choose it over Espresso or Appium. You've set up the environment, written tests that interact with UI elements, and handled system dialogs that exist outside your app's boundaries.
UI Automator's device-level access enables testing scenarios other frameworks can't touch. Permission dialogs, cross-app flows, system settings interactions, and testing across diverse Android devices become straightforward.
The real challenge isn't writing tests. It's maintaining them. UI changes break selectors. Product requirements evolve. Every modification triggers test updates. This is where discipline matters. Use resource IDs for stability. Write Page Objects for reusability. Add explicit waits for reliability. Keep tests focused and independent.
Next steps:
Start with your app's critical user journeys. Login, core transactions, edge cases users encounter. Build a small, reliable test suite. Run it on every commit. Expand coverage gradually.
For teams finding test maintenance consuming more time than test creation, explore how autonomous testing can reduce this burden at autonoma.app.
Happy testing.


