
Introduction
You've built a Flutter app. Login works perfectly on your Pixel 8. Then an iOS user reports the submit button does nothing. Another user on an older Android version says the app crashes when scrolling the product list.
Your Flutter widget tests caught none of this. They render widgets in the Dart VM, not on real devices. They never saw how your app behaves with real touch input, real platform differences, or real device constraints.
Standard Appium won't help. You point it at your Flutter app. It sees a blank canvas. Flutter doesn't render native UI elements. It draws everything itself using Skia. To Appium's UIAutomator2 or XCUITest drivers, your entire app is a single canvas widget with no accessible buttons, text fields, or lists.
This complete Flutter Appium testing guide shows you how to test Flutter applications the way users experience them: on iOS and Android devices, with real gestures, real navigation, and real platform behaviors. You'll learn exactly why Flutter is different, how Appium Flutter Driver solves the rendering problem, and how to write reliable cross-platform tests.
Why Standard Appium Doesn't Work with Flutter
Flutter's rendering engine is fundamentally different from React Native or native apps. Understanding why matters because it explains everything about how you'll test Flutter with Appium.
Native apps and React Native use platform UI components. When you create a Button in React Native, it compiles to UIButton on iOS and android.widget.Button on Android. These are real native elements with accessibility properties. Appium's XCUITest and UIAutomator2 drivers see them, query them, and interact with them.
Flutter renders to a canvas. Every pixel is drawn by Flutter's Skia graphics engine. A Flutter Button isn't a UIButton. It's painted pixels. When Appium looks at a Flutter app, it sees this:
<FlutterView>
  <!-- Everything is inside this single element -->
</FlutterView>
Your login button, text fields, and entire UI exist as painted graphics inside FlutterView. Appium can't find them. It's like trying to click a button in a JPEG image.
This isn't a bug. Flutter's rendering approach gives you pixel-perfect consistency across platforms. The button looks identical on iOS, Android, web, and desktop because Flutter draws it the same way everywhere. The tradeoff is that standard accessibility APIs don't see your widgets.
Appium Flutter Driver solves this by communicating directly with Flutter's Dart VM. Instead of querying native accessibility trees, it queries Flutter's widget tree. It knows about Text widgets, Button widgets, and ListView widgets because it speaks Flutter's language.
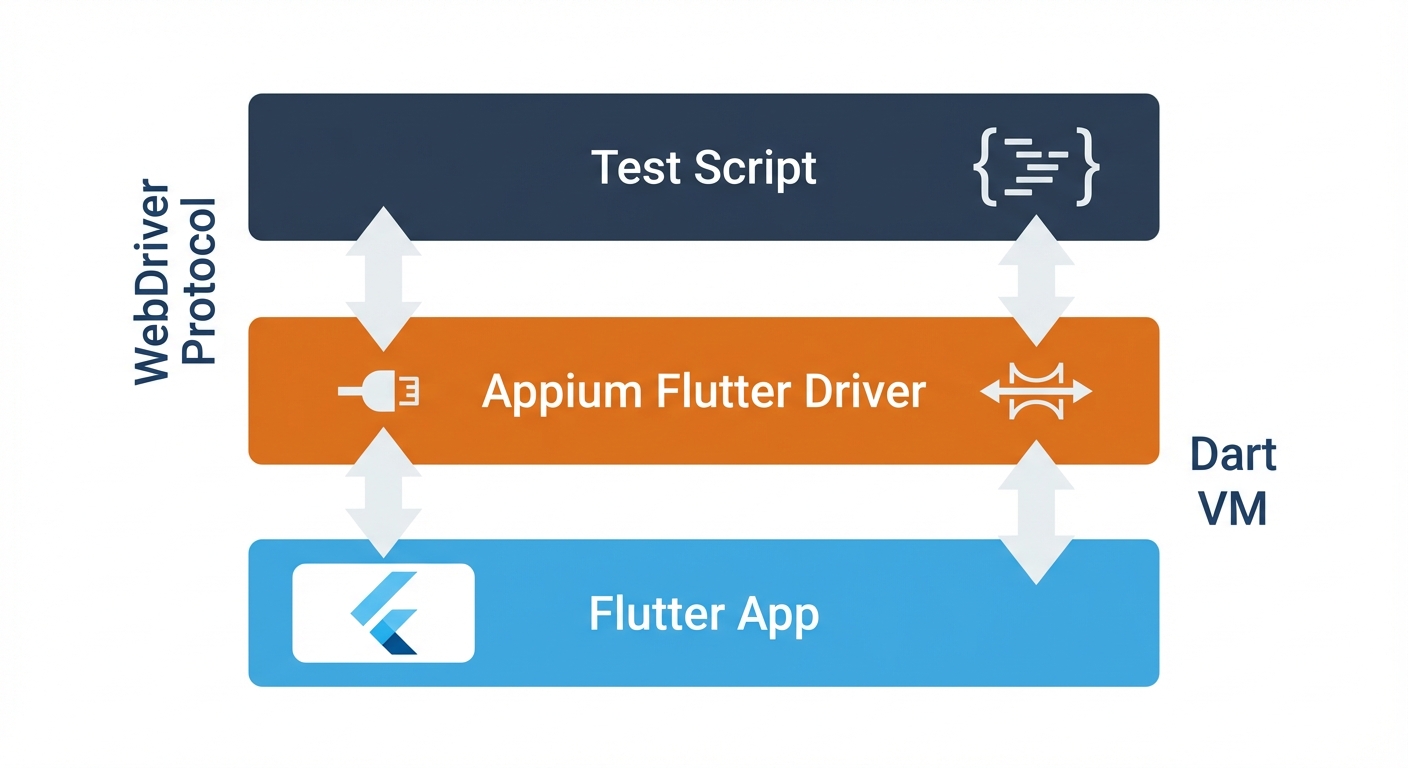
This architectural difference shapes everything about testing Flutter with Appium. You'll use different finders (byValueKey instead of accessibility ID), different setup (Flutter Driver instead of XCUITest), and different strategies (widget tree queries instead of native element queries).
For Flutter teams where Appium's complexity is a barrier, Autonoma offers AI-driven testing on real devices — agents navigate your app autonomously and adapt when your widget tree changes, no test scripts required.
Setting Up Appium Flutter Driver
Install Appium 2.0, Flutter Driver, and WebDriverIO:
npm install -g appium
appium driver install flutter
cd your-flutter-project
npm init -y
npm install --save-dev @wdio/cli
npx wdio config
Configure wdio.conf.js with Flutter-specific capabilities:
export const config = {
  runner: 'local',
  port: 4723,
  specs: ['./e2e/specs/**/*.js'],
  capabilities: [{
    platformName: 'iOS',  // or 'Android'
    'appium:automationName': 'Flutter',  // Critical: use Flutter driver
    'appium:app': '/path/to/Runner.app',  // or app-debug.apk for Android
    'appium:deviceName': 'iPhone 15'
  }],
  framework: 'mocha',
  waitforTimeout: 10000
};
Build your Flutter app in debug mode (required for Dart VM access):
# iOS
flutter build ios --debug --simulator

# Android
flutter build apk --debug
Add keys to Flutter widgets for reliable identification:
TextField(
  key: Key('email-input'),
  decoration: InputDecoration(labelText: 'Email'),
),
ElevatedButton(
  key: Key('login-button'),
  onPressed: () => _login(context),
  child: Text('Log In'),
)
Your First Flutter Appium Test
Create e2e/specs/login.spec.js:
describe('Login Flow', () => {
  it('should log in with valid credentials', async () => {
    // Wait for login screen to load
    await driver.execute('flutter:waitFor', {
      byValueKey: 'email-input',
      timeout: 10000
    });

    // Enter email
    await driver.execute('flutter:enterText', {
      byValueKey: 'email-input',
      text: '[email protected]'
    });

    // Enter password
    await driver.execute('flutter:enterText', {
      byValueKey: 'password-input',
      text: 'password123'
    });

    // Tap login button
    await driver.execute('flutter:click', {
      byValueKey: 'login-button'
    });

    // Wait for home screen
    await driver.execute('flutter:waitFor', {
      byValueKey: 'welcome-message',
      timeout: 15000
    });

    // Verify welcome text
    const welcomeText = await driver.execute('flutter:getText', {
      byValueKey: 'welcome-message'
    });

    expect(welcomeText).to.contain('Welcome back');
  });
});
Start Appium:
appiumRun the test:
npx wdio run wdio.conf.jsFinding Flutter Widgets with Appium
Appium Flutter Driver provides Flutter-specific finders that query the widget tree. These work identically on iOS and Android because they query Flutter's cross-platform widget tree, not native elements.
byValueKey: The Primary Finder
byValueKey finds widgets by their Key property. This is the most reliable finder for Flutter.
Add keys to your widgets:
ElevatedButton(
  key: Key('submit-button'),
  onPressed: _handleSubmit,
  child: Text('Submit'),
)
Find and interact in tests:
// Wait for widget
await driver.execute('flutter:waitFor', {
  byValueKey: 'submit-button'
});

// Click widget
await driver.execute('flutter:click', {
  byValueKey: 'submit-button'
});

// Get text from widget
const text = await driver.execute('flutter:getText', {
  byValueKey: 'submit-button'
});
Best practice: Add keys to every interactive widget and any widget you need to verify in tests (buttons, text fields, lists, navigation elements, status messages).
Other Finders
byText finds widgets by text content. Useful for static labels, but breaks with localization:
await driver.execute('flutter:click', { byText: 'Continue' });byType finds widgets by class name. Least reliable since apps have many widgets of the same type:
await driver.execute('flutter:click', { byType: 'ElevatedButton' });Priority: Use byValueKey first (most reliable), byText for static content only, byType as last resort.
Interacting with Flutter Widgets
Text Input and Clicks
// Enter text (clear first for cross-platform consistency)
await driver.execute('flutter:clearTextField', { byValueKey: 'email-input' });
await driver.execute('flutter:enterText', {
  byValueKey: 'email-input',
  text: '[email protected]'
});

// Click and long press
await driver.execute('flutter:click', { byValueKey: 'submit-button' });
await driver.execute('flutter:longPress', {
  byValueKey: 'message-item',
  durationMilliseconds: 1000
});
Scrolling
Flutter virtualizes ListViews, so you must scroll to render distant widgets:
// Scroll until widget is visible
await driver.execute('flutter:scrollUntilVisible', {
  scrollView: { byValueKey: 'product-list' },
  item: { byValueKey: 'product-99' },
  dyScroll: -300,  // Negative = scroll down
  waitTimeoutMilliseconds: 10000
});

// Then interact with it
await driver.execute('flutter:click', { byValueKey: 'product-99' });
Waiting for Widgets
Always wait before interacting. Flutter has animation delays and network requests:
// Wait for widget to appear
await driver.execute('flutter:waitFor', {
  byValueKey: 'data-table',
  timeout: 10000
});

// Wait for loading to finish
await driver.execute('flutter:waitForAbsent', {
  byValueKey: 'loading-spinner',
  timeout: 30000
});
Cross-Platform Testing: iOS and Android
The same test code runs on both platforms because Appium Flutter Driver queries Flutter's widget tree, not native elements. Create platform-specific config files:
// wdio.ios.conf.js
export const config = {
  capabilities: [{
    platformName: 'iOS',
    'appium:automationName': 'Flutter',
    'appium:app': './build/ios/iphonesimulator/Runner.app'
  }]
};

// wdio.android.conf.js
export const config = {
  capabilities: [{
    platformName: 'Android',
    'appium:automationName': 'Flutter',
    'appium:app': './build/app/outputs/flutter-apk/app-debug.apk'
  }]
};
Run tests on each platform:
npx wdio run wdio.ios.conf.js
npx wdio run wdio.android.conf.js
Most tests work identically across platforms. For platform-specific behaviors (permissions, back navigation), use helper functions that detect the platform and handle differences.
Python Example
JavaScript isn't the only option. Use Python with Appium Python Client:
from appium import webdriver
from appium.options.common import AppiumOptions

# Configure capabilities
options = AppiumOptions()
options.platform_name = 'iOS'
options.platform_version = '17.0'
options.device_name = 'iPhone 15'
options.automation_name = 'Flutter'
options.app = '/path/to/Runner.app'

# Start driver
driver = webdriver.Remote('http://localhost:4723', options=options)

# Wait for login screen
driver.execute_script('flutter:waitFor', {
    'byValueKey': 'email-input',
    'timeout': 10000
})

# Enter credentials
driver.execute_script('flutter:enterText', {
    'byValueKey': 'email-input',
    'text': '[email protected]'
})

driver.execute_script('flutter:enterText', {
    'byValueKey': 'password-input',
    'text': 'password123'
})

# Click login
driver.execute_script('flutter:click', {
    'byValueKey': 'login-button'
})

# Wait for home screen
driver.execute_script('flutter:waitFor', {
    'byValueKey': 'home-screen',
    'timeout': 15000
})

# Verify welcome message
welcome_text = driver.execute_script('flutter:getText', {
    'byValueKey': 'welcome-message'
})

assert 'Welcome back' in welcome_text

driver.quit()
Python works identically to JavaScript because both use Appium's WebDriver protocol. Choose the language your team knows best.
Appium vs integration_test: When to Use Each
Flutter has a native testing solution: integration_test package. It's written in Dart and runs inside your Flutter app. So why use Appium?
Use integration_test when:
You already know Dart. integration_test is written in Dart, uses Flutter's test APIs, and integrates directly with Flutter DevTools. If your team writes Flutter code, you already have these skills.
You need the fastest tests possible. integration_test runs inside your app process with direct access to the widget tree. No WebDriver protocol overhead. Tests run 2-3x faster than Appium.
You only test Flutter apps. integration_test is Flutter-specific. If your entire test suite is Flutter, there's no need for cross-framework compatibility.
Use Appium Flutter Driver when:
Your QA team doesn't know Dart. Many QA engineers know JavaScript or Python, not Dart. Appium lets them write tests in familiar languages.
You test multiple frameworks. If you test Flutter apps, React Native apps, and native apps, Appium provides one unified approach. Same WebDriver protocol, same test patterns, same CI infrastructure.
You use cloud testing platforms. BrowserStack, Sauce Labs, and AWS Device Farm support Appium WebDriver. They don't support integration_test. If you need cloud device testing, Appium is the only option.
You need to test apps you don't control. Appium tests compiled apps without source code access. integration_test requires modifying pubspec.yaml and adding test code to your app.
The real tradeoff:
integration_test is faster and more Flutter-native. Appium is more flexible and language-agnostic. There's no wrong choice. It depends on your team's skills and infrastructure. Many teams use both - integration_test for fast feedback during development, Appium for cross-platform validation and cloud testing.
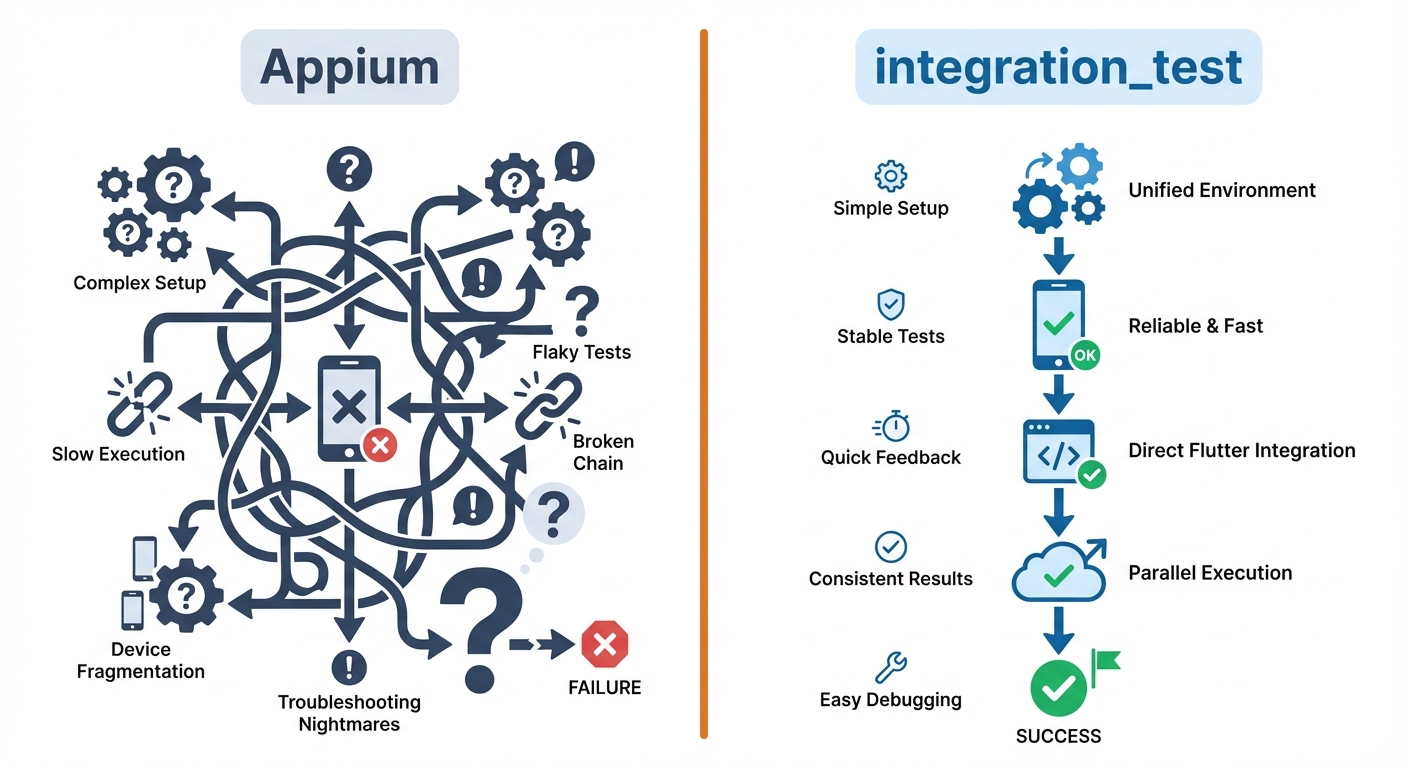
| Feature | Appium Flutter Driver | integration_test |
|---|---|---|
| Language | JavaScript, Python, Java, Ruby | Dart only |
| Test Speed | Moderate (WebDriver overhead) | Fast (direct access) |
| Setup Complexity | Medium (install drivers) | Low (add package) |
| Learning Curve | Easy (standard WebDriver) | Medium (Flutter-specific) |
| Cloud Support | Excellent (all platforms) | Limited |
| Cross-Framework | Yes (Flutter, RN, native) | Flutter only |
| Source Access Required | No | Yes |
| Best For | Multi-framework teams, cloud testing, QA without Dart | Flutter-only teams, fastest tests, DevTools integration |
For more on choosing testing frameworks, see our test automation frameworks guide.
Debugging and Troubleshooting
Enable Flutter Driver extension in your app (debug builds only):
import 'package:flutter/foundation.dart';
import 'package:flutter_driver/driver_extension.dart';

void main() {
  if (kDebugMode) {
    enableFlutterDriverExtension();
  }
  runApp(MyApp());
}
View widget tree when tests fail:
// Get widget hierarchy as JSON
const tree = await driver.execute('flutter:getRenderTree', {});
console.log(JSON.stringify(tree, null, 2));

// Check Flutter connection
const health = await driver.execute('flutter:checkHealth', {});
Common errors and fixes:
"Could not find Flutter app": App not built in debug mode or missing enableFlutterDriverExtension().
"Widget not found": Increase timeout, verify key spelling in widget tree, or scroll to widget first if it's in a ListView.
Platform-specific failures: Add platform detection and use longer timeouts where needed.
CI/CD Integration
Run tests in GitHub Actions. Example iOS workflow:
name: Flutter iOS E2E Tests
on: [push, pull_request]

jobs:
  ios-tests:
    runs-on: macos-14
    steps:
    - uses: actions/checkout@v4
    - uses: subosito/flutter-action@v2
      with:
        flutter-version: '3.16.0'

    - run: flutter pub get
    - run: flutter build ios --debug --simulator

    - name: Install Appium
      run: |
        npm install -g appium
        appium driver install flutter

    - run: appium &

    - run: npx wdio run wdio.ios.conf.js
      env:
        IOS_APP_PATH: ${{ github.workspace }}/build/ios/iphonesimulator/Runner.app

    - uses: actions/upload-artifact@v4
      if: failure()
      with:
        name: screenshots
        path: screenshots/
For Android, use ubuntu-latest with android-emulator-runner action. See regression testing strategies for more CI/CD patterns.
Conclusion
You now have everything needed to test Flutter mobile apps with Appium. You understand why standard Appium doesn't work with Flutter's canvas rendering, how Appium Flutter Driver solves this by querying the widget tree directly, how to find widgets using byValueKey and byType finders, how to handle scrolling and gestures, and when to choose Appium over integration_test.
Start with one critical user flow. Add keys to your widgets. Write a test. Run it on iOS and Android. Watch it catch a platform-specific bug your widget tests never saw.
The confidence you gain from cross-platform end-to-end tests is worth the setup. Your widget tests tell you components work in isolation. Appium tells you your Flutter app works for real users on real devices.
Next steps:
- Add Appium Flutter Driver to your Flutter project
- Add keys to interactive widgets in your most critical screen
- Write one test for your primary user flow
- Set up CI to run tests on both iOS and Android
- Expand coverage gradually
- Consider autonomous testing to reduce maintenance overhead
Looking for a simpler approach? We built Autonoma specifically for teams tired of maintaining brittle Appium tests. Our AI agents write and maintain tests automatically, adapting to UI changes without manual updates. No more broken selectors, no more flaky tests. Try Autonoma to see how autonomous testing works.
Resources:
- Appium Flutter Driver Documentation
- Flutter integration_test Package
- Appium Documentation
- WebDriverIO Documentation
- Test Automation Frameworks Guide - Compare testing approaches
The tools are ready. Your Flutter app is waiting. Start testing.
Frequently Asked Questions
Install Appium 2.0 globally with npm install -g appium, then install the Flutter driver with appium driver install flutter. Verify installation with appium driver list. You also need WebDriverIO for writing tests: npm install --save-dev @wdio/cli.
Flutter renders everything to a canvas using Skia graphics engine instead of using native UI components. Standard Appium drivers (XCUITest, UIAutomator2) see the entire Flutter app as a single canvas element with no accessible widgets. Appium Flutter Driver solves this by communicating directly with Flutter's Dart VM to access the widget tree.
Appium Flutter Driver uses WebDriver protocol and supports JavaScript, Python, Java, and Ruby. integration_test is Flutter's native package written in Dart. Appium is better for multi-language teams, cloud testing platforms, and cross-framework test suites. integration_test is faster but requires Dart knowledge and only works with Flutter.
Use Flutter-specific finders: byValueKey finds widgets by their Key property (most reliable), byText finds widgets by text content (breaks with localization), and byType finds widgets by class name (least reliable). Example: await driver.execute('flutter:click', { byValueKey: 'login-button' }).
Yes, two modifications: 1) Add Key properties to interactive widgets for reliable identification, 2) Add enableFlutterDriverExtension() to your main.dart file in debug builds. Wrap it in kDebugMode check so it doesn't run in production.
Use flutter:scrollUntilVisible command. Flutter virtualizes ListViews, so widgets far down aren't rendered. Example: await driver.execute('flutter:scrollUntilVisible', { scrollView: { byValueKey: 'product-list' }, item: { byValueKey: 'product-99' }, dyScroll: -300 }).
Yes. Appium Flutter Driver queries Flutter's cross-platform widget tree, not native elements. Tests written once run on both platforms without changes. Create platform-specific config files (wdio.ios.conf.js and wdio.android.conf.js) but keep test code identical.
Use flutter:getRenderTree to view the widget hierarchy as JSON. Increase timeouts with flutter:waitFor. Enable screenshots on failure in wdio.conf.js. Run Appium with debug logs: appium --log-level debug. Verify your app was built in debug mode and includes enableFlutterDriverExtension().
Yes. Install Appium Python Client: pip install Appium-Python-Client. Use driver.execute_script() to run Flutter commands. All Flutter finder commands work identically in Python. Choose the language your team knows best.
Use GitHub Actions with macos-14 for iOS and ubuntu-latest with android-emulator-runner for Android. Install Flutter, build your app in debug mode, install Appium and Flutter driver, start Appium server, then run tests with npx wdio. Upload screenshots as artifacts on failure.
ValueKeys are Flutter's Key properties added to widgets for identification. Add them like: ElevatedButton(key: Key('submit-button')). They become byValueKey finders in tests. This is the most reliable way to find widgets because keys don't change when text or styling changes.
Common causes: widget doesn't exist (check key name), widget isn't rendered yet (increase timeout), widget is inside unrendered part of ListView (scroll first), or app wasn't built in debug mode. Use flutter:getRenderTree to verify widget exists and check key spelling.
Use integration_test if your team knows Dart and only tests Flutter apps (faster tests, better DevTools integration). Use Appium if your QA team uses JavaScript/Python, you test multiple frameworks, need cloud testing platforms, or test apps without source access. Many teams use both.
Use flutter:enterText command: await driver.execute('flutter:enterText', { byValueKey: 'email-input', text: 'user@example.com' }). Clear fields first for consistent behavior across platforms: await driver.execute('flutter:clearTextField', { byValueKey: 'email-input' }).
Appium Flutter Driver is designed for mobile (iOS/Android). For Flutter web, use standard Selenium WebDriver with browser automation. Flutter web renders to HTML canvas elements, so use coordinate-based clicking or add accessibility attributes for finding elements.


