
Introduction to Espresso Android Testing
Espresso Android testing is the fastest way to automate UI tests for Android apps. Manual testing doesn't scale: tapping through screens, validating forms, and checking navigation flows takes too long and breaks easily.
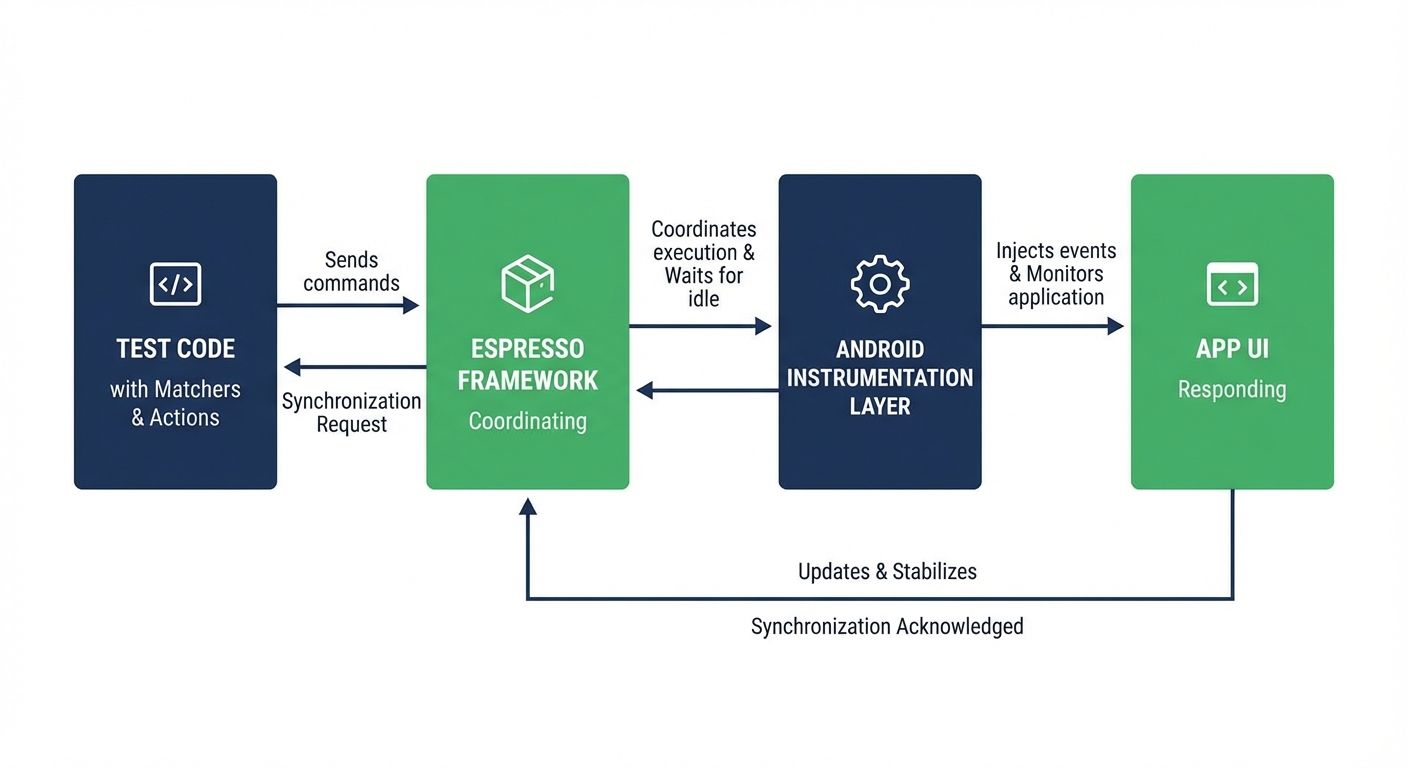
Espresso testing solves this by integrating deeply with the Android framework. It automatically synchronizes with your UI thread, waits for animations, and ensures deterministic tests. Unlike cross-platform tools, Espresso runs in the same process as your app for maximum speed and reliability.
This Espresso testing guide covers setup, writing tests, matchers and actions, handling async operations, and best practices for maintainable test suites.
What is Espresso and Why Use It for Android UI Testing?
Espresso is a white-box testing framework for Android that runs in the same process as your app, giving it direct access to UI components and perfect synchronization with the Android UI thread.
When you test "click the login button," Espresso finds the exact view, waits for the UI thread to be idle (no animations or async operations), and performs the action atomically. No blind coordinate tapping or screen searching.
This deep integration makes Espresso the fastest and most reliable option for Android UI testing. Tests execute in milliseconds. Flakiness is minimal because Espresso automatically handles timing issues.
Espresso excels at testing user interactions: clicking buttons, entering text, verifying messages, and checking navigation. It's ideal for regression testing critical flows like login, checkout, and data entry across Android versions and device sizes.
The framework is maintained by Google and well-documented. When you need confidence that your UI works, Espresso delivers.
For teams where Espresso's tight coupling to implementation details creates a maintenance burden, Autonoma takes a black-box approach — AI agents test your Android app on real devices without depending on view IDs or implementation internals.
Espresso vs Other Android Test Automation Frameworks
Espresso vs UI Automator:
UI Automator tests across app boundaries (system UI, multi-app workflows). It's slower and requires explicit waiting. Use Espresso for testing within your app. Use UI Automator for system dialogs, notifications, or multi-app flows.
Espresso vs Appium:
Appium is cross-platform (write once, run on Android and iOS) but slower due to external WebDriver protocol. Espresso runs in-process with automatic synchronization. Choose Espresso for Android-only projects prioritizing speed and reliability. Choose Appium for cross-platform coverage. See our Test Automation Frameworks guide for detailed comparisons.
Check our Appium Android testing guide if cross-platform is your priority.
Espresso vs Robolectric:
Robolectric runs tests on the JVM without emulators, making it extremely fast for unit tests. It mocks Android framework behavior. Espresso runs on real Android, testing actual framework behavior. Use Robolectric for ViewModels and business logic. Use Espresso for real UI integration tests.
Prerequisites for Espresso Testing
Before writing Espresso tests, ensure you have:
Required Tools:
- Android Studio Arctic Fox (2020.3.1) or later
- Java JDK 8 or higher
- Android SDK with API level 21 (Android 5.0) or higher
- An Android app project (new or existing)
Recommended Setup:
- Android emulator or physical device for running tests
- Gradle 7.0 or higher
- Kotlin 1.5+ or Java 8+
Verify your environment:
# Check Android Studio version
# Help → About Android Studio

# Check Java version
java -version

# Check Gradle version
./gradlew --version

# List available emulators
emulator -list-avds

# Check connected devices
adb devices
Adding Espresso Dependencies to Your Android Project
Espresso dependencies go in your app's build.gradle file. Open app/build.gradle (not the project-level build.gradle) and add these dependencies:
android {
    // ... existing configuration

    defaultConfig {
        // ... existing configuration

        testInstrumentationRunner "androidx.test.runner.AndroidJUnitRunner"
    }
}

dependencies {
    // ... existing dependencies

    // Espresso core
    androidTestImplementation 'androidx.test.espresso:espresso-core:3.5.1'

    // AndroidX Test - Core library
    androidTestImplementation 'androidx.test:core:1.5.0'

    // AndroidX Test - Runner
    androidTestImplementation 'androidx.test:runner:1.5.2'

    // AndroidX Test - Rules (for ActivityScenarioRule, etc)
    androidTestImplementation 'androidx.test:rules:1.5.0'

    // AndroidX Test - JUnit extension
    androidTestImplementation 'androidx.test.ext:junit:1.1.5'

    // Optional: Espresso Intents (for testing intents)
    androidTestImplementation 'androidx.test.espresso:espresso-intents:3.5.1'

    // Optional: Espresso Contrib (for RecyclerView, DatePicker, etc)
    androidTestImplementation 'androidx.test.espresso:espresso-contrib:3.5.1'

    // Optional: Espresso Idling Resource
    androidTestImplementation 'androidx.test.espresso:espresso-idling-resource:3.5.1'
}
For Kotlin projects, the syntax is identical but in build.gradle.kts:
android {
    // ... existing configuration

    defaultConfig {
        // ... existing configuration

        testInstrumentationRunner = "androidx.test.runner.AndroidJUnitRunner"
    }
}

dependencies {
    // ... existing dependencies

    androidTestImplementation("androidx.test.espresso:espresso-core:3.5.1")
    androidTestImplementation("androidx.test:core:1.5.0")
    androidTestImplementation("androidx.test:runner:1.5.2")
    androidTestImplementation("androidx.test:rules:1.5.0")
    androidTestImplementation("androidx.test.ext:junit:1.1.5")
}
After adding dependencies, sync your project:
# Sync from command line
./gradlew build

# Or click "Sync Now" in Android Studio when prompted
Project Structure for Espresso Tests
Espresso tests live in the androidTest directory, separate from unit tests:
app/
├── src/
│   ├── main/
│   │   └── java/com/yourapp/
│   │       ├── MainActivity.kt
│   │       └── LoginActivity.kt
│   ├── test/                    # Unit tests (JVM)
│   │   └── java/com/yourapp/
│   │       └── ViewModelTest.kt
│   └── androidTest/             # Instrumentation tests (Android device/emulator)
│       └── java/com/yourapp/
│           ├── LoginActivityTest.kt
│           └── MainActivityTest.kt
Create the directory structure if it doesn't exist:
mkdir -p app/src/androidTest/java/com/yourappWriting Your First Espresso Test
Let's test a simple login screen. First, here's the activity we're testing:
// LoginActivity.kt
class LoginActivity : AppCompatActivity() {
    override fun onCreate(savedInstanceState: Bundle?) {
        super.onCreate(savedInstanceState)
        setContentView(R.layout.activity_login)

        val emailInput = findViewById<EditText>(R.id.email_input)
        val passwordInput = findViewById<EditText>(R.id.password_input)
        val loginButton = findViewById<Button>(R.id.login_button)
        val errorMessage = findViewById<TextView>(R.id.error_message)

        loginButton.setOnClickListener {
            val email = emailInput.text.toString()
            val password = passwordInput.text.toString()

            if (email == "user@example.com" && password == "password123") {
                // Navigate to home screen
                startActivity(Intent(this, HomeActivity::class.java))
                finish()
            } else {
                errorMessage.text = "Invalid email or password"
                errorMessage.visibility = View.VISIBLE
            }
        }
    }
}
Create your test in app/src/androidTest/java/com/yourapp/LoginActivityTest.kt:
package com.yourapp

import androidx.test.espresso.Espresso.onView
import androidx.test.espresso.action.ViewActions.*
import androidx.test.espresso.assertion.ViewAssertions.matches
import androidx.test.espresso.matcher.ViewMatchers.*
import androidx.test.ext.junit.rules.ActivityScenarioRule
import androidx.test.ext.junit.runners.AndroidJUnit4
import org.junit.Rule
import org.junit.Test
import org.junit.runner.RunWith

@RunWith(AndroidJUnit4::class)
class LoginActivityTest {

    @get:Rule
    val activityRule = ActivityScenarioRule(LoginActivity::class.java)

    @Test
    fun successfulLogin() {
        // Type email
        onView(withId(R.id.email_input))
            .perform(typeText("user@example.com"), closeSoftKeyboard())

        // Type password
        onView(withId(R.id.password_input))
            .perform(typeText("password123"), closeSoftKeyboard())

        // Click login button
        onView(withId(R.id.login_button))
            .perform(click())

        // Verify we navigated to home screen
        // (HomeActivity is now displayed)
        onView(withId(R.id.home_screen))
            .check(matches(isDisplayed()))
    }

    @Test
    fun invalidLoginShowsError() {
        // Type invalid credentials
        onView(withId(R.id.email_input))
            .perform(typeText("wrong@example.com"), closeSoftKeyboard())

        onView(withId(R.id.password_input))
            .perform(typeText("wrongpass"), closeSoftKeyboard())

        // Click login button
        onView(withId(R.id.login_button))
            .perform(click())

        // Verify error message is displayed
        onView(withId(R.id.error_message))
            .check(matches(isDisplayed()))
            .check(matches(withText("Invalid email or password")))
    }
}
Key concepts in this test:
@RunWith(AndroidJUnit4::class): Tells JUnit to use the Android test runnerActivityScenarioRule: Launches the activity before each test and cleans up afteronView(): Finds a view matching the given criteriaperform(): Executes actions on the view (click, type, swipe)check(): Verifies assertions about the view's state
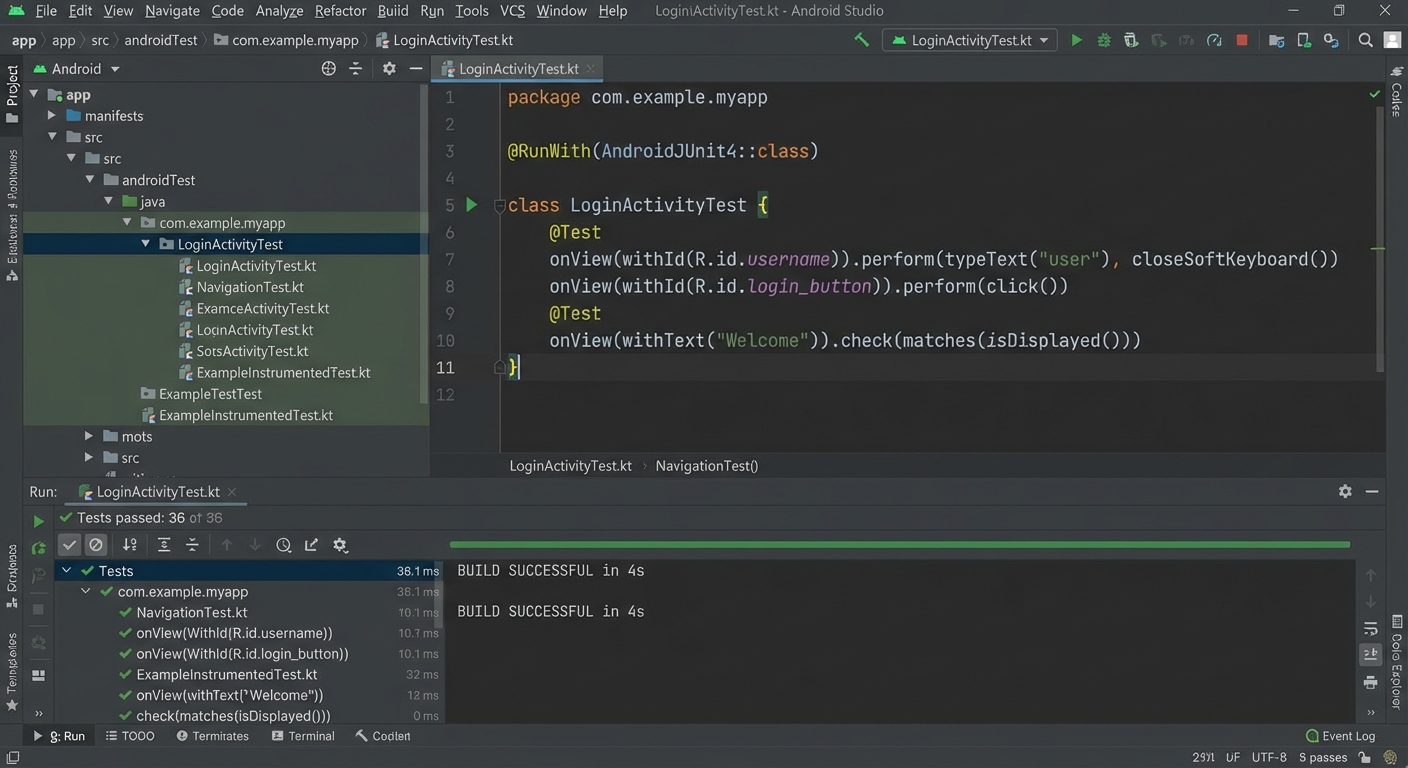
Running Espresso Tests
From Android Studio:
- Right-click on the test class or method
- Select "Run 'LoginActivityTest'"
- Choose a device or emulator
- Watch the test execute
From Command Line:
# Run all instrumentation tests
./gradlew connectedAndroidTest

# Run specific test class
./gradlew connectedAndroidTest -Pandroid.testInstrumentationRunnerArguments.class=com.yourapp.LoginActivityTest

# Run specific test method
./gradlew connectedAndroidTest -Pandroid.testInstrumentationRunnerArguments.class=com.yourapp.LoginActivityTest#successfulLogin
Test results appear in:
-
app/build/reports/androidTests/connected/index.html - Android Studio's Run window
Espresso Matchers: Finding UI Elements
Matchers tell Espresso which view to interact with. Espresso provides dozens of built-in matchers for common scenarios.
Finding Views by ID
The most reliable matcher:
onView(withId(R.id.login_button))
    .perform(click())
Finding Views by Text
// Exact text match
onView(withText("Login"))
    .perform(click())

// Text contains
onView(withText(containsString("Welcome")))
    .check(matches(isDisplayed()))

// Text starts with
onView(withText(startsWith("Total:")))
    .check(matches(isDisplayed()))
Finding Views by Content Description
onView(withContentDescription("Submit button"))
    .perform(click())
Combining Matchers
Use allOf() and anyOf() to combine matchers:
import androidx.test.espresso.matcher.ViewMatchers.*
import org.hamcrest.Matchers.*

// View must match ALL conditions
onView(allOf(
    withId(R.id.button),
    withText("Submit"),
    isEnabled()
)).perform(click())

// View must match ANY condition
onView(anyOf(
    withId(R.id.submit_button),
    withText("Submit")
)).perform(click())

// View must NOT match condition
onView(allOf(
    withId(R.id.button),
    not(isEnabled())
)).check(matches(isDisplayed()))
Finding Views in RecyclerView or ListView
Espresso provides special matchers for list views:
import androidx.test.espresso.contrib.RecyclerViewActions

// Click item at position 2
onView(withId(R.id.recycler_view))
    .perform(RecyclerViewActions.actionOnItemAtPosition<RecyclerView.ViewHolder>(2, click()))

// Scroll to position 10
onView(withId(R.id.recycler_view))
    .perform(RecyclerViewActions.scrollToPosition<RecyclerView.ViewHolder>(10))

// Click item matching text
onView(withId(R.id.recycler_view))
    .perform(RecyclerViewActions.actionOnItem<RecyclerView.ViewHolder>(
        hasDescendant(withText("Account Settings")),
        click()
    ))
Finding Child Views
// Find button inside a specific layout
onView(allOf(
    withId(R.id.submit_button),
    isDescendantOfA(withId(R.id.form_layout))
)).perform(click())

// Find view with specific parent
onView(allOf(
    withText("Transfer"),
    withParent(withId(R.id.action_bar))
)).check(matches(isDisplayed()))
Espresso Actions: Interacting with UI Elements
Actions tell Espresso what to do with a view once it's found.
Clicking and Tapping
// Standard click
onView(withId(R.id.button))
    .perform(click())

// Long click
onView(withId(R.id.item))
    .perform(longClick())

// Double click
onView(withId(R.id.element))
    .perform(doubleClick())
Typing Text
// Type text (replaces existing text)
onView(withId(R.id.email_input))
    .perform(typeText("user@example.com"))

// Append text to existing text
onView(withId(R.id.message_input))
    .perform(typeText("Hello "))
    .perform(typeText("World"))

// Replace text completely
onView(withId(R.id.input))
    .perform(replaceText("New text"))

// Clear text
onView(withId(R.id.input))
    .perform(clearText())

// Close keyboard after typing
onView(withId(R.id.input))
    .perform(typeText("text"), closeSoftKeyboard())
Swiping and Scrolling
// Swipe left/right/up/down
onView(withId(R.id.view))
    .perform(swipeLeft())

onView(withId(R.id.view))
    .perform(swipeRight())

onView(withId(R.id.scroll_view))
    .perform(swipeUp())

onView(withId(R.id.scroll_view))
    .perform(swipeDown())

// Scroll to view (for ScrollView)
onView(withId(R.id.target_view))
    .perform(scrollTo())
Pressing Hardware Keys
import androidx.test.espresso.Espresso.pressBack
import androidx.test.espresso.action.ViewActions.pressKey
import android.view.KeyEvent

// Press back button
pressBack()

// Press a specific key
onView(withId(R.id.input))
    .perform(pressKey(KeyEvent.KEYCODE_ENTER))
Custom Actions
Create custom actions for complex interactions:
import androidx.test.espresso.UiController
import androidx.test.espresso.ViewAction
import android.view.View

fun setProgress(progress: Int): ViewAction {
    return object : ViewAction {
        override fun getConstraints() = isAssignableFrom(SeekBar::class.java)

        override fun getDescription() = "Set progress to $progress"

        override fun perform(uiController: UiController, view: View) {
            val seekBar = view as SeekBar
            seekBar.progress = progress
        }
    }
}

// Use custom action
onView(withId(R.id.seek_bar))
    .perform(setProgress(75))
Espresso Assertions: Verifying Android UI State
Assertions verify that views are in expected states.
Checking Visibility
// View is displayed
onView(withId(R.id.view))
    .check(matches(isDisplayed()))

// View is not displayed (exists but invisible)
onView(withId(R.id.view))
    .check(matches(not(isDisplayed())))

// View doesn't exist at all
onView(withId(R.id.view))
    .check(doesNotExist())
Checking Text
// Exact text match
onView(withId(R.id.label))
    .check(matches(withText("Welcome")))

// Text contains
onView(withId(R.id.label))
    .check(matches(withText(containsString("Welcome"))))

// Text matches regex
onView(withId(R.id.balance))
    .check(matches(withText(matchesPattern("\\$\\d+\\.\\d{2}"))))
Checking View States
// View is enabled/disabled
onView(withId(R.id.button))
    .check(matches(isEnabled()))

onView(withId(R.id.button))
    .check(matches(not(isEnabled())))

// View is clickable
onView(withId(R.id.button))
    .check(matches(isClickable()))

// View is checked (for CheckBox, RadioButton)
onView(withId(R.id.checkbox))
    .check(matches(isChecked()))

onView(withId(R.id.checkbox))
    .check(matches(isNotChecked()))

// View is selected
onView(withId(R.id.view))
    .check(matches(isSelected()))
Checking View Properties
// Check hint text
onView(withId(R.id.input))
    .check(matches(withHint("Enter email")))

// Check content description
onView(withId(R.id.icon))
    .check(matches(withContentDescription("Profile icon")))

// Check if view has focus
onView(withId(R.id.input))
    .check(matches(hasFocus()))
Custom Assertions
import androidx.test.espresso.assertion.ViewAssertion
import android.view.View

fun hasBackgroundColor(@ColorInt color: Int): ViewAssertion {
    return ViewAssertion { view, noViewFoundException ->
        if (noViewFoundException != null) throw noViewFoundException

        val background = view.background as? ColorDrawable
        val actualColor = background?.color

        if (actualColor != color) {
            throw AssertionError("Background color mismatch. Expected: $color, Actual: $actualColor")
        }
    }
}

// Use custom assertion
onView(withId(R.id.view))
    .check(hasBackgroundColor(Color.RED))
Testing Complex User Flows with Espresso
Real apps have complex interactions spanning multiple screens. Here's how to test them.
Testing a Money Transfer Flow
@Test
fun completeMoneyTransfer() {
    // Start from home screen, verify balance
    onView(withId(R.id.account_balance))
        .check(matches(withText(containsString("$2,500"))))

    // Navigate to transfer screen
    onView(withId(R.id.transfer_button))
        .perform(click())

    // Select recipient account from dropdown
    onView(withId(R.id.recipient_dropdown))
        .perform(click())

    onData(allOf(
        instanceOf(String::class.java),
        `is`("Savings Account")
    )).perform(click())

    // Enter amount
    onView(withId(R.id.amount_input))
        .perform(typeText("100.00"), closeSoftKeyboard())

    // Enter memo
    onView(withId(R.id.memo_input))
        .perform(typeText("Test transfer"), closeSoftKeyboard())

    // Review button should be enabled
    onView(withId(R.id.review_button))
        .check(matches(isEnabled()))
        .perform(click())

    // Verify review screen shows correct details
    onView(withId(R.id.confirm_amount))
        .check(matches(withText("$100.00")))

    onView(withId(R.id.confirm_recipient))
        .check(matches(withText("Savings Account")))

    // Confirm transfer
    onView(withId(R.id.confirm_button))
        .perform(click())

    // Wait for success message
    onView(withId(R.id.success_message))
        .check(matches(isDisplayed()))
        .check(matches(withText("Transfer successful")))

    // Navigate back to home
    pressBack()

    // Verify balance updated
    onView(withId(R.id.account_balance))
        .check(matches(withText(containsString("$2,400"))))
}
Testing Form Validation
@Test
fun formValidation_enablesSubmitWhenValid() {
    // Initially submit button should be disabled
    onView(withId(R.id.submit_button))
        .check(matches(not(isEnabled())))

    // Enter valid email
    onView(withId(R.id.email_input))
        .perform(typeText("user@example.com"), closeSoftKeyboard())

    // Button still disabled (need password too)
    onView(withId(R.id.submit_button))
        .check(matches(not(isEnabled())))

    // Enter valid password
    onView(withId(R.id.password_input))
        .perform(typeText("SecurePass123!"), closeSoftKeyboard())

    // Now button should be enabled
    onView(withId(R.id.submit_button))
        .check(matches(isEnabled()))
}

@Test
fun formValidation_showsErrorForInvalidEmail() {
    // Enter invalid email
    onView(withId(R.id.email_input))
        .perform(typeText("invalid-email"), closeSoftKeyboard())

    // Trigger validation by focusing away
    onView(withId(R.id.password_input))
        .perform(click())

    // Error message should appear
    onView(withId(R.id.email_error))
        .check(matches(isDisplayed()))
        .check(matches(withText("Invalid email format")))
}
Handling Asynchronous Operations with Idling Resources
Espresso automatically waits for the UI thread to be idle, but it doesn't know about your custom background operations. When tests fail because views haven't loaded yet, you need idling resources.
When You Need Idling Resources
- Network requests (Retrofit, Volley, etc.)
- Database queries
- Custom async operations
- Third-party libraries with background work
Creating a Simple Idling Resource
import androidx.test.espresso.IdlingResource

class SimpleIdlingResource : IdlingResource {
    @Volatile
    private var callback: IdlingResource.ResourceCallback? = null

    @Volatile
    private var isIdle = true

    override fun getName() = "SimpleIdlingResource"

    override fun isIdleNow() = isIdle

    override fun registerIdleTransitionCallback(callback: IdlingResource.ResourceCallback?) {
        this.callback = callback
    }

    fun setIdleState(isIdle: Boolean) {
        this.isIdle = isIdle
        if (isIdle) {
            callback?.onTransitionToIdle()
        }
    }
}
Using Idling Resource in Tests
import androidx.test.espresso.IdlingRegistry
import org.junit.After
import org.junit.Before

class NetworkTest {
    private lateinit var idlingResource: SimpleIdlingResource

    @Before
    fun setup() {
        idlingResource = SimpleIdlingResource()
        IdlingRegistry.getInstance().register(idlingResource)
    }

    @After
    fun teardown() {
        IdlingRegistry.getInstance().unregister(idlingResource)
    }

    @Test
    fun testNetworkRequest() {
        // Mark as busy before network call
        idlingResource.setIdleState(false)

        // Trigger network request in app
        onView(withId(R.id.refresh_button))
            .perform(click())

        // In your app's network callback, call:
        // idlingResource.setIdleState(true)

        // Espresso automatically waits until idle
        onView(withId(R.id.data_list))
            .check(matches(isDisplayed()))
    }
}
Idling Resource for OkHttp/Retrofit
import androidx.test.espresso.IdlingResource
import okhttp3.Dispatcher

class OkHttpIdlingResource(
    private val dispatcher: Dispatcher
) : IdlingResource {
    @Volatile
    private var callback: IdlingResource.ResourceCallback? = null

    override fun getName() = "OkHttpIdlingResource"

    override fun isIdleNow(): Boolean {
        val idle = dispatcher.runningCallsCount() == 0
        if (idle) {
            callback?.onTransitionToIdle()
        }
        return idle
    }

    override fun registerIdleTransitionCallback(callback: IdlingResource.ResourceCallback?) {
        this.callback = callback
    }
}

// Register in test
val okHttpClient = // your OkHttpClient instance
val idlingResource = OkHttpIdlingResource(okHttpClient.dispatcher)
IdlingRegistry.getInstance().register(idlingResource)Testing RecyclerView and ListView Items
Lists require special handling because items may not be visible initially.
Scrolling to Items
import androidx.test.espresso.contrib.RecyclerViewActions

@Test
fun testScrollToItem() {
    // Scroll to position 20
    onView(withId(R.id.recycler_view))
        .perform(RecyclerViewActions.scrollToPosition<RecyclerView.ViewHolder>(20))

    // Scroll to item with specific text
    onView(withId(R.id.recycler_view))
        .perform(RecyclerViewActions.scrollTo<RecyclerView.ViewHolder>(
            hasDescendant(withText("Account Settings"))
        ))
}
Clicking Items in RecyclerView
@Test
fun testClickRecyclerViewItem() {
    // Click item at position 3
    onView(withId(R.id.recycler_view))
        .perform(RecyclerViewActions.actionOnItemAtPosition<RecyclerView.ViewHolder>(
            3,
            click()
        ))

    // Click specific view inside item
    onView(withId(R.id.recycler_view))
        .perform(RecyclerViewActions.actionOnItemAtPosition<RecyclerView.ViewHolder>(
            5,
            clickChildViewWithId(R.id.item_button)
        ))
}

// Helper function for clicking child views
fun clickChildViewWithId(id: Int): ViewAction {
    return object : ViewAction {
        override fun getConstraints() = null

        override fun getDescription() = "Click child view with id $id"

        override fun perform(uiController: UiController, view: View) {
            val childView = view.findViewById<View>(id)
            childView.performClick()
        }
    }
}
Asserting RecyclerView Content
import androidx.recyclerview.widget.RecyclerView
import androidx.test.espresso.contrib.RecyclerViewActions

@Test
fun testRecyclerViewItemCount() {
    onView(withId(R.id.recycler_view))
        .check { view, noViewFoundException ->
            if (noViewFoundException != null) throw noViewFoundException

            val recyclerView = view as RecyclerView
            val adapter = recyclerView.adapter

            assertThat(adapter?.itemCount, `is`(10))
        }
}

@Test
fun testRecyclerViewItemContent() {
    // Check that item at position 2 contains specific text
    onView(withId(R.id.recycler_view))
        .perform(RecyclerViewActions.scrollToPosition<RecyclerView.ViewHolder>(2))

    onView(allOf(
        withId(R.id.item_title),
        isDescendantOfA(nthChildOf(withId(R.id.recycler_view), 2))
    )).check(matches(withText("Expected Title")))
}

// Helper for finding nth child
fun nthChildOf(parentMatcher: Matcher<View>, childPosition: Int): Matcher<View> {
    return object : TypeSafeMatcher<View>() {
        override fun describeTo(description: Description) {
            description.appendText("position $childPosition of parent ")
            parentMatcher.describeTo(description)
        }

        override fun matchesSafely(view: View): Boolean {
            if (view.parent !is ViewGroup) return false
            val parent = view.parent as ViewGroup

            return parentMatcher.matches(parent) &&
                   parent.getChildAt(childPosition) == view
        }
    }
}
Testing Intents with Espresso Intents
Espresso Intents allows you to verify and stub intents, similar to mocking.
Setup for Intent Testing
Add the dependency if you haven't:
androidTestImplementation 'androidx.test.espresso:espresso-intents:3.5.1'Use IntentsTestRule or initialize/release intents manually:
import androidx.test.espresso.intent.Intents
import androidx.test.espresso.intent.matcher.IntentMatchers.*
import androidx.test.espresso.intent.rule.IntentsRule
import org.junit.Rule

class IntentTest {
    @get:Rule
    val intentsRule = IntentsRule()

    @get:Rule
    val activityRule = ActivityScenarioRule(MainActivity::class.java)

    @Test
    fun testIntentSent() {
        // Perform action that triggers intent
        onView(withId(R.id.open_browser_button))
            .perform(click())

        // Verify intent was sent
        intended(hasAction(Intent.ACTION_VIEW))
        intended(hasData("https://example.com"))
    }
}
Verifying Intents
import androidx.test.espresso.intent.Intents.intended
import androidx.test.espresso.intent.matcher.IntentMatchers.*

@Test
fun testShareIntent() {
    // Trigger share action
    onView(withId(R.id.share_button))
        .perform(click())

    // Verify share intent sent
    intended(hasAction(Intent.ACTION_SEND))
    intended(hasType("text/plain"))
    intended(hasExtra(Intent.EXTRA_TEXT, "Check out this app!"))
}

@Test
fun testOpenActivityIntent() {
    // Trigger navigation
    onView(withId(R.id.settings_button))
        .perform(click())

    // Verify correct activity started
    intended(hasComponent(SettingsActivity::class.java.name))
}
Stubbing Intents
Intercept intents and return fake results:
import androidx.test.espresso.intent.Intents.intending
import androidx.test.espresso.intent.matcher.IntentMatchers.*
import android.app.Activity
import android.app.Instrumentation

@Test
fun testCameraIntentStubbed() {
    // Stub camera intent to return fake image
    val result = Instrumentation.ActivityResult(
        Activity.RESULT_OK,
        Intent().apply {
            putExtra("data", createFakeBitmap())
        }
    )

    intending(hasAction(MediaStore.ACTION_IMAGE_CAPTURE))
        .respondWith(result)

    // Trigger camera
    onView(withId(R.id.take_photo_button))
        .perform(click())

    // Verify app handles fake image correctly
    onView(withId(R.id.image_preview))
        .check(matches(isDisplayed()))
}
Best Practices for Maintainable Espresso Tests
Use Page Object Pattern
Organize tests with Page Objects to reduce duplication. For a complete guide, see our article on Page Object Model: Building Maintainable Test Automation.
// LoginPage.kt
class LoginPage {
    fun enterEmail(email: String) {
        onView(withId(R.id.email_input))
            .perform(typeText(email), closeSoftKeyboard())
    }

    fun enterPassword(password: String) {
        onView(withId(R.id.password_input))
            .perform(typeText(password), closeSoftKeyboard())
    }

    fun clickLogin() {
        onView(withId(R.id.login_button))
            .perform(click())
    }

    fun verifyErrorMessage(message: String) {
        onView(withId(R.id.error_message))
            .check(matches(withText(message)))
    }
}

// LoginActivityTest.kt
class LoginActivityTest {
    private val loginPage = LoginPage()

    @Test
    fun successfulLogin() {
        loginPage.enterEmail("user@example.com")
        loginPage.enterPassword("password123")
        loginPage.clickLogin()

        // Verify navigation to home
        onView(withId(R.id.home_screen))
            .check(matches(isDisplayed()))
    }
}
Keep Tests Independent
Each test should run independently without relying on other tests:
class IndependentTests {
    @get:Rule
    val activityRule = ActivityScenarioRule(MainActivity::class.java)

    @Before
    fun setup() {
        // Reset app state before each test
        clearDatabase()
        clearSharedPreferences()
    }

    @Test
    fun test1() {
        // Test runs with clean state
    }

    @Test
    fun test2() {
        // This test also runs with clean state
        // Doesn't depend on test1
    }
}
Use Descriptive Test Names
// Bad
@Test
fun test1() { }

// Good
@Test
fun loginWithValidCredentials_navigatesToHomeScreen() { }

@Test
fun loginWithInvalidPassword_displaysErrorMessage() { }

@Test
fun transferWithInsufficientFunds_disablesConfirmButton() { }
Externalize Test Data
object TestData {
    const val VALID_EMAIL = "user@example.com"
    const val VALID_PASSWORD = "password123"
    const val INVALID_EMAIL = "invalid"
    const val ERROR_MESSAGE = "Invalid email or password"
}

class LoginTest {
    @Test
    fun validLogin() {
        onView(withId(R.id.email_input))
            .perform(typeText(TestData.VALID_EMAIL), closeSoftKeyboard())

        onView(withId(R.id.password_input))
            .perform(typeText(TestData.VALID_PASSWORD), closeSoftKeyboard())

        // ... rest of test
    }
}
Add Meaningful Failure Messages
@Test
fun testBalanceUpdate() {
    val initialBalance = getBalance()

    performTransfer(amount = 100.0)

    val expectedBalance = initialBalance - 100.0
    val actualBalance = getBalance()

    assertThat(
        "Balance should decrease by transfer amount",
        actualBalance,
        `is`(expectedBalance)
    )
}
Disable Animations in Tests
Animations can cause flakiness. Disable them programmatically:
import androidx.test.platform.app.InstrumentationRegistry
import androidx.test.uiautomator.UiDevice

class BaseTest {
    @Before
    fun disableAnimations() {
        val device = UiDevice.getInstance(InstrumentationRegistry.getInstrumentation())
        device.executeShellCommand("settings put global window_animation_scale 0")
        device.executeShellCommand("settings put global transition_animation_scale 0")
        device.executeShellCommand("settings put global animator_duration_scale 0")
    }

    @After
    fun enableAnimations() {
        val device = UiDevice.getInstance(InstrumentationRegistry.getInstrumentation())
        device.executeShellCommand("settings put global window_animation_scale 1")
        device.executeShellCommand("settings put global transition_animation_scale 1")
        device.executeShellCommand("settings put global animator_duration_scale 1")
    }
}
Running Espresso Tests in CI/CD
GitHub Actions Example
name: Android Tests

on: [push, pull_request]

jobs:
  test:
    runs-on: macos-latest

    steps:
      - uses: actions/checkout@v3

      - name: Set up JDK 17
        uses: actions/setup-java@v3
        with:
          java-version: '17'
          distribution: 'adopt'

      - name: Grant execute permission for gradlew
        run: chmod +x gradlew

      - name: Run instrumentation tests
        uses: reactivecircus/android-emulator-runner@v2
        with:
          api-level: 33
          target: google_apis
          arch: x86_64
          profile: pixel_5
          script: ./gradlew connectedAndroidTest

      - name: Upload test reports
        if: always()
        uses: actions/upload-artifact@v3
        with:
          name: test-reports
          path: app/build/reports/androidTests/
Gradle Configuration for CI
android {
    // ... existing config

    testOptions {
        // Enable test orchestrator for better test isolation
        execution 'ANDROIDX_TEST_ORCHESTRATOR'

        // Configure test execution
        animationsDisabled = true

        unitTests {
            includeAndroidResources = true
            returnDefaultValues = true
        }
    }
}

dependencies {
    // ... existing dependencies

    // Test orchestrator
    androidTestUtil 'androidx.test:orchestrator:1.4.2'
}
Common Espresso Issues and Solutions
Issue: Test Passes Locally but Fails in CI
Cause: Timing differences, different Android versions, or resource constraints.
Solution:
- Use idling resources instead of sleeps
- Increase timeout values in CI
- Disable animations explicitly
- Use test orchestrator for isolation
Issue: "AmbiguousViewMatcherException: Multiple views match"
Cause: Multiple views match your matcher.
Solution:
// Be more specific with matchers
onView(allOf(
    withId(R.id.button),
    isDescendantOfA(withId(R.id.form_layout))
)).perform(click())

// Or use withIndex helper
fun withIndex(matcher: Matcher<View>, index: Int): Matcher<View> {
    return object : TypeSafeMatcher<View>() {
        var currentIndex = 0

        override fun describeTo(description: Description) {
            description.appendText("with index: $index ")
            matcher.describeTo(description)
        }

        override fun matchesSafely(view: View): Boolean {
            return matcher.matches(view) && currentIndex++ == index
        }
    }
}

// Usage
onView(withIndex(withId(R.id.button), 0)).perform(click())
Issue: Tests Are Too Slow
Solution:
- Use
@LargeTest,@MediumTest,@SmallTestannotations to categorize tests - Run small/medium tests frequently, large tests less often
- Mock expensive operations
- Use test orchestrator to run tests in parallel
For comprehensive strategies on maintaining fast, reliable tests, read our guide: How to Reduce Test Flakiness: Best Practices and Solutions.
Frequently Asked Questions About Espresso Testing
Espresso is Google's official UI testing framework for Android apps. It's used to write automated tests that simulate user interactions like tapping buttons, entering text, and navigating through screens. Espresso runs tests directly on Android devices or emulators and automatically synchronizes with your app's UI thread, making tests fast and reliable.
Espresso is faster and more reliable than Appium for Android-only projects because it runs in-process with your app and has automatic synchronization. Appium is better when you need cross-platform testing (Android and iOS) or want to test without accessing app source code. Choose Espresso for speed and reliability on Android. Choose Appium for cross-platform coverage.
1. Add dependencies to app/build.gradle (espresso-core, AndroidX Test)
2. Set testInstrumentationRunner to AndroidJUnitRunner
3. Create test classes in androidTest directory
4. Write tests using onView(), perform(), and check()
5. Run tests from Android Studio or command line
Setup takes 10-15 minutes for a basic configuration.
- Scroll to position:
RecyclerViewActions.scrollToPosition(10)- Click item:
RecyclerViewActions.actionOnItemAtPosition(2, click())- Find item by content:
RecyclerViewActions.scrollTo(hasDescendant(withText("Item")))Add espresso-contrib dependency to use these actions.
Idling resources tell Espresso to wait for asynchronous operations to complete before continuing tests. Use them for network requests, database queries, or custom background operations. Without idling resources, tests may fail because they check assertions before data loads. Espresso automatically waits for the UI thread but doesn't know about your custom async work.
1. Timing issues - Use idling resources instead of Thread.sleep()
2. Animations - Disable animations in tests
3. Ambiguous matchers - Be more specific with view matchers
4. Network flakiness - Mock network responses or use idling resources
5. Test dependencies - Ensure tests are independent and can run in any order
Using test orchestrator also improves test isolation.
Yes, Espresso Intents allows you to verify and stub intents. You can verify that your app sends correct intents (like opening a browser or sharing content) and mock responses from external activities (like camera or file picker). This prevents tests from depending on external apps while still verifying intent behavior.
Use Android emulators in CI environments like GitHub Actions, GitLab CI, or Jenkins. Popular approach is android-emulator-runner for GitHub Actions, which handles emulator startup and test execution. Key considerations: use macOS runners for hardware acceleration, disable animations, use test orchestrator for parallelization, and increase timeouts for slower CI environments.
The 'test' directory is for unit tests that run on the JVM without Android framework dependencies. The 'androidTest' directory is for instrumentation tests (like Espresso) that run on Android devices or emulators and have full access to Android framework APIs. Use 'test' for ViewModels and business logic. Use 'androidTest' for UI tests with Espresso.
Jetpack Compose has its own testing library (androidx.compose.ui:ui-test) designed specifically for Compose UIs. While you can technically use Espresso with Compose, the Compose testing library is better optimized for Compose's declarative UI paradigm. It provides semantics-based matchers that align with how Compose UIs are built.
Conclusion
You now have everything needed to test Android apps with Espresso: setup, matchers, actions, async handling with idling resources, and best practices.
Espresso's in-process execution and automatic synchronization make it the fastest, most reliable option for Android UI testing. Write maintainable tests using Page Object Model, keep tests independent, and use idling resources for async operations.
Next steps:
- Set up your first test suite using this guide's examples
- Add Espresso tests for critical user flows
- Configure CI/CD to run tests on every commit
For teams wanting to accelerate testing beyond traditional frameworks, explore our AI for QA guide to see how AI-powered testing complements Espresso.