
Introduction
You've shipped a React Native app to the App Store and Google Play. It works perfectly on your iPhone 15. Then a user on a Samsung Galaxy reports that login hangs indefinitely. Another on an older iOS version says the checkout flow crashes when tapping "Pay Now."
Your React Native component tests with Jest and React Native Testing Library caught nothing. They render components in Node.js using react-test-renderer. Real users don't use your app in Node.js. They use real devices with real touch inputs, real native modules, and real platform-specific behaviors.
This complete React Native Appium tutorial shows you how to test your mobile application the way users actually experience it: on iOS and Android devices, with real gestures, real navigation, real AsyncStorage, and real native modules. You'll learn exactly how to set up Appium for React Native, test React Native-specific features, and solve the 15 most common problems developers encounter when testing React Native with Appium.
Why Use Appium for React Native Mobile Testing?
You already have Jest and React Native Testing Library. They're fast. They catch logic errors in individual components. A button's onPress handler fires, state updates, the component re-renders with new text.
Then you deploy to production. The button works in isolation. In production, pressing it triggers navigation to a new screen, which loads data from AsyncStorage, which updates native module state, which differs between iOS and Android. Your unit tests never saw this coming.
Appium tests the entire chain. It runs your actual React Native application on iOS simulators, Android emulators, or real devices. It taps buttons, scrolls lists, and fills text inputs just like your users do. When it finds a bug, you know it's a bug users will hit.
When to use each approach:
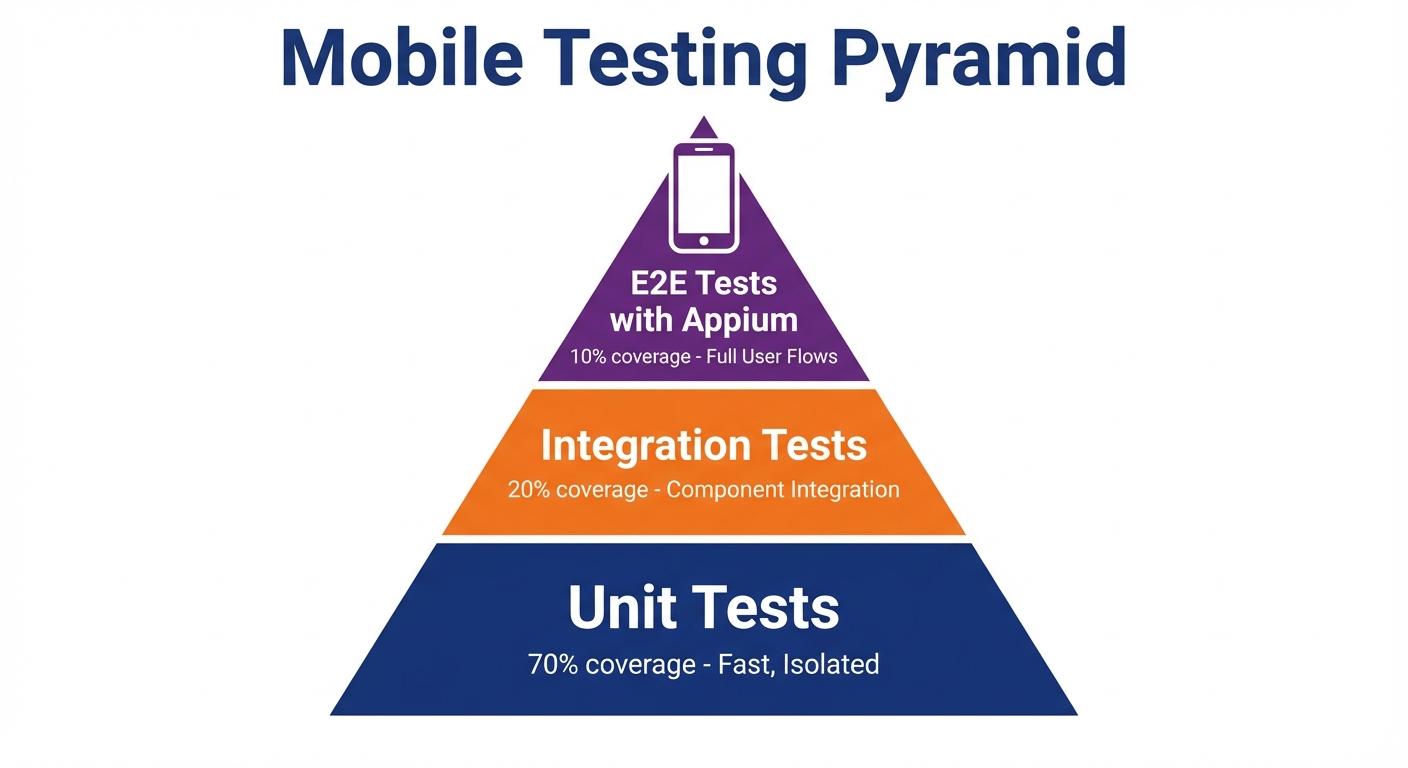
Unit tests are faster and catch component-level logic errors. Use them for testing individual component behavior, utilities, and hooks in isolation. Appium is slower but catches integration bugs: how components work together on real platforms, how navigation behaves, how your app handles platform-specific features like push notifications or biometrics. According to industry benchmarks, apps with automated E2E testing catch 67% more platform-specific bugs than those relying solely on unit tests. You need both. Unit tests give you speed and coverage. Appium gives you confidence. Learn more about integration testing vs end-to-end testing for React Native to understand when to use each approach.
Appium vs Detox:
Detox is React Native-specific with faster synchronization because it runs inside your app's JavaScript context. But it requires code changes, doesn't work with native apps, and has limited CI support. Appium uses the WebDriver protocol, works with any mobile framework (React Native, native iOS/Android, Flutter, hybrid apps), requires no code changes, and runs on every major cloud testing platform. If you're testing React Native exclusively and control the codebase, Detox might be faster. If you need cross-platform compatibility or test apps you don't control, Appium is the better choice.
| Feature | Appium | Detox |
|---|---|---|
| Protocol | WebDriver (universal) | React Native-specific |
| Setup Complexity | Medium | Low |
| Test Speed | Moderate | Fast |
| Code Changes Required | None | Yes (testID required) |
| Cross-Framework Support | Yes (RN, native, Flutter) | React Native only |
| CI/CD Support | Excellent (all platforms) | Limited |
| Best For | Cross-platform testing, apps you don't control | React Native-only projects with full code access |
For a broader comparison, see our mobile test automation frameworks comparison.
For React Native teams where Appium's complexity is a barrier to testing, Autonoma offers AI-driven testing on real devices — agents navigate your app autonomously without requiring test scripts or device-specific selectors.
Setting Up Appium React Native Testing Environment
Installation and Configuration
First, install Appium 2.0 and WebDriverIO in your React Native project:
npm install --save-dev appium @wdio/cli
npx appium driver install uiautomator2
npx appium driver install xcuitest
This installs Appium server, WebDriverIO test framework, and the required drivers for Android (UIAutomator2) and iOS (XCUITest).
Now initialize WebDriverIO configuration:
npx wdio configSelect these options when prompted:
- Where should your tests be located?
./e2e/specs/**/*.ts - Which framework?
mocha - Do you want to use a compiler?
TypeScript - Where should your logs be written to?
./e2e/logs
This creates wdio.conf.ts. Open it and configure for React Native:
export const config: WebdriverIO.Config = {
  runner: 'local',
  port: 4723,
  specs: ['./e2e/specs/**/*.ts'],
  maxInstances: 1,

  capabilities: [{
    platformName: 'iOS',
    'appium:platformVersion': '17.0',
    'appium:deviceName': 'iPhone 15',
    'appium:automationName': 'XCUITest',
    'appium:app': '/path/to/your/ios/build/YourApp.app',
    'appium:noReset': false,
    'appium:fullReset': false,
    'appium:newCommandTimeout': 300
  }],

  logLevel: 'info',
  bail: 0,
  waitforTimeout: 15000,
  connectionRetryTimeout: 120000,
  connectionRetryCount: 3,

  framework: 'mocha',
  mochaOpts: {
    ui: 'bdd',
    timeout: 60000
  },

  before: async () => {
    await driver.setImplicitTimeout(10000);
  }
};
For Android, add this capability:
{
  platformName: 'Android',
  'appium:platformVersion': '13',
  'appium:deviceName': 'Pixel_7_API_33',
  'appium:automationName': 'UIAutomator2',
  'appium:app': '/path/to/your/android/app/build/outputs/apk/debug/app-debug.apk',
  'appium:noReset': false,
  'appium:fullReset': false,
  'appium:newCommandTimeout': 300
}
The app capability points to your built React Native app. Build it first before running tests.
Building Your React Native App for Testing
iOS:
cd ios
xcodebuild -workspace YourApp.xcworkspace \
  -scheme YourApp \
  -configuration Debug \
  -sdk iphonesimulator \
  -derivedDataPath build
The built app is at ios/build/Build/Products/Debug-iphonesimulator/YourApp.app. Use this path in your iOS capability.
Android:
cd android
./gradlew assembleDebug
The built APK is at android/app/build/outputs/apk/debug/app-debug.apk. Use this path in your Android capability.
Your First Test
Create e2e/specs/login.spec.ts:
describe('Login Flow', () => {
  it('should log in with valid credentials', async () => {
    // Find elements by accessibility ID (testID)
    const emailInput = await $('~email-input');
    const passwordInput = await $('~password-input');
    const loginButton = await $('~login-button');

    // Wait for elements to appear
    await emailInput.waitForDisplayed({ timeout: 10000 });

    // Fill credentials
    await emailInput.setValue('[email protected]');
    await passwordInput.setValue('password123');

    // Tap login
    await loginButton.click();

    // Verify we navigated to home screen
    const welcomeText = await $('~welcome-message');
    await welcomeText.waitForDisplayed({ timeout: 15000 });

    expect(await welcomeText.getText()).toContain('Welcome back');
  });
});
Debugging Failed Tests
Appium Inspector
Appium Inspector is the most important debugging tool. It shows your app's element hierarchy in real-time.
Start Appium Inspector:
# Download from: https://github.com/appium/appium-inspector/releases
# Launch Appium Inspector
# Set capabilities matching your test
# Click "Start Session"
Inspector shows:
- Element hierarchy (like browser DevTools)
- Element attributes (accessibility ID, text, coordinates)
- Available locator strategies
- Tap recorder (generates test code from interactions)
Use it to:
- Verify
testIDprops appear as accessibility IDs - Find correct selectors when tests fail
- Check if elements are actually rendered
- Understand view hierarchy differences between iOS/Android
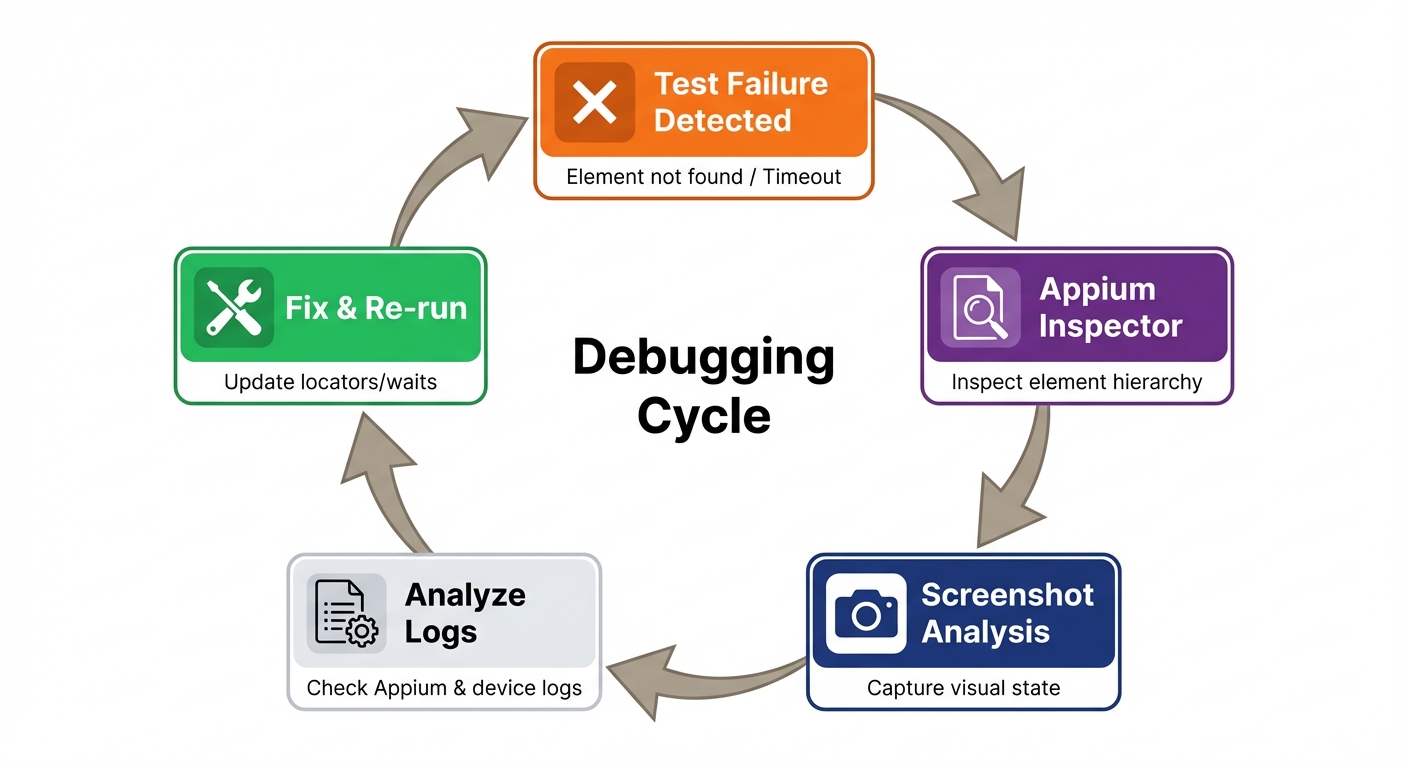
Logs and Screenshots
WebDriverIO captures screenshots on failure automatically. Enable in config:
// wdio.conf.ts
export const config = {
  afterTest: async (test, context, { error }) => {
    if (error) {
      await driver.saveScreenshot(
        `./screenshots/${test.title}-${Date.now()}.png`
      );
    }
  }
};
View Appium logs:
# Start Appium with debug logs
npx appium --log-level debug
Logs show:
- Every command sent to driver
- Element queries and results
- Native errors from iOS/Android
- Timing of operations
Add debug output to tests:
it('debugs element state', async () => {
  const element = await $('~my-element');

  // Log element properties
  console.log('Displayed:', await element.isDisplayed());
  console.log('Enabled:', await element.isEnabled());
  console.log('Text:', await element.getText());
  console.log('Location:', await element.getLocation());
  console.log('Size:', await element.getSize());

  // Take manual screenshot
  await driver.saveScreenshot('./debug-screenshot.png');
});
Common Debugging Commands
// Pause execution (useful for debugging)
await browser.debug(); // Opens REPL, type commands interactively

// Get page source (entire view hierarchy as XML)
const source = await driver.getPageSource();
console.log(source);

// Get current activity/view controller
const activity = await driver.getCurrentActivity(); // Android
const context = await driver.getContexts(); // iOS

// Check app state
const appState = await driver.queryAppState('com.myapp');
// 0 = not installed, 1 = not running, 3 = running in background, 4 = running in foreground

// Get device logs
const logs = await driver.getLogs('syslog'); // iOS
const logcat = await driver.getLogs('logcat'); // Android
CI/CD Integration
GitHub Actions for iOS and Android
Run Appium tests on every commit using GitHub Actions. For Vercel users, check out our Vercel preview deployment testing strategy.
iOS CI workflow:
name: iOS E2E Tests

on:
  push:
    branches: [ main, develop ]
  pull_request:
    branches: [ main ]

jobs:
  ios-tests:
    runs-on: macos-14

    steps:
    - uses: actions/checkout@v4

    - name: Setup Node.js
      uses: actions/setup-node@v4
      with:
        node-version: 18

    - name: Install dependencies
      run: |
        npm ci
        cd ios && pod install && cd ..

    - name: Build iOS app
      run: |
        cd ios
        xcodebuild -workspace YourApp.xcworkspace \
          -scheme YourApp \
          -configuration Debug \
          -sdk iphonesimulator \
          -derivedDataPath build

    - name: Install Appium
      run: |
        npm install -g appium
        appium driver install xcuitest

    - name: Start Appium
      run: appium &

    - name: Run tests
      run: |
        export APP_PATH="$(pwd)/ios/build/Build/Products/Debug-iphonesimulator/YourApp.app"
        npx wdio run wdio.ios.conf.ts

    - name: Upload screenshots
      if: failure()
      uses: actions/upload-artifact@v4
      with:
        name: ios-screenshots
        path: screenshots/
Android CI workflow:
name: Android E2E Tests

on:
  push:
    branches: [ main, develop ]
  pull_request:
    branches: [ main ]

jobs:
  android-tests:
    runs-on: ubuntu-latest

    steps:
    - uses: actions/checkout@v4

    - name: Setup Node.js
      uses: actions/setup-node@v4
      with:
        node-version: 18

    - name: Setup Java
      uses: actions/setup-java@v4
      with:
        distribution: 'temurin'
        java-version: '17'

    - name: Install dependencies
      run: npm ci

    - name: Build Android app
      run: |
        cd android
        ./gradlew assembleDebug

    - name: Setup Android Emulator
      uses: reactivecircus/android-emulator-runner@v2
      with:
        api-level: 33
        target: google_apis
        arch: x86_64
        profile: pixel_6
        script: echo "Emulator started"

    - name: Install Appium
      run: |
        npm install -g appium
        appium driver install uiautomator2

    - name: Start Appium
      run: appium &

    - name: Run tests on emulator
      uses: reactivecircus/android-emulator-runner@v2
      with:
        api-level: 33
        target: google_apis
        arch: x86_64
        profile: pixel_6
        script: |
          export APP_PATH="$(pwd)/android/app/build/outputs/apk/debug/app-debug.apk"
          npx wdio run wdio.android.conf.ts

    - name: Upload screenshots
      if: failure()
      uses: actions/upload-artifact@v4
      with:
        name: android-screenshots
        path: screenshots/
Platform-specific config files:
Create separate configs for iOS and Android:
// wdio.ios.conf.ts
import { config as baseConfig } from './wdio.conf';

export const config = {
  ...baseConfig,
  capabilities: [{
    platformName: 'iOS',
    'appium:platformVersion': '17.0',
    'appium:deviceName': 'iPhone 15',
    'appium:automationName': 'XCUITest',
    'appium:app': process.env.APP_PATH
  }]
};
// wdio.android.conf.ts
import { config as baseConfig } from './wdio.conf';
export const config = {
...baseConfig,
capabilities: [{
platformName: 'Android',
'appium:platformVersion': '13',
'appium:deviceName': 'emulator-5554',
'appium:automationName': 'UIAutomator2',
'appium:app': process.env.APP_PATH,
'appium:avd': 'Pixel_6_API_33'
}]
};Best Practices
Quick reference for writing maintainable Appium tests for React Native:
Use testID props consistently: Add testID to every interactive element. Use descriptive, kebab-case names: login-button, email-input, product-list.
Always use explicit waits: Never assume elements appear instantly. Use waitForDisplayed() with appropriate timeouts (10-15s for React Native). React Native has JavaScript bridge latency.
Test user flows, not implementation: Don't test that useState was called. Test that tapping a button changes visible text or navigates to a new screen.
Handle platform differences: iOS and Android behave differently (text input, scrolling, permissions). Write platform-specific helper functions.
Build apps in debug mode for testing: Debug builds are faster to install and easier to debug. Only test release builds before major releases.
Keep tests independent: Each test should run in isolation. Don't rely on state from previous tests. Use beforeEach() to reset app state.
Use Page Object Model for large apps: When you have many tests for the same screens, extract locators and actions into classes. For larger projects, see our guide on Page Object Model. Example:
class LoginScreen {
  get emailInput() { return $('~email-input'); }
  get passwordInput() { return $('~password-input'); }
  get loginButton() { return $('~login-button'); }

  async login(email: string, password: string) {
    await this.emailInput.setValue(email);
    await this.passwordInput.setValue(password);
    await this.loginButton.click();
  }

  async waitForScreen() {
    await this.emailInput.waitForDisplayed({ timeout: 10000 });
  }
}
Run smoke tests on real devices: Emulators are fast for development. Real devices catch hardware-specific bugs, performance issues, and OS version differences. Run a subset of critical tests on real devices before releases.
Test deep links and push notifications: These are common entry points users never test manually. Automate them to catch navigation bugs.
Conclusion
You now have everything you need to test React Native applications with Appium. You know how to set up Appium with WebDriverIO for iOS and Android, write tests using testID locators, handle gestures and scrolling, test React Native-specific features like React Navigation and AsyncStorage, debug failures when they happen, and run tests in CI/CD.
Start small. Pick one critical user flow (login, checkout, signup). Write a test. Run it on both iOS and Android. Watch it catch a platform-specific bug you didn't know existed. Then add more.
The confidence you gain from end-to-end mobile tests is worth the investment. Your unit tests tell you components work in isolation. Appium tells you your app works for users on real devices.
Next steps:
- Add Appium to your current React Native project
- Write one test for your most critical user flow
- Set up CI to run tests on every commit (see our regression testing strategies)
- Gradually expand coverage to other flows
- Consider autonomous testing with AI to reduce maintenance
Resources:
- Appium Documentation
- WebDriverIO Documentation
- React Native Testing Best Practices
- Appium Discord Community
- Test Automation Frameworks Guide - Compare Appium, Detox, and other mobile frameworks
- How to Test Android Apps with Appium - Android-specific guide
The tools are ready. Your app is waiting. Start testing.
Frequently Asked Questions
Run npm install --save-dev appium @wdio/cli, then install drivers with npx appium driver install uiautomator2 (Android) and npx appium driver install xcuitest (iOS). Initialize WebDriverIO config with npx wdio config and configure capabilities for your iOS .app file or Android .apk file.
Appium uses WebDriver protocol and works with any mobile app (React Native, native, Flutter, hybrid). Detox is React Native-specific with faster synchronization but requires code changes and has limited CI support. Choose Appium for cross-platform compatibility and testing apps you don't control. Choose Detox if you only test React Native and want faster tests.
Add testID props to React Native components (<Button testID="login-button" />), then use accessibility ID locators with the tilde prefix: await $('~login-button'). This works identically on iOS and Android and is the most reliable locator strategy for React Native.
React Native apps have JavaScript bridge latency causing slower rendering than native apps. Increase implicit timeout to 10-15 seconds with await driver.setImplicitTimeout(15000), use explicit waits with element.waitForDisplayed({ timeout: 15000 }), and wait for loading spinners to disappear before checking for content.
Use WebDriverIO's touchPerform() for swipes and scrolls: await browser.touchPerform([{ action: 'press', options: { x: 200, y: 700 }}, { action: 'moveTo', options: { x: 200, y: 300 }}, { action: 'release' }]). For FlatLists, use scrollIntoView() on Android or coordinate-based scrolling on iOS.
Tap navigation elements, wait for navigation animation to complete with await browser.pause(500), then verify the new screen loaded using screen titles or unique elements. Use waitUntil() to verify screen title changed: await browser.waitUntil(async () => (await $('~screen-title').getText()) === 'Products').
Set data through your app's UI, then restart the app with await driver.terminateApp('com.myapp') followed by await driver.activateApp('com.myapp'). Verify the data persisted by checking UI state. Clear AsyncStorage before tests with await driver.execute('mobile: clearApp', {}).
Yes. When initializing WebDriverIO with npx wdio config, select TypeScript as the compiler. WebDriverIO fully supports TypeScript with complete type definitions. All code examples in this guide use TypeScript. You get autocomplete, type checking, and better IDE support.
Use GitHub Actions with macos-14 runner for iOS (includes Xcode and simulators) and ubuntu-latest with android-emulator-runner for Android. Build your app, install Appium, start Appium server in background, then run tests with npx wdio. Upload screenshots as artifacts on failure.
Use Appium Inspector to view element hierarchy and verify testIDs appear as accessibility IDs. Enable screenshots on failure in wdio.conf.ts afterTest hook. Run Appium with debug logs using npx appium --log-level debug. Add await browser.debug() to pause tests and inspect state interactively.
Use this priority: 1) testID props mapped to accessibility IDs ($('~button-id')), 2) text content for static labels ($('=Submit')), 3) XPath only as last resort. testID is most reliable because it works identically on iOS and Android and survives UI changes.
Write platform-specific helper functions. Check platform with driver.isIOS or driver.isAndroid. Common differences: text input (clear before setValue on Android), scrolling (use coordinates on iOS, scrollIntoView on Android), and permission dialogs (different selectors and timing).
Use await driver.execute('mobile: deepLink', { url: 'myapp://product/123', package: 'com.myapp' }) to open deep links. Test both cold starts (terminate app first) and warm starts (app in background). Wait 2-3 seconds for navigation to complete, then verify you landed on the correct screen.
FlatLists virtualize content, so far-down items aren't rendered. Write a helper function that scrolls in a loop, checking if the element appears after each scroll. Use touchPerform() with coordinates for reliable scrolling. On Android, scrollIntoView() sometimes works, but use coordinates for iOS.
Use emulators/simulators for development (fast iteration). Use real devices for: final validation before releases, testing hardware features (camera, biometrics, GPS), verifying performance, and testing on specific OS versions. Run smoke tests on real devices in CI, full suite on emulators for speed.