
Vibe coding best practices are widely covered across prompt engineering, context management, and iterative generation. Almost none of them cover testing. This article fills that gap with a printable, phase-by-phase vibe coding checklist: what to check before you generate, after generation, before deployment, and after deployment. It also includes a Vibe Coding Maturity Model so you know where your current workflow sits and what the next level looks like. The checklist is backed by the ICSE 2026 systematic review of 101 sources on AI-assisted coding quality, which found that QA is the most frequently overlooked dimension of vibe coding workflows.
The workflow feels right up until it does not. Cursor generates the feature in minutes. The diff looks clean. You click through the happy path, it works, you ship. Two days later a user finds the edge case your click-through did not cover, and the bug has already been in production long enough to matter.
This is the specific failure mode that current vibe coding best practices guides do not address. They are almost entirely focused on generation quality: better prompts, cleaner context, smaller tasks. The implicit assumption is that good generation means trustworthy output. The ICSE 2026 systematic review of 101 sources on AI-assisted coding quality found the opposite pattern. QA was the most consistently skipped dimension of vibe coding workflows, not because developers do not care, but because no standard checklist exists for it.
This article gives you that vibe coding checklist, broken into four phases that match how vibe coding actually works: before you generate, after you generate, before you deploy, and after you deploy. Each phase has a specific job. Together they close the gap between "it works on my machine" and "it works for users." (If you are doing a one-time hardening sprint on an existing app, start with our 6 steps to make a vibe-coded app production ready instead — this checklist is the ongoing discipline that keeps it production-grade.)
Why Testing Is the Missing Vibe Coding Best Practice
The most common framing of vibe coding treats it as a generation problem. Better prompts. Better models. Better context. The implicit assumption is that if the generation is good, the output is trustworthy. That assumption is wrong in a specific, measurable way.
A 2024 study from Stanford and UIUC found that developers using AI coding assistants were 41% more likely to introduce security vulnerabilities when they trusted the generated code without manual verification. The issue is not that AI generates bad code. The issue is that AI generates plausible-looking code, and plausible-looking code passes the manual click-through that most vibe coders use as their primary test. We documented seven real-world examples of this pattern across production apps.
When you write code line by line, you are implicitly testing your mental model at each step. You notice when something does not add up. You catch the edge case because you were thinking through it as you typed. The AI does not do this. It generates the full function, the full component, the full API route in one shot, and none of the edge cases feel wrong until they are discovered by a user.
The four-phase checklist below introduces the feedback loops that vibe coding removes. Each phase has a specific purpose. Phase 1 prevents bad generation. Phase 2 catches what generation missed. Phase 3 stops broken code from reaching users. Phase 4 ensures that what reaches users stays working.
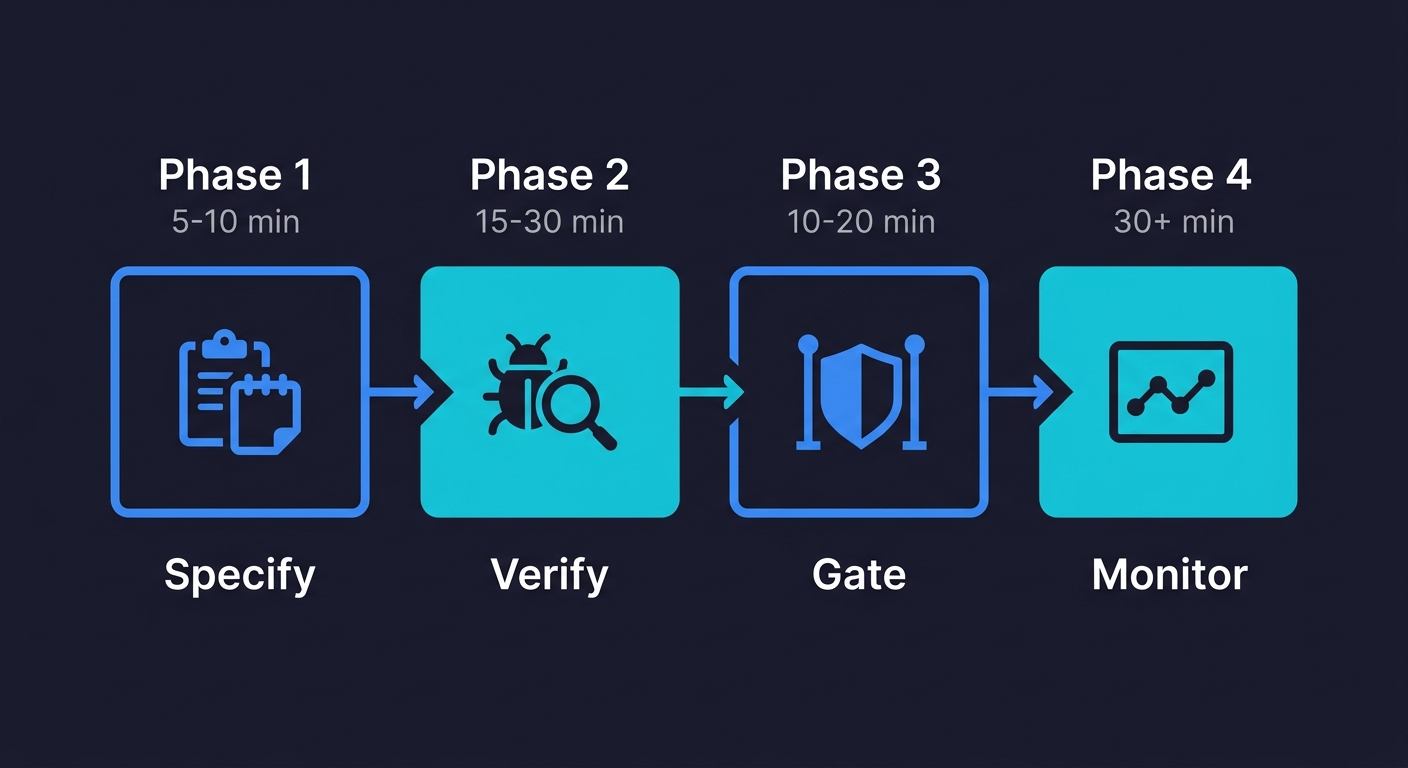
Phase 1: Before Generation (5-10 Minutes)
Most quality problems in vibe-coded apps are seeded before the AI writes a single line. The prompts that produce brittle code share a common trait: they describe the happy path without describing failure modes.
☐ Define the failure cases, not just the happy path
Before you prompt, write down what should happen when things go wrong. What if the API call times out? What if a user submits an empty form? What if a payment fails mid-transaction? If you cannot answer these before generating, the AI will make something up, and it will probably be wrong.
☐ Specify the state your feature needs to start from
Generated code that looks correct often breaks because it assumes database state that may not exist. Before prompting for a checkout flow, specify what a valid cart state looks like. Before prompting for a user profile page, specify what an incomplete profile looks like. The more precise your state specification, the less the AI invents.
☐ Name the components this feature touches
If you are adding a feature that modifies an existing component, name that component explicitly in the prompt. AI tools generate in isolation by default. They do not automatically consider what your new code might break in adjacent functionality. You have to surface those dependencies.
☐ Set the constraint: no silent failures
Add a standing instruction to your system prompt or project context: "Never swallow errors silently. Always surface exceptions to the caller or to the UI." Generated code that catches exceptions and does nothing is one of the most common vibe coding failure modes. It passes every click-through test because nothing visibly breaks. The user just never gets what they asked for.
☐ Identify what "done" looks like before starting
Write three sentences: what the feature does when it works, what the user sees when something goes wrong, and what the system logs when either happens. This is not a formal spec. It is a minimum definition of done that you can use to evaluate the output in Phase 2.
If the specification work in Phase 1 is where most quality problems are seeded, the verification work in Phase 2 is where Autonoma can take over — agents read your codebase and automatically run the unhappy path tests, auth checks, and static analysis that Phase 2 requires, so you get that coverage without adding 30 minutes to every generation cycle.
Phase 2: After Generation, AI Code Testing (15-30 Minutes)
The code exists. It probably runs. This is the phase most vibe coders skip entirely, and it is the phase that determines whether you discover bugs or your users do.
☐ Read the generated code for silent assumptions
Scan every function that handles user input, external API calls, or database writes. Look for three things: missing null checks, assumed data shapes that could be wrong, and error handling that logs but does not surface. You do not need to understand every line. You need to spot where the code assumes things are fine when they might not be.
☐ Test the unhappy paths manually
Run through your pre-generation failure cases from Phase 1. Submit the empty form. Trigger the timeout with a fake API response. Pass an invalid ID to a route that expects a valid one. These tests take five minutes each and they catch the majority of bugs that generated code introduces. If you need a deeper guide on this process, see our walkthrough on how to test a vibe-coded app. Most vibe coders never run them.
☐ Check that error states are visible, not swallowed
Navigate to a broken state deliberately. Delete a record that another component depends on. Revoke a permission that a feature assumes. If the UI shows nothing or shows stale data silently, the error is being swallowed. Find it now.
☐ Verify auth on every generated route
AI tools generate working routes. They do not reliably generate routes with correct authorization. For every new API endpoint or page route generated, manually verify that an unauthenticated request is rejected and that a request with the wrong user's token is also rejected:
# Should return 401, not 200
curl -s -o /dev/null -w "%{http_code}" https://yourapp.com/api/users/123

# Should return 403 with a different user's token
curl -s -o /dev/null -w "%{http_code}" -H "Authorization: Bearer OTHER_USER_TOKEN" \
  https://yourapp.com/api/users/123
This takes two minutes per route and catches the most severe class of vibe coding security risks.
☐ Check for hardcoded values that should be environment variables
Search the generated code for URLs, keys, IDs, or configuration values that appear as string literals. Generated code is notorious for hardcoding things that work in development and break in production. Run this before you commit:
grep -r "localhost\|api_key\|sk-\|password\|secret" src/Any match is a candidate for an environment variable.
☐ Run a static analysis pass
Tools like ESLint, Biome, or Semgrep take minutes to configure and catch a reliable class of generated code problems: unused variables that indicate dead code, type mismatches, and common security patterns like unsanitized inputs:
npx @biomejs/biome check ./src
# or
npx eslint . --ext .ts,.tsx
Run one before you commit.
☐ Test for common security vulnerabilities
Generated code frequently introduces input validation gaps. For any feature that accepts user input, test for basic injection vectors: submit a string containing <script>alert(1)</script> in every text field, pass SQL syntax in search parameters, and check whether file upload endpoints restrict file types. These are not theoretical risks. They are the most common vulnerabilities found in vibe-coded applications.
Phase 3: Before Deployment, Vibe Coding QA Gates (10-20 Minutes)
The code has passed your manual checks. This is your vibe coding testing checklist before deployment: the gates that separate "works on my machine" from "works in production." Production environments have different configuration, different data, and different load patterns than local development.
☐ Run your full test suite, if you have one
If your project has existing unit or integration tests, run them. Generated code breaks existing tests in specific ways: it changes return types, renames properties, or modifies shared state. A failing test before deployment is always better than a failing feature after it.
☐ Run a smoke test across critical user paths
Even if you have no formal test suite, manually walk through the five actions your users do most often. Sign up. Log in. Complete the core task. Update a setting. Log out. These take ten minutes and surface the category of bugs where generated code breaks something adjacent to what it was building.
☐ Verify environment configuration
Check that every environment variable your new code references exists in your deployment environment. A missing environment variable causes the most confident, clean-looking deployment to fail immediately in production. Add a startup check that validates required variables are present.
☐ Review what data gets written and whether it can be undone
For any generated code that writes to a database, check whether the write operation is reversible. Generated code sometimes lacks transactional wrapping, which means partial writes on failure. It sometimes deletes records when it should archive them. These are catastrophic in production and invisible in development.
☐ Check rate limits and external API quotas
If your generated feature calls an external API, confirm the call volume under realistic usage will not exceed your plan limits. Generated code often calls APIs in loops, without caching, without debouncing. What looks fine in development at one request per test run looks different at 500 users per hour.
☐ Confirm rollback is possible
Before you deploy, know how you would revert this deployment if it breaks something. For most vibe coders, this means knowing which git commit to revert to and whether that revert will leave the database in a consistent state. If the feature includes a database migration, confirm there is a down migration.
Phase 4: After Deployment, Production Monitoring (30+ Minutes)
You shipped. Now the real test begins. Most vibe coding best practices guides end at deployment. This phase is where the vibe coding checklist pays back its investment.
☐ Watch your error logs for the first 30 minutes
Errors that appear immediately after deployment are caused by environment differences, configuration mismatches, or edge cases that live data triggers but test data never did. Have your logging dashboard open during the first deployment of any significant feature. Act on errors before users report them.
☐ Walk through the feature as a new user
Create a fresh account in your production environment and complete the feature's critical path as a new user. Production behaves differently from development: different session handling, different CDN caching, different third-party integrations. You will almost always find something that was invisible in development.
☐ Check that existing features still work
Generated code breaks adjacent features. Run your smoke test again, in production, against your critical paths. This is the step that catches the regression nobody anticipated.
☐ Set an alert for error rate increase
If your error rate in the 24 hours following deployment is meaningfully higher than the 24 hours before, something the deployment introduced is causing failures. This alert catches the slow-burn failures that do not surface immediately but accumulate into a support incident by the next morning.
☐ Confirm analytics and logging are working for the new feature
Generated code sometimes omits event tracking. If you cannot see users interacting with your new feature in your analytics, either the feature is not being used or the tracking was not wired correctly. Find out which before you assume the feature launched successfully.
The Vibe Coding Maturity Model
The checklist above covers what to do. This model shows you where your current workflow sits and what the path forward looks like.
Most vibe coders start at Level 1. The goal is Level 4. Level 5 is where the workflow becomes genuinely self-sustaining. The quality issues engineering leaders report almost always trace back to Level 1 and Level 2.
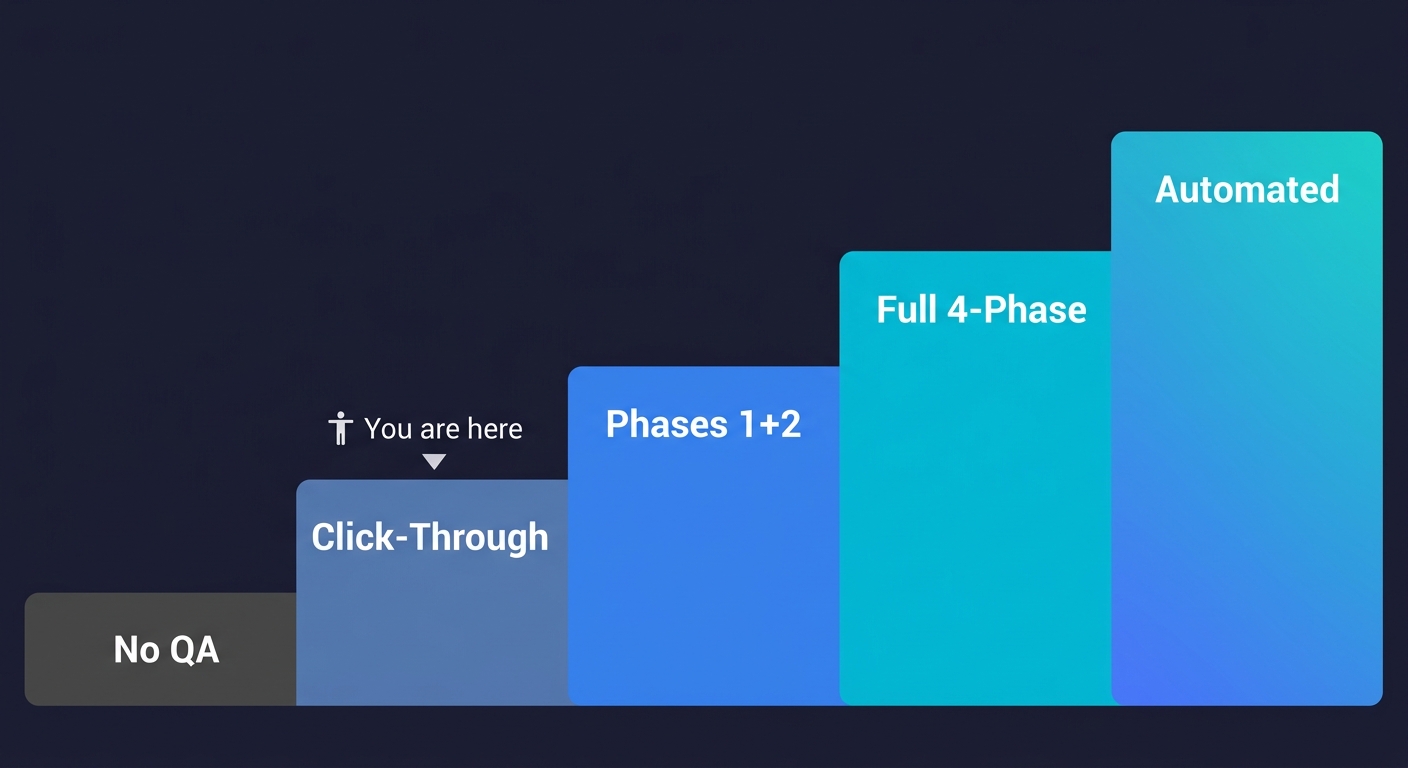
| Level | Name | What You Do | What You Catch | What You Miss |
|---|---|---|---|---|
| 1 | No QA | Generate, deploy, wait for complaints | Nothing proactively | Everything: auth gaps, edge cases, regressions, silent failures |
| 2 | Manual Click-Through | Walk through the happy path after generation | Obvious UI breaks, crashes | Edge cases, unhappy paths, auth bypass, hardcoded secrets |
| 3 | Phases 1 + 2 | Specify failure cases before prompting, verify after generation, run static analysis | Most generation-time bugs, auth issues, silent failures | Environment mismatches, production regressions, slow-burn errors |
| 4 | Full Four-Phase | All four phases: pre-generation, post-generation, pre-deployment, post-deployment | Most bugs before users do, regressions, config issues | Rare edge cases at scale, intermittent failures |
| 5 | Automated QA | Every deploy triggers automated tests, error rate alerts fire before users notice | Regressions instantly, new bugs on every deploy, performance degradation | Novel failure modes only (the checklist runs itself) |
Level 1 is acceptable for throwaway prototypes. Level 3 is the minimum viable QA workflow for anything with real users. Level 4 is where production-grade vibe coding lives. Level 5 is where the workflow becomes self-sustaining.
The gap between Level 4 and Level 5 is the gap between knowing what to check and having infrastructure that checks it for you. For most vibe coders, the bottleneck at Level 5 is that building and maintaining that infrastructure takes as long as building the features. That is the problem we built Autonoma to solve.
Getting to Level 5 Without Building the Infrastructure
Coding agents let you build fast. The testing gap is what stops you from shipping fast.
Autonoma is built around three agents that map to the checklist phases: a Planner that derives test cases from your code, an Executor that runs them against your deployed application, and a Maintainer that keeps the tests valid as the codebase evolves.
For vibe coders, this is what Level 5 actually looks like in practice. You prompt, you generate, you commit. Autonoma handles the verification and monitoring phases automatically for every deploy, without adding process to your workflow.
The checklist above is the manual path to shipping vibe-coded apps with confidence. Autonoma is the automated one. If you want to understand why the traditional test suite is dead and what replaces it, that is the deeper argument for why Level 5 is where vibe coding workflows need to land.
The Complete Vibe Coding Checklist (Quick Reference)
Phase 1: Before Generation (5-10 min)
- ☐ Define failure cases, not just the happy path
- ☐ Specify the state your feature needs to start from
- ☐ Name the components this feature touches
- ☐ Set the constraint: no silent failures
- ☐ Identify what "done" looks like before starting
Phase 2: After Generation (15-30 min)
- ☐ Read the generated code for silent assumptions
- ☐ Test the unhappy paths manually
- ☐ Check that error states are visible, not swallowed
- ☐ Verify auth on every generated route
- ☐ Check for hardcoded values that should be environment variables
- ☐ Run a static analysis pass
- ☐ Test for common security vulnerabilities
Phase 3: Before Deployment (10-20 min)
- ☐ Run your full test suite, if you have one
- ☐ Run a smoke test across critical user paths
- ☐ Verify environment configuration
- ☐ Review what data gets written and whether it can be undone
- ☐ Check rate limits and external API quotas
- ☐ Confirm rollback is possible
Phase 4: After Deployment (30+ min)
- ☐ Watch your error logs for the first 30 minutes
- ☐ Walk through the feature as a new user
- ☐ Check that existing features still work
- ☐ Set an alert for error rate increase
- ☐ Confirm analytics and logging are working for the new feature
Total time: ~1 hour per significant feature. Teams that automate Phases 2-4 with Autonoma reduce this to the Phase 1 specification work only.
The most critical vibe coding best practices for testing are: specifying failure cases before you prompt (not just happy paths), verifying auth on every generated route, running unhappy path tests manually after generation, and monitoring error rates immediately after deployment. Most vibe coding guides cover prompt engineering and context management but skip these testing steps entirely. Autonoma automates the post-generation and post-deployment phases for teams that want this handled continuously.
Start with the Phase 2 checklist: manually test your failure cases, check that error states are visible (not swallowed silently), verify auth on every new route, and run a static analysis tool like ESLint or Biome before committing. This catches the majority of vibe coding bugs without a formal QA process. For ongoing coverage without writing test scripts, tools like Autonoma generate and run tests from your codebase automatically.
The Vibe Coding Maturity Model is a five-level framework describing how robust a team's QA workflow is relative to their AI code generation speed. Level 1 is no QA (generation to deployment with no verification). Level 2 is manual click-through testing. Level 3 adds pre-generation failure specification and post-generation verification. Level 4 runs all four phases including pre-deployment smoke tests and post-deployment monitoring. Level 5 is fully automated QA where every deployment triggers automated testing with no manual checklist steps.
AI-generated code is plausible by design. It passes the visual inspection that humans use to validate hand-written code. The problem is that AI generates entire functions and components in one shot without the incremental mental validation that happens when you write code line by line. The ICSE 2026 systematic review of 101 sources found that QA is the most frequently overlooked dimension of vibe coding workflows. A Stanford study found developers using AI assistants were 41% more likely to introduce security vulnerabilities when they trusted generated code without structured verification.
For static analysis: ESLint, Biome, and Semgrep catch a reliable class of generated code problems without any test writing. For auth verification: manual curl or Postman requests to your generated routes take two minutes each. For automated E2E testing: Autonoma reads your codebase and generates, runs, and maintains tests across your critical paths without scripts or selectors. For monitoring: most observability platforms (Datadog, Sentry, Vercel Analytics) provide the error rate alerting described in Phase 4 of the checklist.
Phase 1 (before generation) adds 5-10 minutes to your prompting process. Phase 2 (after generation) takes 15-30 minutes per feature depending on complexity. Phase 3 (before deployment) takes 10-20 minutes. Phase 4 (after deployment) requires 30 minutes of monitoring attention plus ongoing alert configuration. The full checklist adds roughly one hour of quality work per significant feature. Teams that automate Phase 2 through Phase 4 with tools like Autonoma reduce this to the Phase 1 specification work only.


