
Table of Contents
- Introduction
- Why Selenium for React Testing?
- Setting Up Selenium WebDriver for React
- Core Testing Patterns for React
- Testing React-Specific Features
- Advanced Patterns for React E2E Testing
- Common Problems and Solutions
- Debugging Failed Tests
- CI/CD Integration
- Best Practices
- Frequently Asked Questions
Introduction
You've built a React app. It works perfectly in Chrome on your MacBook. Then a user on Firefox reports the checkout form doesn't submit. Another user on an older version of Safari says the dashboard doesn't load. Your CI pipeline runs headless Chrome. It caught nothing.
When you test React apps with Selenium, these cross-browser bugs don't reach production. Unit tests with Jest and React Testing Library test components in a simulated environment. They don't test how your app behaves in actual browsers with real rendering engines, real JavaScript implementations, real CSS parsing.
This complete React Selenium tutorial shows you how to test your application across real browsers on different platforms: Chrome on Windows, Firefox on Linux, Safari on macOS. You'll learn exactly how to set up Selenium WebDriver for React, handle React's asynchronous rendering with explicit waits, test React-specific features like hooks and routing, and solve the 15 most common problems developers encounter when testing React with Selenium.
Quick Start (30 minutes):
npm install --save-dev selenium-webdriver chromedriver @types/selenium-webdriver- Create driver config and your first test (examples below)
- Run:
npm test -- e2e
You'll have working cross-browser tests running in under 30 minutes.
Why Selenium for React Testing?
You already have Jest and React Testing Library. They're fast. They run in jsdom, a JavaScript implementation of web standards. A button's onClick handler fires, state updates, the component re-renders with new text.
Then you deploy to production. The button works in jsdom. In Safari 14, clicking it does nothing. A CSS grid layout that renders perfectly in Chrome breaks in Firefox. A form autofill feature that works in your tests fails in Edge because the browser handles autofill events differently.
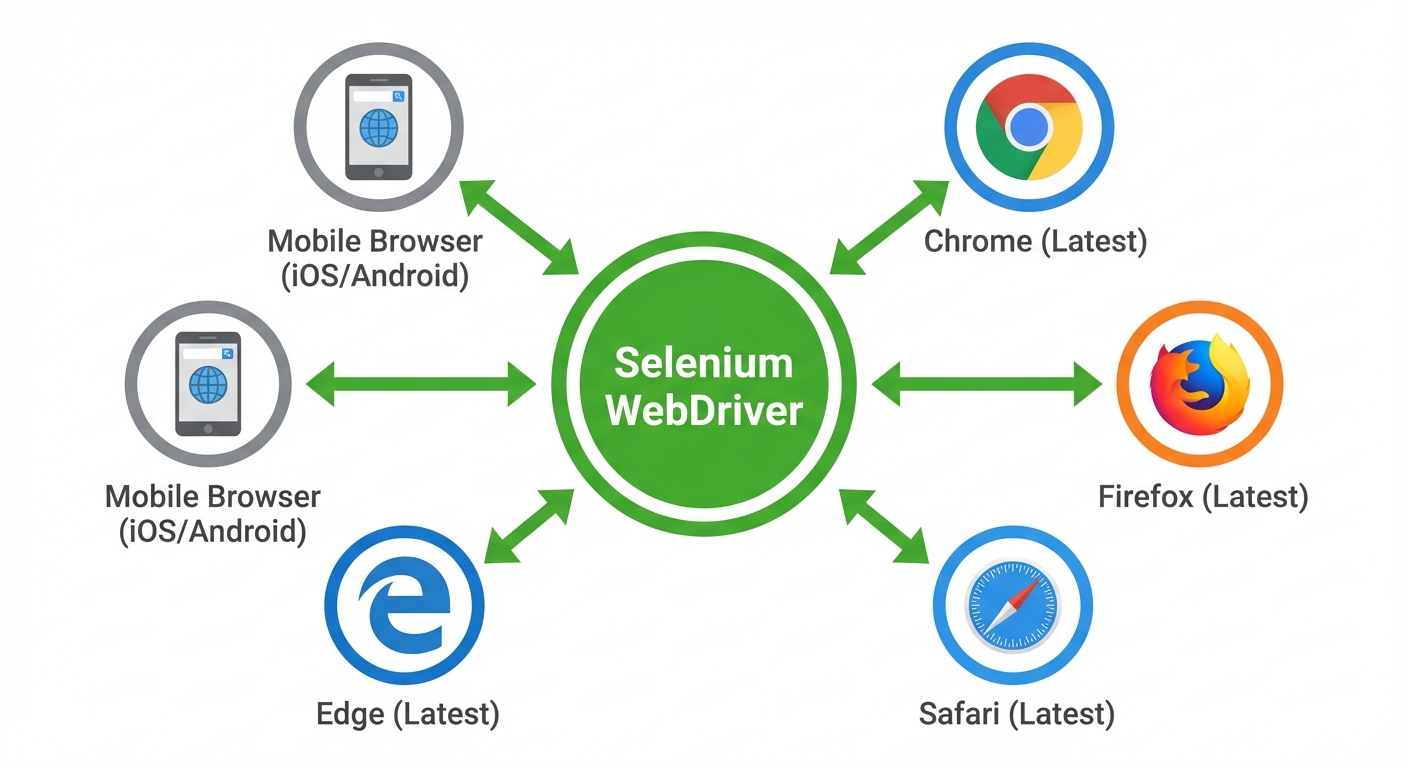
Selenium tests in actual browsers. It controls Chrome through ChromeDriver, Firefox through GeckoDriver, Safari through SafariDriver. When it finds a bug, you know it's a bug users will hit in that specific browser. According to the 2024 Stack Overflow Developer Survey, Selenium remains the most widely-used browser automation tool with developers relying on it for comprehensive cross-browser E2E testing coverage.
When Selenium shines compared to other tools:
Selenium vs Playwright vs Cypress for React Testing:
| Feature | Selenium | Playwright | Cypress |
|---|---|---|---|
| Browser Support | Chrome, Firefox, Safari, Edge, IE11 | Chrome, Firefox, Safari, Edge | Chrome, Firefox, Edge |
| Mobile Testing | ✅ (via Appium) | ✅ (limited) | ❌ |
| Auto-waiting | ❌ (manual explicit waits) | ✅ Built-in | ✅ Built-in |
| Language Support | Java, Python, C#, JS, Ruby | TypeScript, JavaScript, Python | JavaScript only |
| Learning Curve | Steep | Moderate | Easy |
| Enterprise Adoption | Very High | Growing | Moderate |
Playwright and Cypress focus on modern browsers and offer simpler APIs. Selenium supports a wider range of browsers including older versions of Internet Explorer, legacy Edge, and mobile browsers through Appium. Large enterprises with strict browser support requirements choose Selenium. If your users run IE11 or you need to test on physical mobile devices, Selenium (and Appium) is often the only option.
Selenium uses the W3C WebDriver protocol. This means the same test suite can run in any language: JavaScript, Python, Java, C#, Ruby. If your organization has QA teams that prefer Java or Python, Selenium provides that flexibility. Playwright and Cypress are primarily JavaScript-focused.
The tradeoff you're making:
Selenium requires more setup. You manage browser drivers, handle explicit waits, and write more verbose code compared to Playwright's auto-waiting. But you gain maximum browser coverage, language flexibility, and compatibility with established enterprise testing infrastructure. Learn more about test automation frameworks to understand when to use each approach. For a modern alternative with auto-waiting, check out our React Playwright testing guide. If you prefer a simpler setup with built-in auto-waiting and time-travel debugging, see our Cypress React testing guide.
Setting Up Selenium WebDriver for React
Installation and WebDriver Setup
First, install Selenium WebDriver and a test runner in your Create React App project:
npm install --save-dev selenium-webdriver @types/selenium-webdriver jest ts-jest @types/jestSelenium needs browser-specific drivers to control browsers. Install ChromeDriver for Chrome:
npm install --save-dev chromedriverFor Firefox, install GeckoDriver:
npm install --save-dev geckodriverFor Safari on macOS, enable the built-in SafariDriver:
safaridriver --enableJest Configuration
Create or update jest.config.js for E2E tests:
module.exports = {
  preset: 'ts-jest',
  testEnvironment: 'node',
  testMatch: ['**/e2e/**/*.test.ts'],
  testTimeout: 30000,
  globals: {
    'ts-jest': {
      tsconfig: {
        esModuleInterop: true,
        allowSyntheticDefaultImports: true
      }
    }
  }
};
This configuration sets a 30-second timeout (Selenium tests are slower than unit tests) and looks for tests in an e2e directory.
Project Structure
Create an e2e directory at your project root (next to src):
your-react-app/
├── src/
├── public/
├── e2e/
│   ├── config/
│   │   └── driver.ts
│   ├── pages/
│   │   ├── LoginPage.ts
│   │   └── DashboardPage.ts
│   ├── tests/
│   │   ├── auth/
│   │   │   ├── login.test.ts
│   │   │   └── signup.test.ts
│   │   └── homepage.test.ts
│   └── utils/
│       └── wait-helpers.ts
├── jest.config.js
└── package.json
The pages directory uses the Page Object Model pattern (more on this later). The config directory contains driver setup.
Driver Configuration
Create e2e/config/driver.ts:
import { Builder, WebDriver, Browser } from 'selenium-webdriver';
import chrome from 'selenium-webdriver/chrome';
import firefox from 'selenium-webdriver/firefox';

export async function createDriver(browser: string = 'chrome'): Promise<WebDriver> {
  let driver: WebDriver;

  switch (browser.toLowerCase()) {
    case 'chrome':
      const chromeOptions = new chrome.Options();
      if (process.env.CI) {
        chromeOptions.addArguments('--headless', '--no-sandbox', '--disable-dev-shm-usage');
      }
      driver = await new Builder()
        .forBrowser(Browser.CHROME)
        .setChromeOptions(chromeOptions)
        .build();
      break;

    case 'firefox':
      const firefoxOptions = new firefox.Options();
      if (process.env.CI) {
        firefoxOptions.addArguments('--headless');
      }
      driver = await new Builder()
        .forBrowser(Browser.FIREFOX)
        .setFirefoxOptions(firefoxOptions)
        .build();
      break;

    case 'safari':
      driver = await new Builder()
        .forBrowser(Browser.SAFARI)
        .build();
      break;

    default:
      throw new Error(`Unsupported browser: ${browser}`);
  }

  // Set implicit wait timeout
  await driver.manage().setTimeouts({ implicit: 10000 });

  return driver;
}

export const BASE_URL = process.env.BASE_URL || 'http://localhost:3000';
This configuration creates drivers for Chrome, Firefox, and Safari with headless mode in CI environments.
Your First Test
Create e2e/tests/homepage.test.ts:
import { WebDriver, By, until } from 'selenium-webdriver';
import { createDriver, BASE_URL } from '../config/driver';

describe('Homepage', () => {
  let driver: WebDriver;

  beforeAll(async () => {
    driver = await createDriver();
  });

  afterAll(async () => {
    await driver.quit();
  });

  test('loads and displays title', async () => {
    await driver.get(BASE_URL);

    const title = await driver.getTitle();
    expect(title).toContain('React App');

    const heading = await driver.wait(
      until.elementLocated(By.css('h1')),
      10000
    );

    const isDisplayed = await heading.isDisplayed();
    expect(isDisplayed).toBe(true);
  });
});
Run it:
# Start your React app first
npm start

# In another terminal, run tests
npm test -- e2e
Selenium launches Chrome, navigates to your app, and verifies the title and heading appear. The test runs slower than unit tests because it's controlling a real browser.

Core Testing Patterns for React
Locator Strategies: By Class and Best Practices
Selenium uses the By class to locate elements. Unlike Playwright's accessibility-focused locators, Selenium requires you to choose your strategy explicitly.
Locator options in order of preference:
The most maintainable approach uses data attributes. Add data-testid attributes to your React components:
// In your React component
<button data-testid="submit-button">Submit</button>

// In your test
const submitButton = await driver.findElement(By.css('[data-testid="submit-button"]'));
await submitButton.click();
This approach survives CSS class changes and DOM restructuring. When data attributes aren't available, use CSS selectors based on semantic HTML:
// Find by ID (if available)
const emailInput = await driver.findElement(By.id('email'));

// Find by name attribute (good for forms)
const passwordInput = await driver.findElement(By.name('password'));

// Find by CSS selector
const heading = await driver.findElement(By.css('h1'));

// Find by class name
const errorMessage = await driver.findElement(By.className('error-message'));
Avoid XPath unless necessary:
XPath is powerful but brittle. It breaks when DOM structure changes:
// ❌ WRONG - Breaks when structure changes
const button = await driver.findElement(By.xpath('//div/div[2]/button'));

// ✅ BETTER - More resilient
const button = await driver.findElement(By.css('button[type="submit"]'));
Complete login form test using best practices:
import { WebDriver, By, until } from 'selenium-webdriver';
import { createDriver, BASE_URL } from '../config/driver';

describe('Login', () => {
  let driver: WebDriver;

  beforeAll(async () => {
    driver = await createDriver();
  });

  afterAll(async () => {
    await driver.quit();
  });

  test('user can log in with valid credentials', async () => {
    await driver.get(`${BASE_URL}/login`);

    // Use data-testid for form inputs
    const emailInput = await driver.findElement(By.css('[data-testid="email-input"]'));
    await emailInput.sendKeys('[email protected]');

    const passwordInput = await driver.findElement(By.css('[data-testid="password-input"]'));
    await passwordInput.sendKeys('securePassword123');

    const submitButton = await driver.findElement(By.css('[data-testid="submit-button"]'));
    await submitButton.click();

    // Wait for navigation and verify URL
    await driver.wait(until.urlContains('/dashboard'), 10000);

    const currentUrl = await driver.getCurrentUrl();
    expect(currentUrl).toContain('/dashboard');

    // Verify welcome message appears
    const welcomeHeading = await driver.wait(
      until.elementLocated(By.css('h1')),
      10000
    );
    const headingText = await welcomeHeading.getText();
    expect(headingText).toContain('Welcome back');
  });
});
Testing User Interactions
Selenium provides methods that simulate real user actions:
test('user completes checkout flow', async () => {
  await driver.get(`${BASE_URL}/products`);

  // Click product link
  const productLink = await driver.findElement(By.css('[data-testid="premium-plan"]'));
  await productLink.click();

  // Fill form fields
  const cardNumber = await driver.wait(
    until.elementLocated(By.css('[data-testid="card-number"]')),
    10000
  );
  await cardNumber.sendKeys('4242424242424242');

  const expiry = await driver.findElement(By.css('[data-testid="expiry"]'));
  await expiry.sendKeys('12/25');

  const cvc = await driver.findElement(By.css('[data-testid="cvc"]'));
  await cvc.sendKeys('123');

  // Select from dropdown
  const countrySelect = await driver.findElement(By.css('[data-testid="country"]'));
  await countrySelect.sendKeys('United States');

  // Check checkbox
  const termsCheckbox = await driver.findElement(By.css('[data-testid="terms"]'));
  await termsCheckbox.click();

  // Submit
  const purchaseButton = await driver.findElement(By.css('[data-testid="purchase-button"]'));
  await purchaseButton.click();

  // Verify success message
  const successMessage = await driver.wait(
    until.elementLocated(By.css('[data-testid="success-message"]')),
    10000
  );
  const isDisplayed = await successMessage.isDisplayed();
  expect(isDisplayed).toBe(true);
});
Each action is synchronous. sendKeys() and click() wait for the element to be interactable before proceeding.
Explicit Waits with WebDriverWait
React updates the DOM asynchronously. Selenium doesn't have auto-waiting like Playwright. You must use explicit waits to handle React's rendering:
import { until } from 'selenium-webdriver';

test('dynamic content appears after API call', async () => {
  await driver.get(`${BASE_URL}/users`);

  // Click button that triggers API call
  const loadButton = await driver.findElement(By.css('[data-testid="load-users"]'));
  await loadButton.click();

  // Wait until user list appears (even if API takes 5 seconds)
  const userList = await driver.wait(
    until.elementLocated(By.css('[data-testid="user-list"]')),
    10000,
    'User list did not appear'
  );

  // Wait until list has items
  await driver.wait(async () => {
    const items = await driver.findElements(By.css('[data-testid="user-list"] li'));
    return items.length === 10;
  }, 10000, 'Expected 10 users in list');

  // Verify specific user appears
  const firstUser = await driver.wait(
    until.elementLocated(By.xpath('//*[contains(text(), "John Doe")]')),
    10000
  );

  const isDisplayed = await firstUser.isDisplayed();
  expect(isDisplayed).toBe(true);
});
Common ExpectedConditions:
Selenium provides built-in conditions via until:
elementLocated()- Element exists in DOMelementIsVisible()- Element exists and is visibleelementToBeClickable()- Element is visible and enabledtitleContains()- Page title contains texturlContains()- Current URL contains textstalenessOf()- Element is no longer attached to DOM
Custom wait conditions:
For React-specific scenarios, write custom wait functions:
// Wait for loading spinner to disappear
await driver.wait(async () => {
  const spinners = await driver.findElements(By.css('[data-testid="loading-spinner"]'));
  return spinners.length === 0;
}, 10000, 'Loading spinner did not disappear');

// Wait for element to have specific text
await driver.wait(async () => {
  const counter = await driver.findElement(By.css('[data-testid="count"]'));
  const text = await counter.getText();
  return text === '3';
}, 10000, 'Counter did not reach 3');
Testing React-Specific Features: Components, Hooks, and E2E Patterns
Components with State
React components update state asynchronously. Selenium requires explicit waits to handle re-renders:
test('counter increments when button clicked', async () => {
  await driver.get(`${BASE_URL}/counter`);

  // Initial state
  const counter = await driver.findElement(By.css('[data-testid="count"]'));
  let countText = await counter.getText();
  expect(countText).toBe('0');

  // Click triggers setState
  const incrementButton = await driver.findElement(By.css('[data-testid="increment"]'));
  await incrementButton.click();

  // Wait for React re-render
  await driver.wait(async () => {
    const counter = await driver.findElement(By.css('[data-testid="count"]'));
    const text = await counter.getText();
    return text === '1';
  }, 10000);

  // Multiple clicks
  await incrementButton.click();
  await incrementButton.click();

  await driver.wait(async () => {
    const counter = await driver.findElement(By.css('[data-testid="count"]'));
    const text = await counter.getText();
    return text === '3';
  }, 10000);

  countText = await counter.getText();
  expect(countText).toBe('3');
});
The pattern: click, wait for condition, verify. Never assume the DOM has updated immediately after an action.
Testing React Hooks (useEffect, useState)
Components with useEffect often trigger API calls after render. Test the visible behavior:
test('user profile loads data from API', async () => {
  await driver.get(`${BASE_URL}/profile/123`);

  // Component mounts, useEffect fires, API call starts
  // Loading state appears
  const loadingSpinner = await driver.wait(
    until.elementLocated(By.css('[data-testid="loading"]')),
    5000
  );

  const isLoadingDisplayed = await loadingSpinner.isDisplayed();
  expect(isLoadingDisplayed).toBe(true);

  // Wait for loading to disappear
  await driver.wait(async () => {
    const spinners = await driver.findElements(By.css('[data-testid="loading"]'));
    return spinners.length === 0;
  }, 10000, 'Loading spinner did not disappear');

  // Wait for data to render
  const nameHeading = await driver.wait(
    until.elementLocated(By.xpath('//*[contains(text(), "Jane Smith")]')),
    10000
  );

  const headingText = await nameHeading.getText();
  expect(headingText).toContain('Jane Smith');

  const email = await driver.findElement(By.css('[data-testid="user-email"]'));
  const emailText = await email.getText();
  expect(emailText).toBe('[email protected]');
});
This test doesn't know about useEffect. It verifies what users experience: loading state appears, then data appears.
Testing Forms and Controlled Components
React controlled components require proper event sequences. Selenium handles this correctly:
test('form validates input and shows errors', async () => {
  await driver.get(`${BASE_URL}/signup`);

  const emailInput = await driver.findElement(By.css('[data-testid="email"]'));
  const passwordInput = await driver.findElement(By.css('[data-testid="password"]'));
  const submitButton = await driver.findElement(By.css('[data-testid="submit"]'));

  // Submit without filling - validation errors appear
  await submitButton.click();

  const emailError = await driver.wait(
    until.elementLocated(By.css('[data-testid="email-error"]')),
    5000
  );
  const emailErrorText = await emailError.getText();
  expect(emailErrorText).toBe('Email is required');

  const passwordError = await driver.findElement(By.css('[data-testid="password-error"]'));
  const passwordErrorText = await passwordError.getText();
  expect(passwordErrorText).toBe('Password is required');

  // Fill invalid email
  await emailInput.sendKeys('notanemail');

  // Trigger blur event by clicking elsewhere
  await passwordInput.click();

  await driver.wait(async () => {
    const error = await driver.findElement(By.css('[data-testid="email-error"]'));
    const text = await error.getText();
    return text === 'Invalid email address';
  }, 5000);

  // Fill valid email
  await emailInput.clear();
  await emailInput.sendKeys('[email protected]');

  // Wait for error to disappear
  await driver.wait(async () => {
    const errors = await driver.findElements(By.css('[data-testid="email-error"]'));
    return errors.length === 0;
  }, 5000);

  // Fill short password
  await passwordInput.sendKeys('123');
  await emailInput.click(); // Trigger blur on password

  await driver.wait(async () => {
    const error = await driver.findElement(By.css('[data-testid="password-error"]'));
    const text = await error.getText();
    return text === 'Password must be at least 8 characters';
  }, 5000);

  // Fill valid password
  await passwordInput.clear();
  await passwordInput.sendKeys('securePass123');

  // Submit valid form
  await submitButton.click();

  await driver.wait(until.urlContains('/dashboard'), 10000);

  const currentUrl = await driver.getCurrentUrl();
  expect(currentUrl).toContain('/dashboard');
});
Selenium's sendKeys() triggers the correct React synthetic events. Use click() on another element to trigger blur validation.
Testing React Router Navigation
React Router navigation is asynchronous. Wait for both URL change and content to load:
test('user navigates through application routes', async () => {
  await driver.get(BASE_URL);

  // Navigate to products page
  const productsLink = await driver.findElement(By.css('[data-testid="products-link"]'));
  await productsLink.click();

  // Wait for URL change
  await driver.wait(until.urlContains('/products'), 10000);

  // Verify content loaded
  const productsHeading = await driver.wait(
    until.elementLocated(By.xpath('//*[contains(text(), "Our Products")]')),
    10000
  );

  const headingText = await productsHeading.getText();
  expect(headingText).toBe('Our Products');

  // Navigate to specific product
  const premiumLink = await driver.findElement(By.css('[data-testid="premium-plan"]'));
  await premiumLink.click();

  await driver.wait(until.urlMatches(/\/products\/\d+/), 10000);

  const productHeading = await driver.wait(
    until.elementLocated(By.xpath('//*[contains(text(), "Premium Plan")]')),
    10000
  );

  const productText = await productHeading.getText();
  expect(productText).toBe('Premium Plan');

  // Use back button
  await driver.navigate().back();

  await driver.wait(until.urlContains('/products'), 10000);

  const currentUrl = await driver.getCurrentUrl();
  expect(currentUrl).toContain('/products');
});
The urlContains() and urlMatches() conditions accept strings and regex patterns for dynamic routes.
Advanced Patterns for React E2E Testing
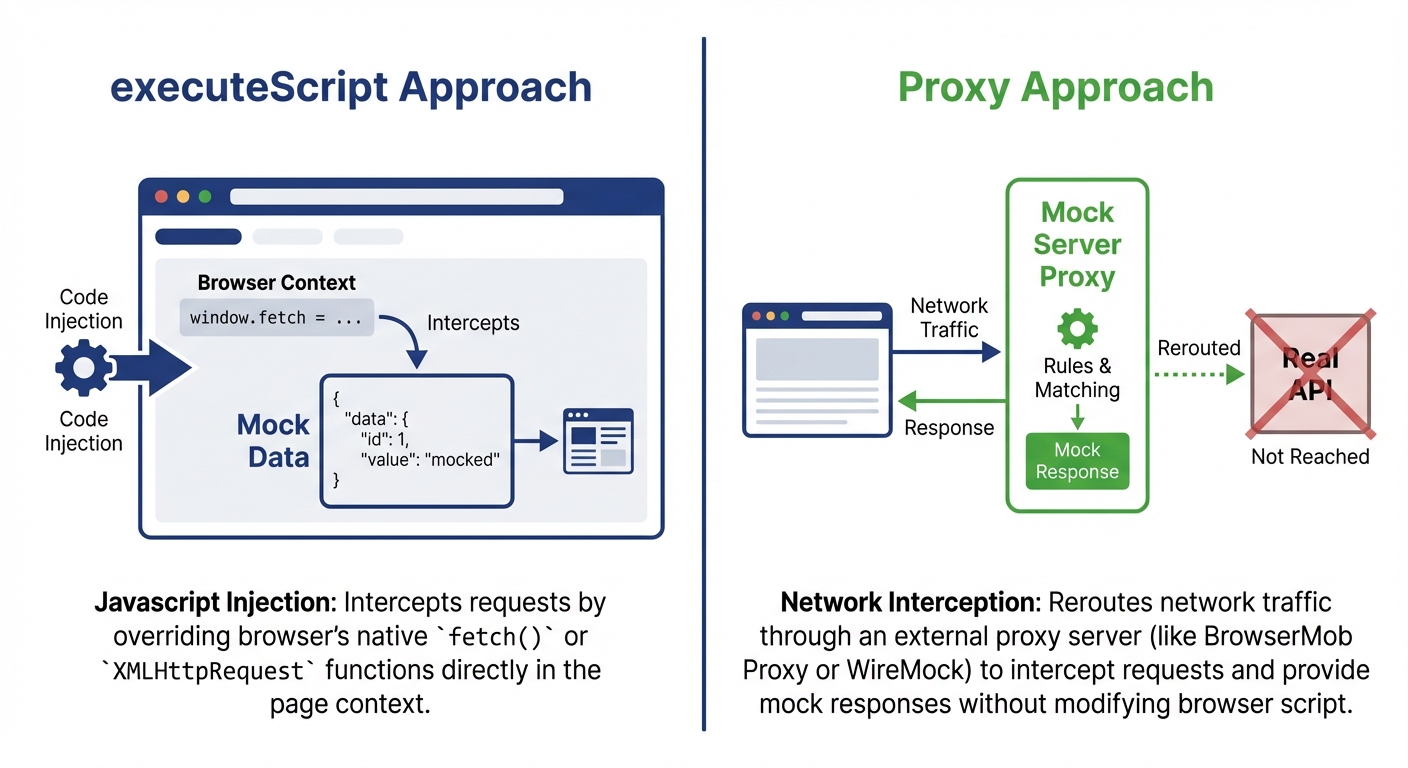
API Mocking with executeScript
Selenium doesn't have built-in request interception like Playwright. You mock APIs by injecting JavaScript before your React app loads:
test('displays users from mocked API', async () => {
  // Navigate to page
  await driver.get(`${BASE_URL}/users`);

  // Inject mock before app makes API call
  await driver.executeScript(`
    window.originalFetch = window.fetch;
    window.fetch = function(url, options) {
      if (url.includes('/api/users')) {
        return Promise.resolve({
          ok: true,
          status: 200,
          json: () => Promise.resolve([
            { id: 1, name: 'Alice Johnson', email: '[email protected]' },
            { id: 2, name: 'Bob Smith', email: '[email protected]' }
          ])
        });
      }
      return window.originalFetch(url, options);
    };
  `);

  // Trigger component mount that calls API
  await driver.navigate().refresh();

  // React component receives mock data
  const alice = await driver.wait(
    until.elementLocated(By.xpath('//*[contains(text(), "Alice Johnson")]')),
    10000
  );

  const aliceText = await alice.getText();
  expect(aliceText).toContain('Alice Johnson');

  const bob = await driver.findElement(By.xpath('//*[contains(text(), "Bob Smith")]'));
  const bobText = await bob.getText();
  expect(bobText).toContain('Bob Smith');
});

test('handles API error gracefully', async () => {
  await driver.get(`${BASE_URL}/users`);

  // Mock API failure
  await driver.executeScript(`
    window.fetch = function(url, options) {
      if (url.includes('/api/users')) {
        return Promise.resolve({
          ok: false,
          status: 500,
          json: () => Promise.resolve({ error: 'Internal server error' })
        });
      }
      return window.originalFetch(url, options);
    };
  `);

  await driver.navigate().refresh();

  // Verify error message displays
  const errorMessage = await driver.wait(
    until.elementLocated(By.xpath('//*[contains(text(), "Failed to load users")]')),
    10000
  );

  const errorText = await errorMessage.getText();
  expect(errorText).toContain('Failed to load users');

  const retryButton = await driver.findElement(By.css('[data-testid="retry-button"]'));
  const isDisplayed = await retryButton.isDisplayed();
  expect(isDisplayed).toBe(true);
});
This approach works but has limitations. For complex mocking scenarios, consider using a mock server (MSW, json-server) that your tests can control.
Selenium Cross-Browser Testing
Selenium's main advantage is comprehensive cross-browser coverage. Run the same test suite across multiple browsers to catch browser-specific bugs:
import { WebDriver } from 'selenium-webdriver';
import { createDriver, BASE_URL } from '../config/driver';

const browsers = ['chrome', 'firefox', 'safari'];

browsers.forEach(browserName => {
  describe(`Login on ${browserName}`, () => {
    let driver: WebDriver;

    beforeAll(async () => {
      driver = await createDriver(browserName);
    });

    afterAll(async () => {
      await driver.quit();
    });

    test('user can log in with valid credentials', async () => {
      await driver.get(`${BASE_URL}/login`);

      const emailInput = await driver.findElement(By.css('[data-testid="email"]'));
      await emailInput.sendKeys('[email protected]');

      const passwordInput = await driver.findElement(By.css('[data-testid="password"]'));
      await passwordInput.sendKeys('securePassword123');

      const submitButton = await driver.findElement(By.css('[data-testid="submit"]'));
      await submitButton.click();

      await driver.wait(until.urlContains('/dashboard'), 10000);

      const currentUrl = await driver.getCurrentUrl();
      expect(currentUrl).toContain('/dashboard');
    });
  });
});
This runs the same test in Chrome, Firefox, and Safari. Browser-specific bugs surface immediately.
Page Object Model for Maintainability
As your test suite grows, duplicate locators and actions make tests brittle. The Page Object Model encapsulates page-specific logic:
// e2e/pages/LoginPage.ts
import { WebDriver, By, until } from 'selenium-webdriver';

export class LoginPage {
  private driver: WebDriver;

  // Locators
  private emailInput = By.css('[data-testid="email"]');
  private passwordInput = By.css('[data-testid="password"]');
  private submitButton = By.css('[data-testid="submit"]');
  private errorMessage = By.css('[data-testid="error-message"]');

  constructor(driver: WebDriver) {
    this.driver = driver;
  }

  async navigate(baseUrl: string): Promise<void> {
    await this.driver.get(`${baseUrl}/login`);
  }

  async login(email: string, password: string): Promise<void> {
    const emailField = await this.driver.findElement(this.emailInput);
    await emailField.sendKeys(email);

    const passwordField = await this.driver.findElement(this.passwordInput);
    await passwordField.sendKeys(password);

    const button = await this.driver.findElement(this.submitButton);
    await button.click();
  }

  async waitForDashboard(): Promise<void> {
    await this.driver.wait(until.urlContains('/dashboard'), 10000);
  }

  async getErrorMessage(): Promise<string> {
    const error = await this.driver.wait(
      until.elementLocated(this.errorMessage),
      5000
    );
    return await error.getText();
  }
}
Now tests are cleaner and easier to maintain:
// e2e/tests/auth/login.test.ts
import { WebDriver } from 'selenium-webdriver';
import { createDriver, BASE_URL } from '../../config/driver';
import { LoginPage } from '../../pages/LoginPage';

describe('Login', () => {
  let driver: WebDriver;
  let loginPage: LoginPage;

  beforeAll(async () => {
    driver = await createDriver();
    loginPage = new LoginPage(driver);
  });

  afterAll(async () => {
    await driver.quit();
  });

  test('successful login with valid credentials', async () => {
    await loginPage.navigate(BASE_URL);
    await loginPage.login('[email protected]', 'securePassword123');
    await loginPage.waitForDashboard();

    const currentUrl = await driver.getCurrentUrl();
    expect(currentUrl).toContain('/dashboard');
  });

  test('shows error with invalid credentials', async () => {
    await loginPage.navigate(BASE_URL);
    await loginPage.login('[email protected]', 'wrongpassword');

    const errorText = await loginPage.getErrorMessage();
    expect(errorText).toBe('Invalid email or password');
  });
});
When the login form changes, you update one file (LoginPage.ts) instead of every test. Learn more about Page Object Model architecture for scalable test suites.
Testing Portals and Modals
React portals render outside the normal component tree. Selenium handles this automatically since it searches the entire DOM:
test('modal opens and closes correctly', async () => {
  await driver.get(`${BASE_URL}/dashboard`);

  // Modal not visible initially
  const modals = await driver.findElements(By.css('[role="dialog"]'));
  expect(modals.length).toBe(0);

  // Open modal
  const openButton = await driver.findElement(By.css('[data-testid="open-settings"]'));
  await openButton.click();

  // Modal appears (even though it's in a portal)
  const modal = await driver.wait(
    until.elementLocated(By.css('[role="dialog"]')),
    5000
  );

  const isDisplayed = await modal.isDisplayed();
  expect(isDisplayed).toBe(true);

  const modalHeading = await driver.findElement(By.xpath('//*[@role="dialog"]//*[contains(text(), "Settings")]'));
  const headingText = await modalHeading.getText();
  expect(headingText).toBe('Settings');

  // Interact with modal content
  const notificationsCheckbox = await driver.findElement(By.css('[data-testid="notifications"]'));
  await notificationsCheckbox.click();

  // Close modal
  const closeButton = await driver.findElement(By.css('[data-testid="close-modal"]'));
  await closeButton.click();

  // Wait for modal to disappear
  await driver.wait(async () => {
    const modals = await driver.findElements(By.css('[role="dialog"]'));
    return modals.length === 0;
  }, 5000);
});
Use findElements() (plural) to check if elements exist. It returns an empty array instead of throwing an error.
Common Problems and Solutions
Timing Issues: StaleElementReferenceException
The most frustrating Selenium error is StaleElementReferenceException. It happens when React re-renders and replaces DOM elements after you've located them:
// ❌ WRONG - Stores element reference that becomes stale
test('counter increments', async () => {
  await driver.get(`${BASE_URL}/counter`);

  const counter = await driver.findElement(By.css('[data-testid="count"]'));
  const button = await driver.findElement(By.css('[data-testid="increment"]'));

  await button.click();

  // React re-renders, counter element is replaced
  const text = await counter.getText(); // StaleElementReferenceException!
});
Solution: relocate elements after each action that triggers a re-render:
// ✅ CORRECT - Relocates element after re-render
test('counter increments', async () => {
  await driver.get(`${BASE_URL}/counter`);

  const button = await driver.findElement(By.css('[data-testid="increment"]'));
  await button.click();

  // Wait and relocate after React re-renders
  await driver.wait(async () => {
    const counter = await driver.findElement(By.css('[data-testid="count"]'));
    const text = await counter.getText();
    return text === '1';
  }, 10000);

  // Relocate again for verification
  const counter = await driver.findElement(By.css('[data-testid="count"]'));
  const text = await counter.getText();
  expect(text).toBe('1');
});
General rule: Don't store element references across React state updates. Use fresh findElement() calls.
For more strategies on handling timing issues and building stable tests, see our guide on reducing test flakiness. Also, check out our integration vs E2E testing guide to understand when to use each testing approach.
NoSuchElementException: When Tests Can't Find Elements
Two common causes: elements haven't rendered yet, or your locator is wrong.
Problem: Looking for elements before React renders them
// ❌ WRONG - Looks immediately, before React renders
test('displays user data', async () => {
  await driver.get(`${BASE_URL}/profile/123`);

  // React hasn't finished rendering yet
  const name = await driver.findElement(By.css('[data-testid="user-name"]')); // NoSuchElementException!
});
Solution: use explicit waits:
// ✅ CORRECT - Waits for element to appear
test('displays user data', async () => {
  await driver.get(`${BASE_URL}/profile/123`);

  const name = await driver.wait(
    until.elementLocated(By.css('[data-testid="user-name"]')),
    10000,
    'User name element did not appear'
  );

  const nameText = await name.getText();
  expect(nameText).toBe('Jane Smith');
});
Problem: Locator matches multiple elements
Selenium throws an error when you use findElement() with a selector that matches multiple elements and you need a specific one:
// ❌ WRONG - Gets first match, might not be the one you want
test('clicks first product', async () => {
  await driver.get(`${BASE_URL}/products`);

  // Five products, five buttons - gets first one
  const button = await driver.findElement(By.css('[data-testid="add-to-cart"]'));
  await button.click();
});
Solutions: be more specific or use indexed access:
// ✅ CORRECT - Option 1: More specific selector
test('clicks specific product', async () => {
  await driver.get(`${BASE_URL}/products`);

  const button = await driver.findElement(
    By.css('[data-testid="product-123"] [data-testid="add-to-cart"]')
  );
  await button.click();
});

// ✅ CORRECT - Option 2: Get all, then select specific index
test('clicks second product', async () => {
  await driver.get(`${BASE_URL}/products`);

  const buttons = await driver.findElements(By.css('[data-testid="add-to-cart"]'));
  await buttons[1].click(); // Second button (0-indexed)
});
React-Specific Challenges
Testing hooks with side effects: Don't test the hook directly. Test what users see:
test('displays fetched data', async () => {
  await driver.get(`${BASE_URL}/dashboard`);

  // useEffect runs, fetches data, updates state
  // Just verify the result appears
  const salesHeading = await driver.wait(
    until.elementLocated(By.xpath('//*[contains(text(), "Sales: $")]')),
    10000
  );

  const text = await salesHeading.getText();
  expect(text).toContain('Sales: $1,234');
});
Conditional rendering issues: Elements that appear/disappear based on state require checking existence:
// ❌ WRONG - Assumes error always exists
test('shows success message', async () => {
  await driver.get(`${BASE_URL}/form`);

  const submitButton = await driver.findElement(By.css('[data-testid="submit"]'));
  await submitButton.click();

  const success = await driver.findElement(By.css('[data-testid="success"]')); // NoSuchElementException if error instead
});
Solution: test both states explicitly:
// ✅ CORRECT - Tests actual condition
test('shows success on valid submission', async () => {
  await driver.get(`${BASE_URL}/form`);

  const emailInput = await driver.findElement(By.css('[data-testid="email"]'));
  await emailInput.sendKeys('[email protected]');

  const submitButton = await driver.findElement(By.css('[data-testid="submit"]'));
  await submitButton.click();

  const success = await driver.wait(
    until.elementLocated(By.css('[data-testid="success"]')),
    5000
  );

  const isDisplayed = await success.isDisplayed();
  expect(isDisplayed).toBe(true);

  const errors = await driver.findElements(By.css('[data-testid="error"]'));
  expect(errors.length).toBe(0);
});

test('shows error on invalid submission', async () => {
  await driver.get(`${BASE_URL}/form`);

  const submitButton = await driver.findElement(By.css('[data-testid="submit"]'));
  await submitButton.click();

  const error = await driver.wait(
    until.elementLocated(By.css('[data-testid="error"]')),
    5000
  );

  const errorText = await error.getText();
  expect(errorText).toBe('Email is required');

  const successes = await driver.findElements(By.css('[data-testid="success"]'));
  expect(successes.length).toBe(0);
});
Integration Challenges
Element not clickable: Happens when overlays cover elements:
// ❌ WRONG - Tries to click covered element
test('clicks button', async () => {
  await driver.get(`${BASE_URL}/app`);

  const button = await driver.findElement(By.css('[data-testid="submit"]'));
  await button.click(); // ElementClickInterceptedException if overlay present
});
Solution: wait for overlay to disappear:
// ✅ CORRECT - Waits for overlay to disappear
test('clicks button', async () => {
  await driver.get(`${BASE_URL}/app`);

  // Wait for loading overlay to disappear
  await driver.wait(async () => {
    const overlays = await driver.findElements(By.css('[data-testid="loading-overlay"]'));
    return overlays.length === 0;
  }, 10000);

  const button = await driver.findElement(By.css('[data-testid="submit"]'));
  await button.click();
});
API mocking timing: Inject mocks before navigation:
// ❌ WRONG - Navigates first, mocks too late
test('mocks API', async () => {
  await driver.get(`${BASE_URL}/users`);

  await driver.executeScript(`
    window.fetch = () => Promise.resolve({ json: () => [] });
  `);

  // Too late - useEffect already called real API
});

// ✅ CORRECT - Mocks before navigation
test('mocks API', async () => {
  await driver.get(`${BASE_URL}/users`);

  await driver.executeScript(`
    window.fetch = () => Promise.resolve({ json: () => [] });
  `);

  await driver.navigate().refresh();

  // Now useEffect calls mocked API
});
React Router navigation: Wait for both URL and content:
// ❌ WRONG - Only checks URL
test('navigates to products', async () => {
  await driver.get(BASE_URL);

  const link = await driver.findElement(By.css('[data-testid="products-link"]'));
  await link.click();

  await driver.wait(until.urlContains('/products'), 10000);
  // If products take time to load, subsequent interactions might fail
});

// ✅ CORRECT - Checks URL and content
test('navigates to products', async () => {
  await driver.get(BASE_URL);

  const link = await driver.findElement(By.css('[data-testid="products-link"]'));
  await link.click();

  await driver.wait(until.urlContains('/products'), 10000);

  const heading = await driver.wait(
    until.elementLocated(By.xpath('//*[contains(text(), "Our Products")]')),
    10000
  );

  const headingText = await heading.getText();
  expect(headingText).toBe('Our Products');
});
Debugging Failed Tests
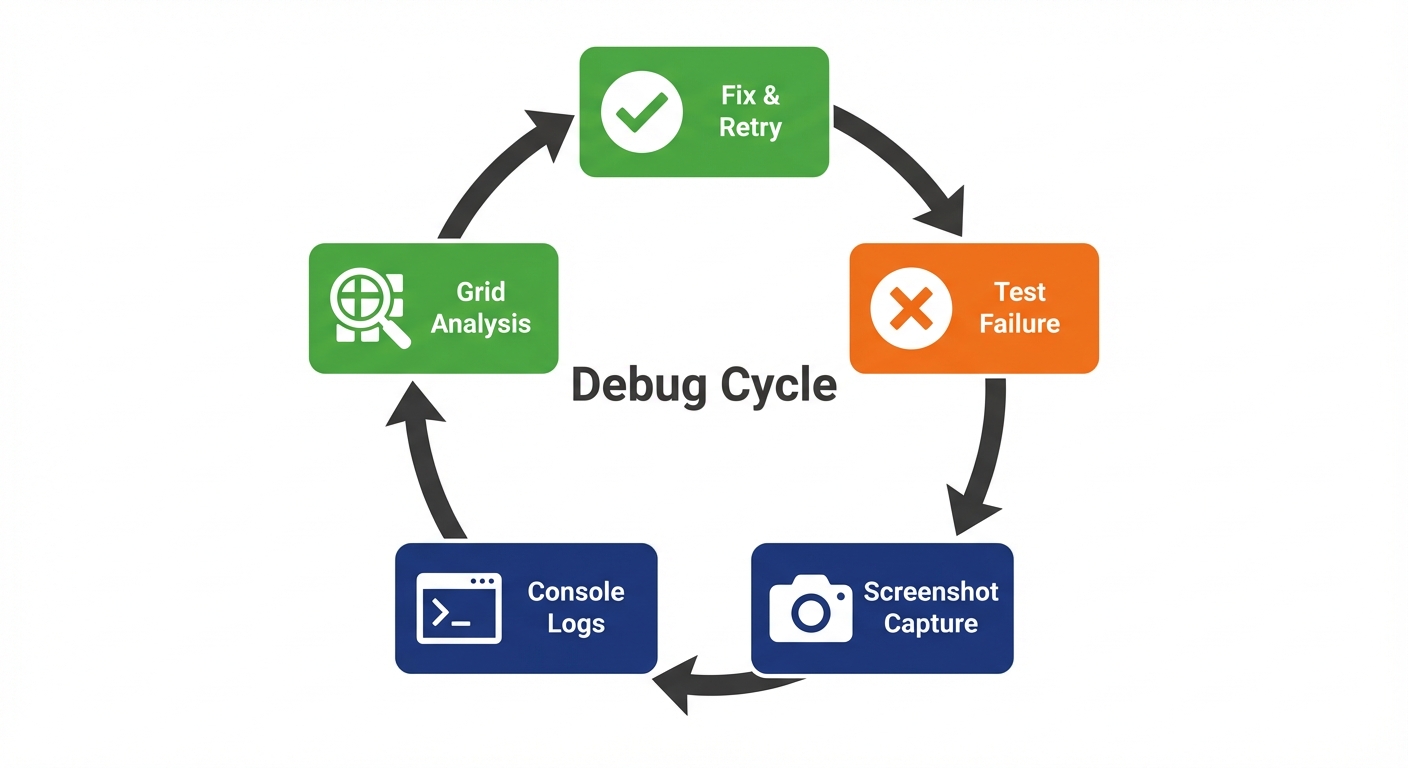
When a test fails, Selenium provides tools to understand why.
Taking Screenshots on Failure
Capture screenshots to see the exact page state when a test fails:
import * as fs from 'fs';

afterEach(async () => {
  if (global.testFailed) {
    const screenshot = await driver.takeScreenshot();
    const testName = expect.getState().currentTestName?.replace(/\s+/g, '-');
    fs.writeFileSync(`screenshots/${testName}.png`, screenshot, 'base64');
  }
});
Add this to your test setup to automatically capture screenshots on failure.
Using Browser Console Logs
Access browser console logs to see JavaScript errors:
test('debugging with console logs', async () => {
  await driver.get(`${BASE_URL}/dashboard`);

  // Get browser console logs
  const logs = await driver.manage().logs().get('browser');

  logs.forEach(log => {
    console.log(`[${log.level}] ${log.message}`);
  });

  // Filter for errors
  const errors = logs.filter(log => log.level.name === 'SEVERE');
  expect(errors.length).toBe(0);
});
This catches JavaScript errors your React app throws that might cause test failures.
Slow Motion Debugging
Add delays to see what Selenium is doing:
async function slowClick(driver: WebDriver, locator: By) {
  const element = await driver.findElement(locator);

  // Highlight element
  await driver.executeScript(
    "arguments[0].style.border='3px solid red'",
    element
  );

  await new Promise(resolve => setTimeout(resolve, 500));
  await element.click();

  await driver.executeScript(
    "arguments[0].style.border=''",
    element
  );
}
Use this during development to watch Selenium interact with your app in real-time.
Selenium Grid for Parallel Execution
Run tests in parallel across browsers using Selenium Grid:
// Connect to remote Selenium Grid
export async function createRemoteDriver(browser: string): Promise<WebDriver> {
  const driver = await new Builder()
    .forBrowser(browser)
    .usingServer('http://localhost:4444/wd/hub')
    .build();

  return driver;
}
Selenium Grid distributes tests across multiple machines and browsers simultaneously, dramatically reducing test execution time.
CI/CD Integration
Run Selenium tests in GitHub Actions to catch bugs before deployment. For CI/CD integration strategies, check out our regression testing strategies.
Create .github/workflows/selenium.yml:
name: Selenium Tests
on:
  push:
    branches: [ main, dev ]
  pull_request:
    branches: [ main ]

jobs:
  test:
    timeout-minutes: 60
    runs-on: ubuntu-latest

    strategy:
      matrix:
        browser: [chrome, firefox]

    steps:
    - uses: actions/checkout@v4

    - uses: actions/setup-node@v4
      with:
        node-version: 18

    - name: Install dependencies
      run: npm ci

    - name: Install Chrome
      if: matrix.browser == 'chrome'
      run: |
        sudo apt-get update
        sudo apt-get install -y google-chrome-stable

    - name: Install Firefox
      if: matrix.browser == 'firefox'
      run: |
        sudo apt-get update
        sudo apt-get install -y firefox

    - name: Build React app
      run: npm run build

    - name: Start React app
      run: npm start &
      env:
        CI: true

    - name: Wait for app to be ready
      run: npx wait-on http://localhost:3000

    - name: Run Selenium tests
      run: BROWSER=${{ matrix.browser }} npm test -- e2e

    - name: Upload screenshots
      if: failure()
      uses: actions/upload-artifact@v4
      with:
        name: screenshots-${{ matrix.browser }}
        path: screenshots/
        retention-days: 30
This workflow:
- Runs tests in Chrome and Firefox in parallel (matrix strategy)
- Installs browser dependencies
- Builds your React app
- Starts the dev server
- Runs all tests
- Uploads screenshots on failure
Headless mode: Tests run headless in CI automatically (configured in driver.ts with the CI environment variable check).
Best Practices
Quick reference for writing maintainable Selenium tests:
Use data-testid attributes: Add data-testid to React components. Avoid CSS selectors that break when styles change.
Always use explicit waits: Never use sleep() or fixed delays. Use driver.wait() with conditions that wait for specific states.
Relocate elements after re-renders: Don't store element references across React state updates. Call findElement() fresh each time to avoid StaleElementReferenceException.
Test user flows, not implementation: Don't test that useState was called. Test that clicking a button changes visible text.
Implement Page Object Model: When you have many tests for the same page, extract locators and actions into classes. This reduces duplication and improves maintainability. For larger projects, implement a Page Object Model to organize your tests effectively.
Keep tests independent: Each test should run in isolation. Don't rely on state from previous tests. Use beforeEach() for setup.
Cross-browser testing: Run the same test suite across Chrome, Firefox, and Safari. Use Selenium Grid for parallel execution.
Example Page Object:
class DashboardPage {
  constructor(private driver: WebDriver) {}

  async navigate(baseUrl: string): Promise<void> {
    await this.driver.get(`${baseUrl}/dashboard`);
    await this.waitForLoad();
  }

  async waitForLoad(): Promise<void> {
    await this.driver.wait(
      until.elementLocated(By.css('[data-testid="dashboard-content"]')),
      10000
    );
  }

  async getSalesTotal(): Promise<string> {
    const element = await this.driver.findElement(By.css('[data-testid="sales-total"]'));
    return await element.getText();
  }

  async clickAnalytics(): Promise<void> {
    const button = await this.driver.findElement(By.css('[data-testid="analytics-button"]'));
    await button.click();
    await this.driver.wait(until.urlContains('/analytics'), 10000);
  }
}
This reduces duplication and makes tests easier to maintain when the dashboard UI changes.
If Selenium's setup complexity and maintenance burden are holding your React team back from E2E testing, Autonoma eliminates both — AI agents read your codebase and run tests on real browsers without any test scripts to write or maintain.
Conclusion
You now have everything you need to test React applications with Selenium WebDriver. You know how to set up Selenium with TypeScript and Jest, write tests using explicit waits to handle React's asynchronous rendering, locate elements reliably with data attributes, test React-specific features like hooks and routing, implement the Page Object Model for maintainability, run cross-browser tests across Chrome, Firefox, and Safari, and debug failures with screenshots and console logs.
Selenium's strength is cross-browser coverage and enterprise compatibility. If your users run older browsers or you need to test on physical mobile devices via Appium, Selenium is often the only choice. The tradeoff is more verbose code and manual wait management compared to newer tools.
Start small. Pick one critical user flow (login, checkout, signup). Write a test. Run it across browsers. Watch it catch a browser-specific bug you didn't know existed. Then add more.
Next steps:
- Add Selenium to your current React project
- Write one test for your most critical user flow
- Set up CI to run tests across browsers on every commit (see our regression testing strategies)
- Implement Page Object Model as your test suite grows
- Gradually expand coverage to other flows
- Consider autonomous testing with AI to reduce maintenance overhead
- Explore AI for QA to understand how modern AI agents can enhance your testing workflow
Resources:
- Selenium Documentation
- WebDriver W3C Specification
- Selenium Community Forum
- Test Automation Frameworks Guide - Compare Selenium, Playwright, and Cypress
- Software Testing Basics - Learn fundamental testing concepts
The tools are ready. Your app is waiting. Start testing.
Frequently Asked Questions
Run npm install --save-dev selenium-webdriver @types/selenium-webdriver in your project root. Then install browser drivers: chromedriver for Chrome, geckodriver for Firefox. Set up Jest or Mocha as your test runner, create a driver configuration file, and write tests using findElement() with explicit waits.
Selenium uses the W3C WebDriver protocol with explicit waits and requires separate driver binaries. It supports older browsers (IE11, legacy Edge) and multiple languages (Java, Python, C#, JavaScript). Playwright has built-in auto-waiting, modern API, and simpler setup but focuses on modern browsers only. Choose Selenium for maximum browser coverage and enterprise compatibility.
Don't test hooks directly. Test what users see after the hook runs. If a component uses useEffect to fetch data, navigate to the page and use driver.wait() with until.elementLocated() to wait for the data to appear. Example: await driver.wait(until.elementLocated(By.css('[data-testid="user-name"]')), 10000). Selenium's explicit waits handle async hook behavior when configured properly.
StaleElementReferenceException occurs when React re-renders and replaces DOM elements after you've located them. Fix by relocating elements before each interaction using fresh findElement() calls instead of storing element references. Use explicit waits to ensure elements are stable before interacting. Never store element references across React state updates.
Use driver.executeScript() to override window.fetch before your React app makes API calls. Inject the mock, then refresh the page so React components use the mocked API. Example: driver.executeScript('window.fetch = () => Promise.resolve({ json: () => [] })') then driver.navigate().refresh(). For complex scenarios, use a mock server like MSW or json-server.
Click navigation links and wait for both URL change and content to load. Use await driver.wait(until.urlContains('/products'), 10000) to verify the URL, then await driver.wait(until.elementLocated(By.xpath('//*[contains(text(), "Products")]')), 10000) to confirm content rendered. This ensures both routing and data loading completed.
Flaky tests fail randomly due to timing issues. Fix them by: using explicit waits (driver.wait() with until conditions) instead of sleep(), relocating elements before each interaction to avoid StaleElementReferenceException, waiting for loading states to disappear before checking content, and never storing element references across React state updates. Always wait for specific conditions, never fixed delays.
Yes. Install @types/selenium-webdriver for TypeScript definitions. Configure ts-jest in your jest.config.js. All code examples in this guide use TypeScript. You get autocomplete, type checking, and better IDE support. Selenium's TypeScript support is mature and well-documented.
Create a GitHub Actions workflow that installs dependencies, installs browser drivers, builds your React app, starts the dev server with npm start &, waits for the server with npx wait-on, and runs tests with npm test. Tests run headless automatically when CI environment variable is set. Use matrix strategy to run tests across multiple browsers in parallel.
Take screenshots on failure using driver.takeScreenshot(), save to files for later inspection. Access browser console logs with driver.manage().logs().get('browser') to see JavaScript errors. Add delays and element highlighting during development with executeScript() to watch interactions in slow motion. Use screenshots and console logs to understand what went wrong.
Use locators in this priority: data-testid attributes (most resilient), By.id() or By.name() for form inputs, By.css() with semantic selectors, XPath only as last resort. Add data-testid to React components for stable locators that survive CSS and DOM structure changes. Avoid CSS class selectors that break when styles change.
Create a driver factory that accepts browser name as parameter (chrome, firefox, safari). Use Jest's describe() with forEach to run the same test suite across browsers. In CI, use GitHub Actions matrix strategy to run tests in parallel. Install appropriate drivers (ChromeDriver, GeckoDriver) for each browser. Selenium Grid enables distributed parallel execution.
Page Object Model encapsulates page-specific locators and actions in classes. Use it when you have multiple tests for the same page to reduce duplication. Each page class contains locator definitions and action methods (navigate, fillForm, etc.). Tests use these methods instead of raw findElement() calls. When the UI changes, update one page class instead of every test.
React portals render outside the normal component tree but Selenium searches the entire DOM. Use driver.findElement(By.css('[role="dialog"]')) to locate modals regardless of where they're rendered. Use findElements() (plural) to check if modals exist without throwing errors. Wait for modals to appear with driver.wait(until.elementLocated()) and wait for them to disappear by checking array length.
Use Selenium if you need to support older browsers (IE11, legacy Edge), test on physical mobile devices via Appium, or use multiple programming languages (Java, Python, C#). Use Playwright if you only need modern browser support (Chrome, Firefox, Safari) and want simpler API with built-in auto-waiting. Selenium excels at cross-browser coverage and enterprise compatibility; Playwright excels at developer experience and modern web app testing.


